A Study on the Strength Characteristic of Compact Tension Specimen due to Internal Holes and Material
Copyright © The Korean Society for Precision Engineering
This is an Open-Access article distributed under the terms of the Creative Commons Attribution Non-Commercial License (http://creativecommons.org/licenses/by-nc/3.0) which permits unrestricted non-commercial use, distribution, and reproduction in any medium, provided the original work is properly cited.
Abstract
Majority of deformation and ruptures as a result of severe deformation of mechanical structures are due to the existence of cracks or cracks generated through specific situations. These cracks causes stress concentration and eventually ruptures under lower load conditions than they are designed to withstand. In this study, simulation tensile analysis was done by designing compact tension specimen models with the number of holes that existed inside and the materials of the test specimens by focusing on the effects of the cracks. The study results from all the analysis (deformations, equivalent stress and strain energy) confirmed that the specimen models having two holes had better strength characteristics than those with only one hole. Additionally, the durability and strength characteristics of specific mechanical structures against the load improved through appropriate arrangement of holes thereby reducing stress generation. As such the results of this study could be utilized as the basic data for future researches on composite materials and sandwich type homogenous materials. Furthermore, the study results can assist in designing more durable products.
Keywords:
Compact tension specimen, Crack, Internal holes, Material, Strength characteristic키워드:
소형 인장 시험편, 균열, 내부 구멍들, 소재, 강도 특성1. Introduction
Majority of deformation and ruptures due to severe deformation of machines and mechanical structures are due to cracks that exist inside or generated by specific situations. Such cracks induce deformation and rupture of mechanical structures and can even cause human casualties due to such rupture. In particular, cracks generate stress concentration phenomenon that can lead to the ruptures under load conditions that are lower than the maximum load that the mechanical structures are designed to resist. Therefore, the researches to relieve such stress concentration, and to give improved durability and strength characteristics are being conducted actively until now. By focusing on such trend, this study was aimed at relieving the stress concentration phenomenon and improving the strength characteristics of mechanical structures. For this purpose, compact tension specimen models with 3D configuration were designed for each of the materials with the presence of one or two holes along with crack within the test specimen by using the material property values of stainless steel, aluminum and brass. In addition, the simulation analysis was carried on the tensile load by using finite-element analysis program. The durability and strength characteristics of particular mechanical structures against load were also evaluated in this analysis. It is deemed that the research results deduced through this study can be utilized as basic data for researches on composite materials and sandwich type dissimilar materials to be executed later on. Moreover, it could make contribution towards designing of products with better durability.1-5
2. Research Method
2.1 Research Models
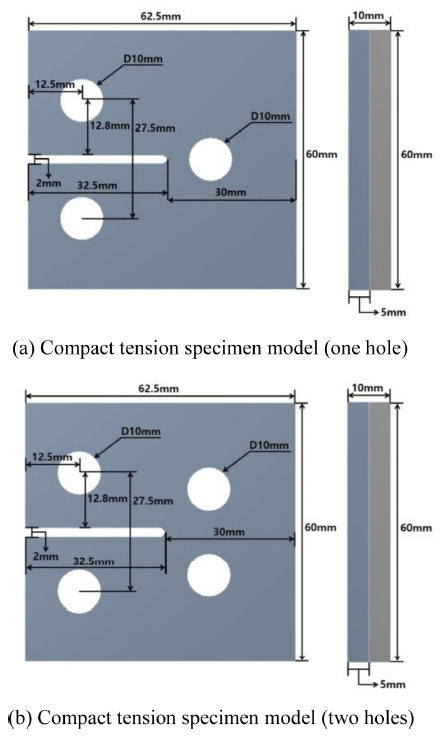
Fig. 1 illustrates the compact tension specimen models used in this study. These models were designed by using CATIA design program. Cracks existed inside the specimen model. The number of holes and material properties were designated all together as variables. A total of four specimen models were designed, including stainless steel-aluminum specimen model and stainless steel-brass specimen model with a single hole inside the specimen model, and stainless steel-aluminum specimen model and stainless steel-brass specimen model with two holes inside the specimen model. Specifications of each test specimen model are given in Figs. 1(a) and 1(b). In addition, Table 1 illustrates the property values of materials used in each of the test specimen models in this study. 6-10
2.2 Boundary Conditions for Simulation Analysis
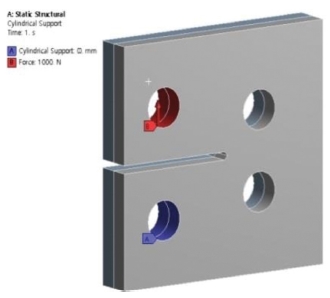
In this study, the simulation analysis was carried out to examine the durability and strength characteristics of compact tension specimen models in accordance with the number of holes within the specimen and the materials used for the specimen. Boundary conditions applied to the test specimen models for each of the conditions are given in the Fig. 2 That is, with the presumption of the situation in which the test specimen models are loaded onto tension test device and subjected to load. The cylindrical support condition is applied to the lower hole of the test specimen model, thereby fixating the hole. On the other hand, the force condition is applied to the top hole in the test specimen model with tensile load of 1000N for the execution of analysis. As illustrated in the Fig. 2, the boundary conditions are the same for all the test specimen models.11-20
3. Analysis Results
3.1 Results of Total Deformation
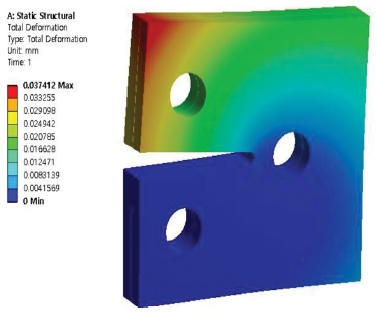
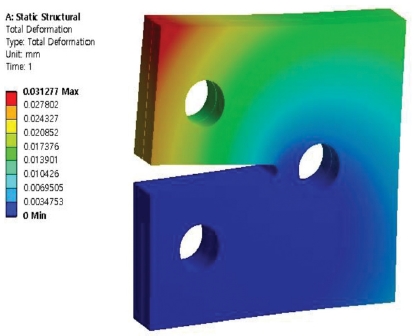
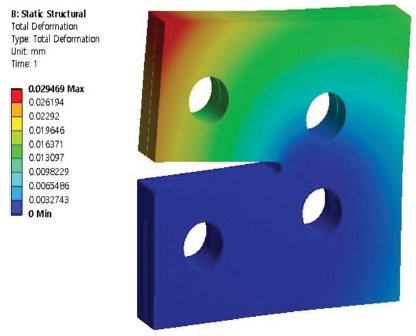
Figs. 3 to 6 show the results of simulation analysis of deformation of the compact tension specimen with varying number of holes and materials used. Results of the analysis show that although there are infinitesimal deformations of all the test specimen models, it is possible to confirm the presence of slight differences between the specimen models. Firstly, the stainless steel-aluminum specimen model with one hole had the maximum deformation of approximately 0.0374 mm while the stainless steel-brass specimen model with one hole had the maximum deformation of approximately 0.0313 mm. The stainless steel-aluminum specimen model and stainless steel-brass specimen model with two holes had the maximum deformations of approximately 0.0352 mm and 0.0295 mm, respectively. When the specimen models were compared with each other on the grounds of the aforementioned analysis results, all the specimen models showed the maximum deformation at the adhesive interface bonded with each material on the top part due to the tensile load. Moreover, it was found that the specimen models with two holes showed lower maximum deformations than the specimen models with only one hole. It was considered that two holes were allocated within the specimen model in order to disperse the load exerted onto specimen model.
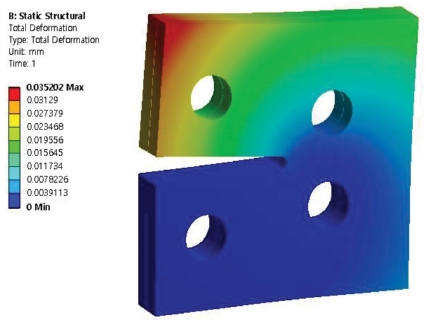
Contour of total deformation at compact tension specimen model (stainless steel-aluminum, two holes)
3.2 Results of Equivalent Stress
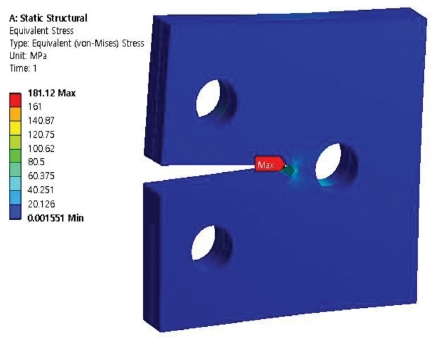
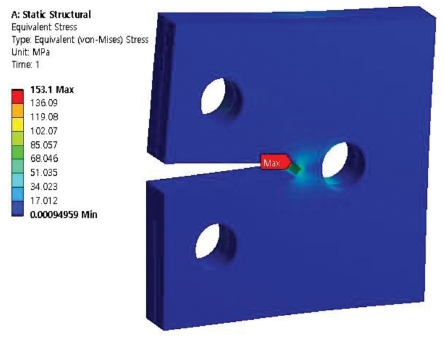
Figs. 7 to 10 show the results of simulation analysis of equivalent stress of the compact tension specimen with varying number of holes and materials used. Firstly, it was confirmed that the maximum equivalent stresses that occurred in the stainless steel-aluminum specimen model and the stainless steel-brass test specimen model with a single hole in the specimens were approximately 181.12 MPa and 153.1 MPa, respectively. Secondly, the maximum equivalent stresses that occurred in the stainless steel-aluminum specimen model and the stainless steel-brass specimen model with two holes in the specimens were approximately 154.81 MPa and 131.11 MPa, respectively. When the specimen models were compared with each other on the grounds of the data deduced through the aforementioned analysis, all the test specimen models showed the maximum equivalent stress near the crack at inner part on the adhesive interface bonded with each material. Moreover, similar to the results of analysis of deformations, it was found that the specimen models with two holes showed lower maximum equivalent stress than the specimen models with only one hole. In the case of stainless steel-aluminum specimen model with two holes, it showed the strength characteristic with almost no difference with that of stainless steel-brass specimen model with only a single hole although it was a material with strength characteristics that was weaker than those of the stainless steel-brass. It was considered that two holes were allocated within the specimen model in order to disperse the equivalent stress generated at the section with crack.
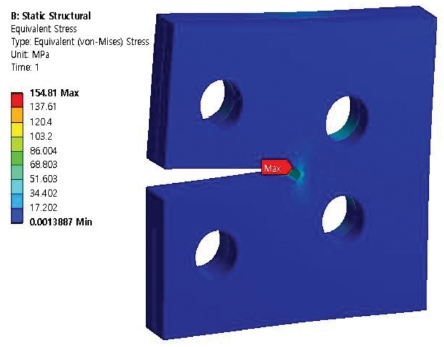
Contour of equivalent stress at compact tension specimen model (stainless steel-aluminum, two holes)
3.3 Results of Strain Energy
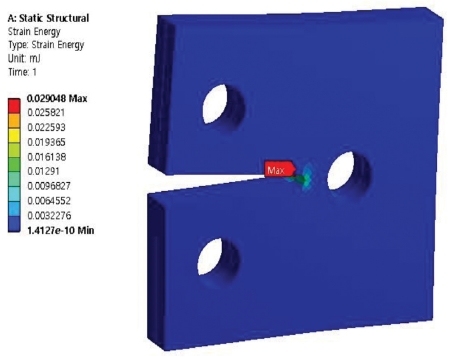
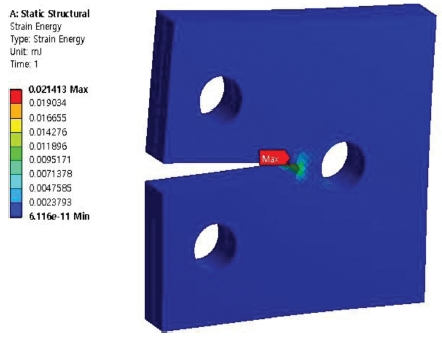
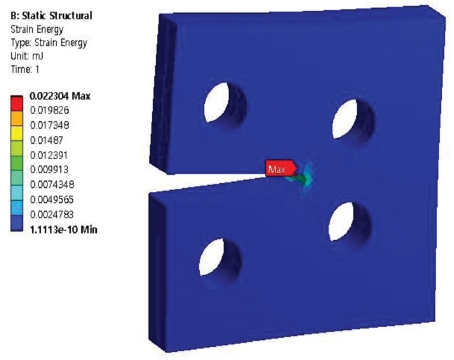
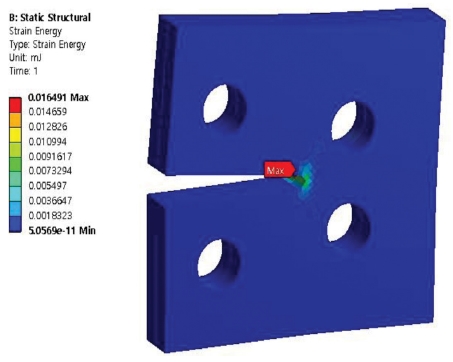
Figs. 11 to 14 show the results of simulation analysis of strain energy of the compact tension specimen with varying number of holes and materials used. Firstly, it was confirmed that the maximum strain energies that occurred in the stainless steel-aluminum specimen model and the stainless steel-brass specimen model with a single hole in the specimens were approximately 0.029 mJ and 0.0214 mJ, respectively. Secondly, the maximum strain energies that occurred in the stainless steel-aluminum specimen model and the stainless steel-brass specimen model with 2 holes in the specimens were approximately 0.0223 mJ and 0.0165 mJ, respectively. The specimen models were compared with each other on the grounds of the data deduced through the aforementioned analysis. Like the comparative results on equivalent stress, all the test specimen models showed the maximum strain energy near the crack at inner part on the adhesive interface bonded with each material. Moreover, similar to the results explained above, it was found that the specimen models with two holes showed lower maximum strain energy than the specimen models with only one hole. As with the results of analysis of equivalent stress, the stainless steel-aluminum specimen model with two holes displayed strength characteristic that was not much different from that of stainless steel-brass specimen model with only a single hole, although the stainless steel-aluminum was a material with strength characteristics that was weaker than those of the stainless steel-brass. It was considered that two holes were allocated within the specimen model in order to disperse the strain energy generated at the section with crack.
4. Comparison of Analysis Results and Discussion
Table 2 is a summary of the results of analysis explained above and illustrates the strength characteristics of the compact tension specimens against the tensile load applied on each of the conditions. All the results of analysis show that the specimen models with two holes have better strength characteristics than the specimen models with a single hole. By comparing with other specimen models, the stainless steel-brass specimen models with two holes are shown to have the best strength characteristics as the maximum deformation, the equivalent stress and strain energy have the lowest values. The stainless steel-aluminum specimen model with one hole are shown to have the worst strength characteristics as the maximum deformation, equivalent stress and strain energy have the highest values. In particular, when the results of analysis of equivalent stress and strain energy are compared, the stainless steel-aluminum specimen models with two holes show the strength characteristics that are not much different from those of the stainless steel-brass specimen models with a single hole. This is in spite of the fact that the stainless steel-aluminum is a material with weaker strength characteristics than stainless steel-brass. It is considered that two holes are allocated within the test specimen model in dispersing the equivalent stress and the strain energy generated at the section with crack of the specimen model. As such, it is possible to confirm that durability and strength characteristics of specific mechanical structures against load can be improved markedly only through appropriate allocation of holes in order to reduce generation of stress arising from the load. It is deemed that the research results deduced through this study can be utilized as basic data for researches on composite materials and sandwich type dissimilar materials to be executed later on. Moreover, it could make contribution towards designing of products with better durability.
5. Conclusions
In this study, the following conclusions are deduced through execution of simulation tensile analysis by analyzing and comparing compact tension specimen models with the number of holes allocated inside the specimen and the materials used for the specimen as the variables.
(1) It is possible to check the durability and strength characteristics of the specimen models by designing compact tension specimen models for each of the conditions and executing simulation tensile analysis on these models.
(2) As the results of this study, it is possible to confirm that the maximum deformations of all the specimen models occur at the top of the specimen model, while the maximum equivalent stress and maximum strain energy occur at the crack section within the test specimen. Moreover, it is confirmed from all the analysis results (deformations, equivalent stress and strain energy) that the specimen models with two holes have better strength characteristics than the test specimen models with only a single hole.
(3) When the results of analysis of the equivalent stress and the strain energy are compared, the stainless steel-aluminum specimen models with two holes showed the strength characteristics that are not much different from those of the stainless steel-brass specimen models with a single hole. This is in spite of the fact that the stainless steel-aluminum is a material with weaker strength characteristics than stainless steel-brass. This is deemed to be the result of the actions of the two holes allocated within the specimen model in dispersing the equivalent stress and the strain energy generated at the section with crack of the specimen model. As such, it is possible to confirm that the durability and strength characteristics of specific mechanical structures against load can be improved markedly only through appropriate allocation of holes in order to reduce generation of stress arising from the load.
(4) It is deemed that the research results deduced through this study can be utilized as basic data for researches on composite materials and sandwich type dissimilar materials to be executed later on. Moreover, it could make contribution towards designing of products with better durability.
Acknowledgments
“This research was supported by Basic Science Research Program through the National Research Foundation of Korea (NRF) funded by the Ministry of Education (NRF-2018R1D1A1B07041627).”
REFERENCES
-
Jeong, H. S., Jeon, J. W., Ha, M. Y., and Cho, J. R., “Finite Element Analysis for Inconel 625 Fine Tube Bending to Predict Deformation Characteristics,” International Journal of Precision Engineering and Manufacturing, Vol. 13, No. 8, pp. 1395-1401, 2012.
[https://doi.org/10.1007/s12541-012-0183-3]

-
Chae, S. W., Lee, M. K., Park, J. Y., Lee, T. S., and Park, S. B., “Finite Element Analysis and the Clinical Consideration for the Methodology of PMMA Injection in Vertebroplasty,” International Journal of Precision Engineering and Manufacturing, Vol. 13, No. 8, pp. 1467-1472, 2012.
[https://doi.org/10.1007/s12541-012-0193-1]

-
Yu, X. D., Wei, G., Long, X. W., and Tang, J. X., “Finite Element Analysis and Optimization of Dither Mechanism in Dithered Ring Laser Gyroscope,” International Journal of Precision Engineering and Manufacturing, Vol. 14, No. 3, pp. 415-421, 2013.
[https://doi.org/10.1007/s12541-013-0057-3]

-
Lee, S. C., Kim, C. K., Song, H. E., and Kim, Y. S., “Finite Element Analysis of Crystalline Silicon Solar Cell in Screen Printing Process by Using Taguchi Method,” International Journal of Precision Engineering and Manufacturing, Vol. 14, No. 4, pp. 635-642, 2013.
[https://doi.org/10.1007/s12541-013-0085-z]

-
Ko, D. H., Ko, D. C., Lim, H. J., Lee, J. M., and Kim, B. M., “FE-Simulation Coupled with CFD Analysis for Prediction of Residual Stresses Relieved by Cryogenic Heat Treatment of Al6061 Tube,” International Journal of Precision Engineering and Manufacturing, Vol. 14, No. 8, pp. 1301-1309, 2013.
[https://doi.org/10.1007/s12541-013-0177-9]

-
Kwon, H. J., Lee, J., Shin, B., Jeon, S., Han, C. S., et al, “Geometry Design of Vertical Probe Needle Using Mechanical Testing and Finite Element Analysis,” International Journal of Precision Engineering and Manufacturing, Vol. 15, No. 11, pp. 2335-2342, 2014.
[https://doi.org/10.1007/s12541-014-0598-0]

-
Quan, G., Luo, G., and Wen, H., “Influence of Electric Upsetting Process Variables on Temperature Field Evolution by Multi-Field Coupling Finite Element Analysis,” International Journal of Precision Engineering and Manufacturing, Vol. 16, No. 7, pp. 1525-1531, 2015.
[https://doi.org/10.1007/s12541-015-0202-2]

-
Kang, K. T., Kim, H. J., Son, J., Yeom, J. S., and Chun, H. J., “Comparing an Instrumented Posterior Fixation System with Rigid and Semi-Flexible Rods Using Finite Element Analysis,” International Journal of Precision Engineering and Manufacturing, Vol. 16, No. 1, pp. 163-170, 2015.
[https://doi.org/10.1007/s12541-015-0021-5]

-
Kim, B., “Finite Element Modeling and Parametric Study of an Automotive V-Belt Pulley for Durability Improvement,” International Journal of Precision Engineering and Manufacturing, Vol. 16, No. 7, pp. 1517-1524, 2015.
[https://doi.org/10.1007/s12541-015-0201-3]

-
Seo, J., Noh, D. K., Lee, G. H., and Jang, J. S., “A Percussion Performance Analysis for Rock-Drill Drifter through Simulation Modeling and Experimental Validation,” International Journal of Precision Engineering and Manufacturing, Vol. 17, No. 2, pp. 163-170, 2016.
[https://doi.org/10.1007/s12541-016-0021-0]

-
Horn, A. J., Sherry, A. H., and Budden, P. J., “Size and Geometry Effects in Notched Compact Tension Specimens,” Journal of Pressure Vessels and Piping, Vol. 154, pp. 29-40, 2017.
[https://doi.org/10.1016/j.ijpvp.2017.05.012]

-
Zhang, J., Ding, X., and Zhao, Q., “Experimental and Numerical Investigation of Scattering Gravels on the Surface Bond Strength of Self-Compacting Concrete,” Journal of Construction and Building Materials, Vol. 145, pp. 11-19, 2017.
[https://doi.org/10.1016/j.conbuildmat.2017.03.219]

-
Chua, B. L., Lee, H. J., and Ahn, D. G., “Estimation of Effective Thermal Conductivity of Ti-6Al-4V Powders for a Powder Bed Fusion Process Using Finite Element Analysis,” International Journal of Precision Engineering and Manufacturing, Vol. 19, No. 2, pp. 257-264, 2018.
[https://doi.org/10.1007/s12541-018-0030-2]

-
Mahmod, M., Hanoon, A. N., and Abed, H. J., “Flexural Behavior of Self-Compacting Concrete Beams Strengthened with Steel Fiber Reinforcement,” Journal of Building Engineering, Vol. 16, pp. 228-237, 2018.
[https://doi.org/10.1016/j.jobe.2018.01.006]

-
Abdellah, M. Y., “Comparative Study on Prediction of Fracture Toughness of CFRP Laminates from Size Effect Law of Open Hole Specimen Using Cohesive Zone Model,” Journal of Engineering Fracture Mechanics, Vol. 191, pp. 277-285, 2018.
[https://doi.org/10.1016/j.engfracmech.2017.12.040]

-
Kim, D., Lee, G., and Hur, J., “Life Fatigue Prediction of an Accumulator Composed of Bladder and Housing,” Journal of the Korean Society for Manufacturing Process Engineers, Vol. 17, No. 5, pp. 58-63, 2018.
[https://doi.org/10.14775/ksmpe.2018.17.5.058]

- Lee, J. H., Cho, J. U., Park, J. W., Kim, J. W., Oh, B. S., et al., “A Simulation Study on Composite Compact Tension Specimen for Sandwich with Holes,” Proc. of the Korean Society of Manufacturing Process Engineers Spring Conference, p. 51, 2018.
- Cho, J. H., Lee, W. S., Lee, J. C., and Won, J. B., “A Study on Structural Stability of Dual Head Machine,” Proc. of the Korean Society for Manufacturing Process Engineers Autumn Conference, p. 165, 2018.
-
Lee, C. H. and Suh, J. S., “Numerical Analysis on the Freezing Process of Internal Water Flow in a L-Shape Pipe,” Journal of the Korean Society of Manufacturing Process Engineers, Vol. 17, No. 6, pp. 144-150, 2018.
[https://doi.org/10.14775/ksmpe.2018.17.6.144]

-
Zhu, Z. G., Zhang, Q., Lv, J. H., Qin, Z., and Lyu, S. K., “Simulation Analysis of Flexible Track Drilling Machines Based on ADAMS,” Journal of the Korean Society for Manufacturing Process Engineers, Vol. 17, No. 5, pp. 1-7, 2018.
[https://doi.org/10.14775/ksmpe.2018.17.5.001]


Jung-Ho Lee is a graduate school student in the Department of Mechanical Engineering of Kongju National University, Korea. His field of specialization are fracture mechanics (Dynamic impact), impact fracture of composite material, fatigue and strength evaluation, and so on.
E-mail: junghocade@gmail.com

Sung-Ki Lyu is a professor in the School of Mechanical & Aerospace Engineering of Gyeongsang National University, Korea. His research interests are gear, gearbox, and mechanical system design.
E-mail: sklyu@gnu.ac.kr

Jae-Ung Cho received his M.S. and Doctor Degree in Mechanical Engineering from Inha University, Incheon, Korea, in 1982 and 1986, respectively. Now he is a professor in the Division of Mechanical & Automotive Engineering of Kongju National University, Korea. He is interested in the areas of fracture mechanics (Dynamic impact), composite material, fatigue and strength evaluation, and so on.
E-mail: jucho@kongju.ac.kr

