A Comparative Study on Fracture Property of Aluminum Foam DCB and TDCB Specimens for Type of Mode III on Thickness
Copyright © The Korean Society for Precision Engineering
This is an Open-Access article distributed under the terms of the Creative Commons Attribution Non-Commercial License (http://creativecommons.org/licenses/by-nc/3.0) which permits unrestricted non-commercial use, distribution, and reproduction in any medium, provided the original work is properly cited.
Abstract
This study focuses on these issues and includes the static fracture experiments with two forms of specimens; aluminum foam DCB and TDCB bonded with the type of mode III, a simulation static analysis to verify this experiment, and analysis of fracture behavior of adhesive interface of structures attached with aluminum foam by shape and thickness. The thickness of DCB and TDCB specimens designed in this study are set as variable t, and each thickness is t = 35 mm, 45 mm, 55 mm. According to forced displacements, the maximum reaction forces of DCB specimens due to thickness were approximately 0.35 kN, 0.45 kN, 0.54 kN, and the maximum reaction force of TDCB were approximately 0.4 kN, 0.52 kN, and 0.63 kN respectively. We expect the data according to variables to be easily investigated without a separate testing process, and effective analysis of the mechanical characteristics of aluminum foam DCB and TDCB.
Keywords:
DCB and TDCB, Static fracture, Forced displacement, Specimen thickness, Type of Mode Ⅲ키워드:
이중외팔보와 경사진 이중외팔보, 정적 파괴, 강제 변위, 시험편 두께, 모드 Ⅲ형1. Introduction
Aluminum foam is a material with an excellent physical characteristic and dynamic function. Also, it is a material that can resolve the issues of light weight problems. One of the greatest advantages of aluminum foam is that it can be bonded using only adhesives; and this bonding method simplifies the production process and maximizes the utilization of the lightweight material.1 However, research of the fracture behavior of adhesive joints is necessary for safety in the case of the bonding method using only adhesives; and because aluminum foam is a porous material, it may have a different fracture behavior compared to non-porous materials, making research of the fracture behavior of adhesive layers significant.2-4 Focusing on these characteristics, we attempt to analyze the static fracture behavior of aluminum foam attached structures using closed aluminum foam, which is mainly used as shock absorbents. Before analyzing the characteristics, we have performed a static experiment and simulation static analysis to obtain data for static fracture according to the various shapes, thickness, and shape factors of aluminum foam attached structures. According to the results, the fracture behavior of adhesive layers may be affected by different variables, but it is mostly affected by shape. We have planned and designed a mode III type model for a closer study. Based on the UK Industrial Standard (British Standard : BS 7991) and the ISO International Standard (ISO 11343), we have designed and produced specimens of mode III type DCB (Double Cantilever Beams) and TDCB (Tapered Double Cantilever Beams) with a single-lap attachment method with thickness set as its variable, using a closed structure aluminum foam produced at Foam Tech. company in Korea. We have performed static experiments for the specimens according to each thickness. Also, we have performed a simulation static analysis using the ANSYS finite element analysis program to verify this method. We have compared the shearing strength of attached structures of the shapes of DCB and TDCB that have been constructed with the porous material aluminum foam, and performed research on their mechanical characteristics.5-8
2. Research Method
2.1 Research Model
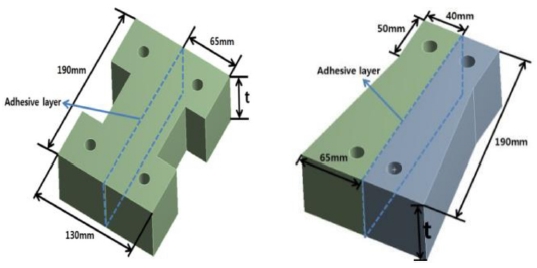
The design plan specified in UK Industrial Standard 7991 : 2001 has been redesigned in a single-lap attachment method following the aim of this research. The redesigned DCB and TDCB model in Fig. 1 has been designed with thickness set as variable t; and describing the shape of each model, the width of the DCB model is 130mm, and its vertical length is 190mm. Also, the thicknesses of three models are 35 mm, 45 mm, and 55 mm with thickness set as variable t. In the case of the TDCB model, the width of the upper layer is 80 mm, the width of the bottom layer is 130 mm, and the vertical length is 190 mm. The vertical length of the upper layer of the model is the determined value based on the shape factor; and thickness has been set as variable t for the DCB model, and the thickness was designed as 35 mm, 45 mm, and 55 mm.9-11
2.2 Experimental Conditions
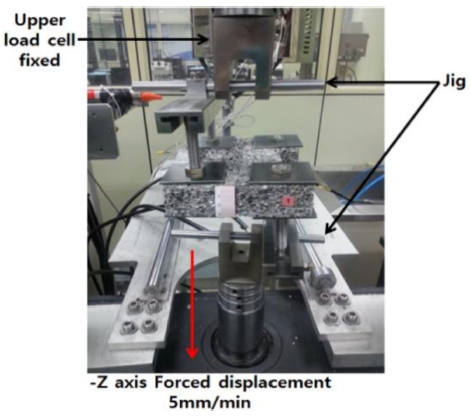
Fig. 2 shows the static experiment method performed on DCB and TDCB specimens of this research. A jig has been produced to attach DCB and TDCB specimens to the upper layer load cell and the lower layer load cell of the tensile tester as illustrated above. Specimens have been attached to the tensile tester, the upper layer load cell of the tensile tester has been fixed, and a forced displacement of 5 mm/min in the direction of the -Z axis has been assigned to the lower layer load cell to perform static tests. The tester used for the static experiment was a tensile tester by MTS.12-15
2.3 Boundary Conditions for the Simulation Analysis
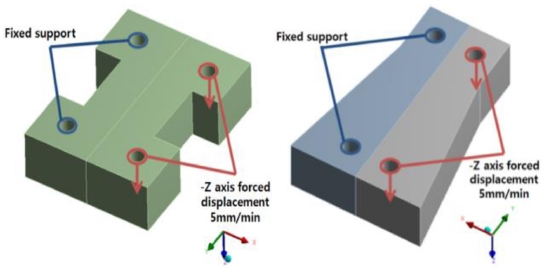
We have performed a simulation static analysis to verify the static experiment on DCB and TDCB tensile testers. Fig. 3 shows examples of DCB and TDCB specimen models applied as simulation analysis conditions to perform analysis. We have fixed one hole of all three shapes of DCB and TDCB tensile testers with a fixed support condition, assigned a forced displacement condition in the direction of the -Z axis for the other hole, and performed an analysis of pulling one side of the tensile tester in the direction of the -Z axis with a forced displacement of 5mm/min. The aluminum foam of A1-SAF40 with closed cell type produced by adding foaming agent to melted aluminum is used as the research model, and the material properties of the model applied in the simulation analysis are shown on Table 1. In addition, the adhesives spread on the adhesive layers of the aluminum foam specimens are an aerosol type adhesive with an adhesive strength of about 0.4MPa.16-21
3. Research Results
3.1 Results of Experiment and Analysis
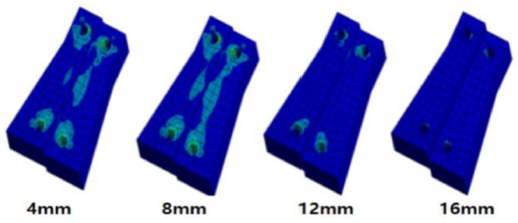
When performing the static experiment by assigning a forced displacement of 5 mm/min to the DCB and TDCB specimens of a thickness of t = 35 mm, the values of reaction data following the forced displacement of each DCB and TDCB specimen are displayed in Fig. 4. First, we could see that the DCB specimen shows the greatest reaction when the forced displacement is approximately 6.5 mm, and the maximum reaction force of the DCB specimen turned out to be 0.35 kN. The adhesive strength of the bonding interface of the specimen model gradually decreases after the maximum reaction force. The bonding interface of the specimen model is detached after a forced displacement of about 15 mm, and is maintained when the reaction force becomes 0. The TDCB specimen showed the greatest reaction force when the forced displacement was about 7 mm, and the maximum reaction force of the TDCB specimen model turned out to be approximately 0.4 kN. Like the DCB specimen model, the adhesive strength of the bonding interface of the specimen model gradually decreased. The bonding interface of the specimen model is detached after a forced displacement of about 14 mm and a reaction force of 0. Fig. 5 and Fig. 6 show the contour of equivalent stress that is applied from the progress of forced displacement as a result of simulation analysis of the DCB and TDCB specimens with a thickness of 35 mm. The equivalent stress of specimen models gradually increase as forced displacement progresses, and equivalent stress gradually decreases after a certain level of forced displacement. The equivalent stress of the adhesive layer when the specimen models began to detach after the maximum reaction force, turned out to be approximately 0.715 MPa for DCB specimens, and 0.868 MPa for TDCB specimens.
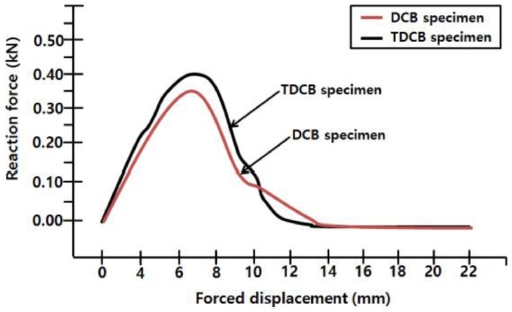
Graph of reaction force due to forced displacement of the static experiment (Thickness of specimens are 35 mm)
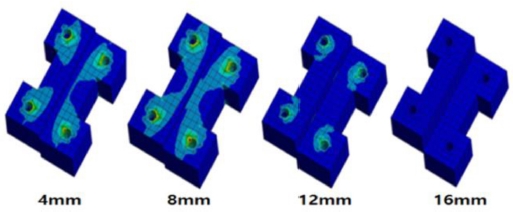
Change of the equivalent stress according to the progress of forced displacement (35 mm thickness of DCB specimen)
The values of reaction force data of DCB and TDCB specimens with a thickness of t = 45 mm depending on forced displacement are displayed in Fig. 7. We could see that DCB produces its maximum reaction force of about 0.45 kN when the forced displacement is about 6.5 mm. The TDCB specimen produces a reaction force of about 0.52 kN when the forced displacement is 6.5 mm. Also, Figs. 8 and 9 show the contour and change of simulation analysis results of DCB and TDCB specimens with a thickness of t = 45 mm depending on equivalent stress. The equivalent stress gradually increases as forced displacement increases, until the maximum reaction force occurs, and gradually decreases after the point of maximum reaction force. The equivalent stress of adhesive layers of specimen models at maximum reaction force turned out to be: DCB specimen 0.6 MPa, and TDCB specimen 0.756 MPa.
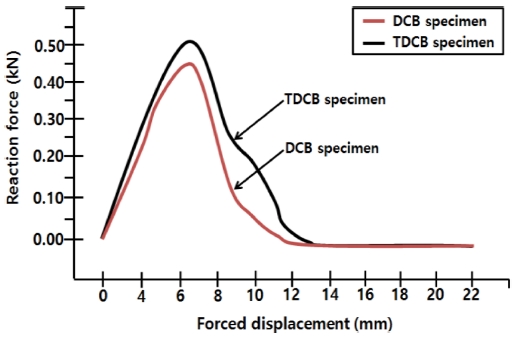
Graph of reaction force due to forced displacement of the static experiment (Thickness of specimens are 45 mm)
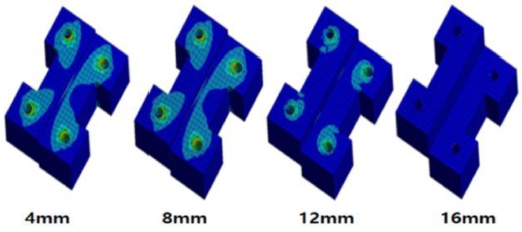
Change of the equivalent stress according to the progress of forced displacement (45 mm thickness of DCB specimen)
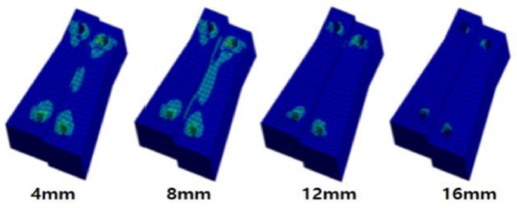
Fig. 10 shows the value of reaction force data of DCB and TDCB specimens with a thickness of t = 55 mm depending on forced displacement. We can see that the DCB specimen produces its maximum reaction force of about 0.54 kN when forced displacement is about 7 mm, and the TDCB specimen produces a maximum reaction force of 0.63 kN when forced displacement is 7 mm. Figs. 11 and 12 show the contour and change of simulation analysis results of DCB and TDCB specimens with a thickness of t = 55 mm depending on equivalent stress. Likewise, the equivalent stress gradually increases as forced displacement increases, until the maximum reaction force occurs, and gradually decreases after the point of maximum reaction force. The equivalent stress of adhesive layers of specimen models at maximum reaction force turned out to be: DCB specimen 0.549 MPa, and TDCB specimen 0.663MPa. As Table 2 shows the maximum reaction forces and equivalent stresses of adhesive layer of DCB and TDCB specimens by each thickness, the static fracture property of each specimen can be checked.
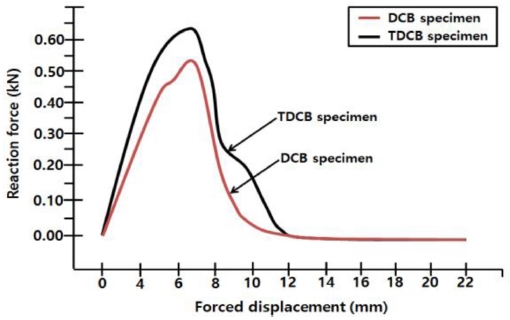
Graph of reaction force due to forced displacement of the static experiment (Thickness of specimens are 55 mm)
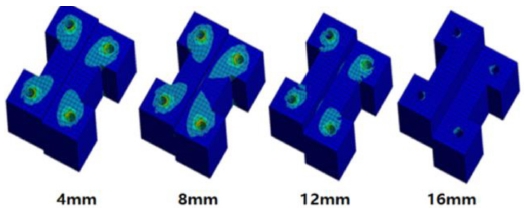
Change of the equivalent stress according to the progress of forced displacement (55 mm thickness of DCB specimen)
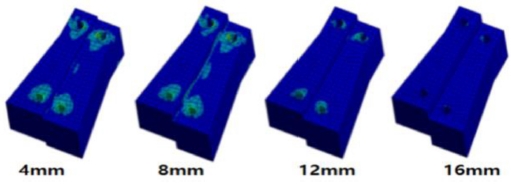
Change of the equivalent stress according to the progress of forced displacement (55 mm thickness of TDCB specimen)
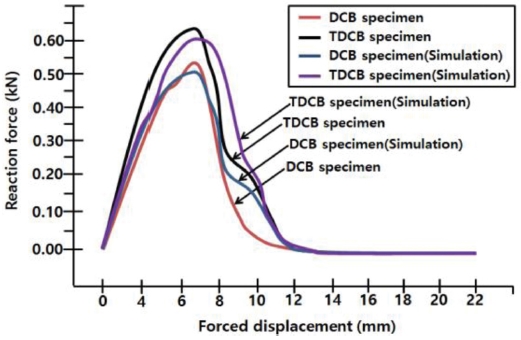
In this study, we have performed a simulation static analysis to verify the static experiment results of DCB and TDCB specimens. Fig. 13 is an example of static analysis results; and shows the comparison between values of reaction force data of DCB and TDCB specimens with values of reaction force data of the static experiment. According to comparison results, the maximum reaction force of the DCB specimen in the actual static experiment was about 0.54 kN, and the maximum reaction force of the TDCB specimen was about 0.63 kN. The maximum reaction force of the DCB specimen model and the TDCB specimen model in simulation analysis was about 0.51 kN and 0.6 kN. This shows the margin of error of -5.88% and -5%, which is not a significant difference. The point of maximum reaction force of the DCB and TDCB specimens was at a forced displacement of 7 mm, which does not show a significant change compared to the forced displacement of 7 to 7.5 mm in the simulation. The adhesive strength of the bonding interface of the specimens after maximum reaction force gradually decreases as in the static fracture experiment, and the bonding interface of the specimens are detached completely at a forced displacement of about 14 mm and the reaction force becomes 0. The point of complete detachment of the bonding interface did not show a significant change as it was 13 mm for the static fracture experiment, and 14 mm for the simulation static analysis. The comparison results show that the reaction force of both the static fracture experiment and simulation static analysis depending on forced displacement gradually increase until the maximum reaction force; and that a forced displacement of 7 mm and 8 mm each displays the greatest reaction force. However, we can see a difference between the analysis and experiment data on the graph after the maximum reaction force. This is considered to be the disturbance of the progression of forced displacement by the lingering adhesives spread on the bonding interface of specimens, which is called adhesion inertia.
Table 3 shows the maximum reaction forces at experiment and analysis in case of the DCB and TDCB specimens with the thickness(t) of 55 mm. The static fracture property and error of the specimen with the corresponding thickness can be checked.
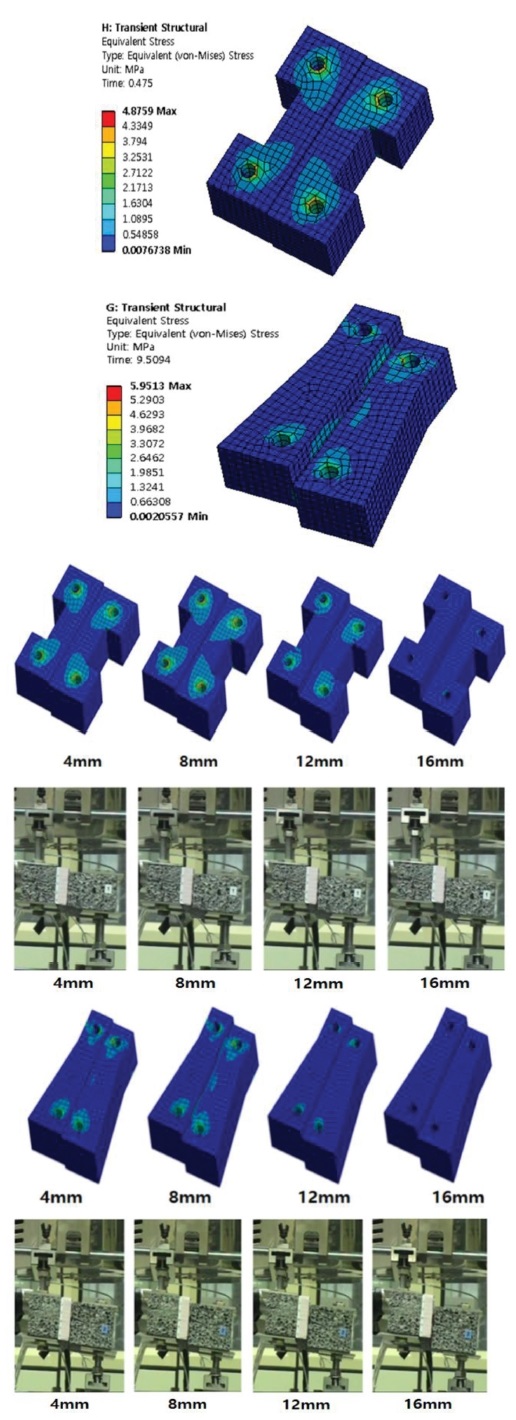
Fig. 14 shows the contour and comparison of stress at the bonding interface in a simulation analysis, and stress depending on forced displacement when the maximum reaction force occurs for DCB and TDCB specimens with a thickness of t = 55 mm. The image on top shows the stress at the bonding interface of specimens when the maximum reaction force occurs, and the two images on the bottom show the contour of stress that occurs when forced displacement is applied to specimens and the experiment performance process. Also, the image below shows the shearing process of the bonding interface of specimens.
4. Conclusions
We have deduced the following results from static experiment s of the thickness of mode III type DCB and TDCB specimens, and simulation static analysis for its verification.
1. Each specimen model showed its maximum reaction force when the forced displacement was about 6.5 to 7 mm, and the simulation static analysis also showed a similar forced displacement of about 7 to 7.5 mm for maximum reaction force. In addition, we can see that the adhesive strength of bonding interface of both the experiment and analysis gradually decreases based on the point of maximum reaction force.
2. The maximum reaction force of DCB and TDCB specimens with a thickness of t = 35 mm turned out to be approximately 0.35 kN and 0.4 kN, 0.45 kN and 0.52 kN for specimens with a thickness of t = 45 mm, and 0.54 kN and 0.63 kN for specimens with a thickness of t = 55 mm. We can see that the maximum reaction force of specimens also increases as the thickness of specimens increases.
3. When comparing the experiment and analysis results of DCB and TDCB specimens, the forced displacement section that produces maximum reaction force turned out to be similar, and the maximum reaction force of TDCB specimens were greater than DCB specimens. As a result, TDCB specimens can withstand stronger external forces; in other words, they have an excellent durability.
4. We can see that the experiment and simulation analysis for verification produced similar results, and that data for each variable can be easily investigated without a separate experiment process. Furthermore, effective analysis of the mechanical characteristics of mode III type TDCB adhesive structures can be expected to be made.
Acknowledgments
This paper was presented at ISGMA 2017
“This research was supported by Basic Science Research Program through the National Research Foundation of Korea (NRF) funded by the Ministry of Education, Science and Technology (2015R1D1A1A01057607).” “This research was supported by Basic Science Research Program through the National Research Foundation of Korea(NRF) funded by the Ministry of Education (NRF-2018R1D1A1B07041627).”
REFERENCES
-
Lefanti, R., Ando, M., and Sukumaran, J., “Fatigue and Damage Analysis of Elastomeric Silent Block in Light Aircrafts,” Materials & Design, Vol. 52, pp. 384-392, 2013.
[https://doi.org/10.1016/j.matdes.2013.05.039]

-
Hu, H., Lu, W.-J., and Lu, Z., “Impact Crash Analyses of an Off-Road Utility Vehicle–Part II: Simulation of Frontal Pole, Pole side, Rear Barrier and Rollover Impact Crashes,” International Journal of Crashworthiness, Vol. 17, No. 2, pp. 163-172, 2012.
[https://doi.org/10.1080/13588265.2011.632858]

-
Han, M.-S., Choi, H.-K., Cho, J.-U., and Cho, C.-D., “Experimental Study on the Fatigue Crack Propagation Behavior of DCB Specimen with Aluminum Foam,” International Journal of Precision Engineering and Manufacturing, Vol. 14, No. 8, pp. 1395-1399, 2013.
[https://doi.org/10.1007/s12541-013-0188-6]

-
Zhang, Y.-J. and Yang, C.-S., “FEM Analyses for Influences of Stress-Chemical Solution on THm Coupling in Dual-Porosity Rock Mass,” Journal of Central South University, Vol. 19, No. 4, pp. 1138-1147, 2012.
[https://doi.org/10.1007/s11771-012-1120-4]

-
Cho, J. U., Hong, S. J., Lee, S. K., and Cho, C., “Impact Fracture Behavior at the Material of Aluminum Foam,” Materials Science and Engineering: A, Vol. 539, pp. 250-258, 2012.
[https://doi.org/10.1016/j.msea.2012.01.091]

-
Pirondi, A. and Nicoletto, G., “Fatigue Crack Growth In Bonded DCB Specimens,” Engineering Fracture Mechanics, Vol. 71, Nos. 4-6, pp. 859-871, 2004.
[https://doi.org/10.1016/S0013-7944(03)00046-8]

-
Shokrieh, M., Heidari-Rarani, M., and Rahimi, S., “Influence of Curved Delamination Front on Toughness of Multidirectional DCB Specimens,” Composite Structures, Vol. 94, No. 4, pp. 1359-1365, 2012.
[https://doi.org/10.1016/j.compstruct.2011.11.035]

-
Blackman, B., Kinloch, A., Wang, Y., and Williams, J., “The Failure of Fibre Composites and Adhesively Bonded Fibre Composites Under High Rates of Test,” Journal of Materials Science, Vol. 31, No. 17, pp. 4451-4466, 1996.
[https://doi.org/10.1007/BF00366341]

-
Cho, J.-U., Kinloch, A., Blackman, B., Rodriguez, S., Cho, C.-D., et al., “Fracture Behaviour of Adhesively-Bonded Composite Materials Under Impact Loading,” International Journal of Precision Engineering and Manufacturing, Vol. 11, No. 1, pp. 89-95, 2010.
[https://doi.org/10.1007/s12541-010-0011-6]

-
Cooper, V., Ivankovic, A., Karac, A., McAuliffe, D., and Murphy, N., “Effects of Bond Gap Thickness on the Fracture of Nano-Toughened Epoxy Adhesive Joints,” Polymer, Vol. 53, No. 24, pp. 5540-5553, 2012.
[https://doi.org/10.1016/j.polymer.2012.09.049]

-
Ghaffarzadeh, H. and Nikkar, A., “Explicit Solution to the Large Deformation of a Cantilever Beam Under Point Load at the Free Tip Using the Variational Iteration Method-II,” Journal of Mechanical Science and Technology, Vol. 27, No. 11, pp. 3433-3438, 2013.
[https://doi.org/10.1007/s12206-013-0866-4]

-
Crocombe, A. and Richardson, G., “Assessing Stress State and Mean Load Effects on the Fatigue Response of Adhesively Bonded Joints,” International Journal of Adhesion and Adhesives, Vol. 19, No. 1, pp. 19-27, 1999.
[https://doi.org/10.1016/S0143-7496(98)00049-9]

- Blackman, B. and Kinloch, A., “Determination of the Mode I Adhesive Fracture Energy, GIC, of Structural Adhesives Using the Double Cantilever Beam (DCB) and the Tapered Double Cantilever Beam (TDCB) Specimens,” Imperial College of Science and Technology(JISC), pp. 3-13, 2001.
-
Kim, S.-S., Han, M.-S., Cho, J.-U., and Cho, C.-D., “Study on the Fatigue Experiment of Tdcb Aluminum Foam Specimen Bonded with Adhesive,” International Journal of Precision Engineering and Manufacturing, Vol. 14, No. 10, pp. 1791-1795, 2013.
[https://doi.org/10.1007/s12541-013-0239-z]

-
Pradeep, K., Rao, B. N., Srinivasan, S., and Balasubramaniam, K., “Interface Fracture Assessment on Honeycomb Sandwich Composite DCB Specimens,” Engineering Fracture Mechanics, Vol. 93, pp. 108-118, 2012.
[https://doi.org/10.1016/j.engfracmech.2012.06.011]

- Lee, J. H., “A Study on Fracture Property of Joint Interface at Aluminum Foam Structures of DCB and TDCB with Mode ? Type,” M. Sc. Thesis, Department of Mechanical Engineering, Graduate School, Kongju National University, 2017.
-
Kim, D., Lee, G. and Hur, J., “Life Fatigue Prediction of an Accumulator Composed of Bladder and Housing,” Journal of the Korean Society of Manufacturing Process Engineers, Vol. 17, No. 5, pp. 58-63, 2018.
[https://doi.org/10.14775/ksmpe.2018.17.5.058]

- Lee, J., Cho, J., Park, J., Kim, J., Oh, B., et al., “A Simulation Study on Composite Compact Tension Specimen for Sandwich with Holes,” Proc. of the Korean Society of Manufacturing Process Engineers Spring Conference, p. 51, 2018.
- Cho, J. H., Lee, W. S., Lee, J. C., and Won, J. B., “A Study on Structural Stability of Dual Head Machine,” Proc. of the Korean Society of Manufacturing Process Engineers Autumn Conference, p. 165, 2018.
-
Lee, C. H. and Suh, J.-S., “Numerical Analysis on the Freezing Process of Internal Water Flow in a L-Shape Pipe,” Journal of the Korean Society of Manufacturing Process Engineers, Vol. 17, No. 6, pp. 144-150, 2018.
[https://doi.org/10.14775/ksmpe.2018.17.6.144]

-
Zhu, Z.-G., Zhang, Q., Lv, J.-H., Qin, Z., and Lyu, S.-K., “Simulation Analysis of Flexible Track Drilling Machines Based on ADAMS,” Journal of the Korean Society of Manufacturing Process Engineers, Vol. 17, No. 5, pp. 1-7, 2018.
[https://doi.org/10.14775/ksmpe.2018.17.5.001]


Jung-Ho Lee is a graduate school student in the Department of Mechanical Engineering of Kongju National University, Cheonan. His fields of specialization are Fracture Mechanics (Dynamic Impact), Impact Fracture of Composite Material, Fatigue & Strength Evaluation, and Durability & Optimum Design.
E-mail: junghocade@gmail.com

Professor in Gyeongsang National University. His research interest are Gear, Gearbox, and Mechanical System Design.
E-mail: sklyu@gnu.ac.kr

Jae-Ung Cho received his M.S. and Doctor Degree in Mechanical Engineering from Inha University, Incheon, Korea, in 1982 and 1986, respectively. Now he is a professor in the Division of Mechanical & Automotive Engineering of Kongju National University, Korea. He is interested in the areas of fracture mechanics (Dynamic impact), composite mate-rial, fatigue and strength evaluation, and so on.
E-mail: jucho@kongju.ac.kr

