Influence of Angle of Corner Deposition on Temperature and Residual Stress Distributions in the Vicinity of the Deposited Region by a Ti-6Al-4V Wire-Feeding Type of Direct Energy Deposition Process
Copyright © The Korean Society for Precision Engineering
This is an Open-Access article distributed under the terms of the Creative Commons Attribution Non-Commercial License (http://creativecommons.org/licenses/by-nc/3.0) which permits unrestricted non-commercial use, distribution, and reproduction in any medium, provided the original work is properly cited.
Abstract
It is compelling to realize that the additive manufactured part using wire feeding type directed energy deposition (DED) process is subjected to undesired thermal effects, and induced residual stress during the manufacturing process. In order to improve the quality of the manufactured part, the distributions of temperature and residual stress have to be understood to manage the results of the processing of these materials. The objective of this paper is to investigate the influence of the angle of corner deposition on the distributions of temperature and residual stress of the Ti-6Al-4V deposited bead, and the substrate via thermo-mechanical finite element analyses (FEAs). In the same fashion, the formation of the heat affected zone (HAZ) and the stress influenced region (SIR) are estimated from the measured results of the FEAs. Equally important, it can be stated that from the estimated HAZ and SIR regions, the overlapping of undesired thermal effects and residual stress between two beads fabricated by the wire feeding type DED process can be avoided at the design stage.
Keywords:
Thermo-mechanical analysis, Wire feeding type directed energy deposition, Ti-6Al-4V, Corner deposition키워드:
열-구조 연계 해석, 와이어를 이용한 직접 에너지 증착, 모서리 증착1. Introduction
Directed energy deposition (DED) is one of the important direct metal additive manufacturing (AM) processes. DED utilizes focused energy source such as laser, electron beam or plasma arc to melt materials as they are being deposited onto the substrate.1-5 The deposited material solidifies on the substrate as a bead. By depositing the bead repetitively in a line-by-line and layer-by-layer manner, a three dimensional structure can be fabricated.1-3,6 The materials are supplied either in the form of powder or wire.1-4,7 In comparison with the powder feeding type, the wire feeding type DED process is capable to produce part at a higher deposition rate and higher density with lesser material wastage and contamination.1,8-11 Therefore, it is suitable for building part with large volumes.2 The addictive manufactured parts are subjected to cyclic heating and cooling during repeated material deposition. Thus, undesired distortion and residual stresses are induced in the parts.12-14 Residual stresses, particularly tensile residual stress, may lead to formation of irregular cracks in the heat affected zone (HAZ) and deleteriously affect the fracture toughness and fatigue strength of the manufactured part.12,15-18
In order to understand the process and improve the quality of the addictive manufactured part, the temperature and residual stress distributions have been investigated experimentally.14,19,20 However, only a limited number of experimental values on the part can be obtained. Numerical analyses provide an excellent alternative because it is cost-effective and capable to provide complete thermal and mechanical distribution of the part throughout the process.13,21-23
Some researchers have applied the numerical analysis to estimate the thermo-mechanical characteristics on the fabricated part. Single bead deposition represents the fundamental unit of multi-layered deposition in DED process.11 Deus and Mazumder performed a three-dimensional finite element analysis (FEA) to estimate the temperature and residual stress distribution in straight part deposited by laser cladding (LC) and revealed that pockets of tensile stress are formed near the end of the clad.24 Chiumenti et al. validated their thermo-mechanical FEA with ten layers straight bead depositions and estimated the hot cracking risk area based on continuum damage model on a cuboid structure fabricated by shaped metal deposition (SMD) process.17 Anca et al. developed a thermo-mechanical FEA model using a zero strength temperature technique at solidus temperature to simulate the temperature and residual stress of the straight wall structure fabricated by SMD process.25 Ding et al investigated the change in stress of a straight wall structure during the thermal cycles of the wire-arc additive manufacturing (WAAM) process via a thermo-mechanical finite element model.22
Besides, numerical analyses have been used to investigate the effect of process parameters on the temperature and residual stress of the fabricated part. Mukherjee et al. investigated the change of the stresses and strains on the multilayer deposition of straight beads according to heat input and layer thickness.16 Denlinger et al. studied the effect of dwell time between depositions on distortion and residual stress of AM wall structures deposited with Ti-6Al-4V and Inconel 625 using FEA.23 However, previous studies only focus on variation of temperature and residual stress on straight bead depositions. Besides, the geometry of the deposited bead according to process condition is neglected.
In this paper, the influence of angle of corner deposition on the distributions of temperature and residual stress of the Ti-6Al-4V deposited bead and the substrate is investigated via thermo-mechanical FEAs. The variation of heat affected zone (HAZ) and stress influenced region (SIR) according to the angle of corner deposition and the power of laser are quantitatively estimated. From the results of examination, the overlapping of undesired HAZ and SIR regions between deposited beads during deposition can be avoided for a Ti-6Al-4V part fabricated by a wire feeding type DED process.
2. Finite Element Analyses
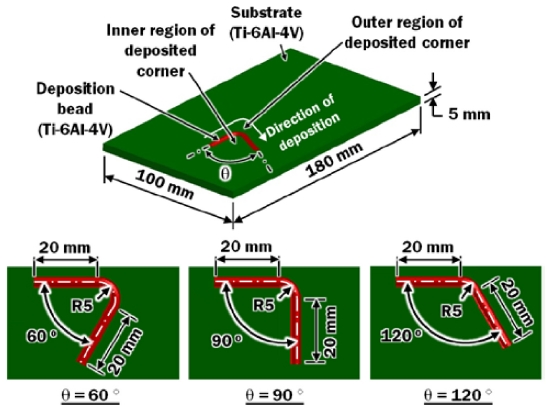
In order to investigate the influence of the angle of corner deposition (θ) on the thermo-mechanical characteristics of a wire-feed DED process, three three-dimensional finite element models of corner deposition bead with different corner angle are proposed, as shown in Fig. 1. The deposition bead consists of two 20 mm straight beads and a corner deposition bead with a radius of 5 mm in between them. The angle between the two straight beads defines the angle of the corner deposition. The straight beads are used before and after the corner deposition in order to remove the thermal transient effect at the beginning and end of a deposition bead. The thermo-mechanical FEAs are performed using the commercial software Sysweld V12.0. The bead and the substrate are constructed using 8-node hexahedron solid element. The material for the deposited bead and the 180 mm × 100 mm × 5 mm substrate is Ti-6Al-4V. The material is represented by the temperature dependent material properties of Ti-6Al-4V in the FEA.26-30 A laser is used as the energy source in this DED process. The travel speed of the table is set at 8 mm/s.
The angle of corner deposition (θ) and power of laser (P) are chosen as the primary and secondary parameters in these FEAs, respectively. The angles at the corner deposition are set to be 60o, 90o, and 120o. The power of the laser is in the range of 1.5 - 2.5 kW, as shown in Table 1. The shapes of the deposited bead according to travel speed of the table (v) has been estimated from a Ti-6Al-4V wire-feed DED experiment, as shown in Fig. 2.26 The shape of the straight deposited bead is assumed to be maintained at the corner deposition. The cooling time of the specimen after deposition is set at 10 seconds.

Estimated shapes of the deposited bead for different power of laser26 (Adapted from Ref. 26 on the basis of open access)
A laser with a top-hat intensity distribution is applied as the heat source for the DED process, as shown in Eqs. (1) and (2).26 The effective radius of the laser beam (re) at surface of bead (z = 0) is 0.75 mm, as measured by a beam profiler.26 Calibrated penetration depths and efficiencies for different power of laser by Chua et al. are applied to the top-hat heat flux model.26
| (1) |
| (2) |
A natural convection condition with ambient temperature of 20oC is applied to the deposited bead and the substrate. The nodes along the edge line at four corners of the substrate are constrained translationally and rotationally.
3. Results and Discussion
3.1 Temperature Distribution and Heat Affected Zone (HAZ)
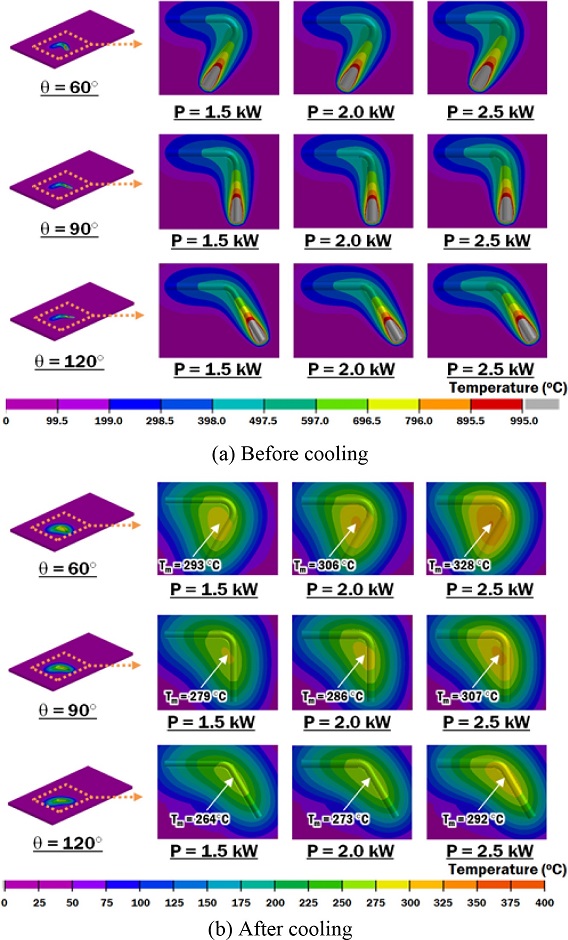
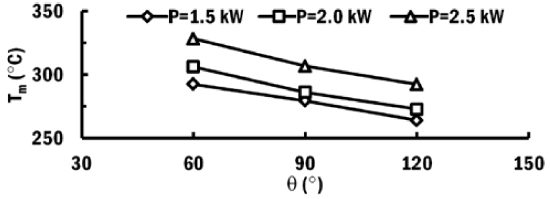
The influences of the angle of corner deposition and power of laser on the temperature distribution on the specimens are investigated via thermal FEAs, as shown in Fig. 3. The results of thermal analyses for the same power of laser reveal that the heat is higher at the inner region of the deposited corner than the outer region of the deposited corner. The is due to the fact that the smaller angle of corner deposition consists the straight deposited bead closer to each other after the deposition direction has changed. Therefore, heat is accumulated within the small area at the inner region of the deposited corner. Consequently, the temperature on the specimen after cooling increases when the angle θ decreases, as shown in Fig. 4.
Besides, Figs. 3 and 4 reveal that the temperature on the specimen increases when the power of laser increases for the same angle of corner deposition. This is attributed that the higher power of laser produces more heat on the specimen and results to a higher temperature during the process.
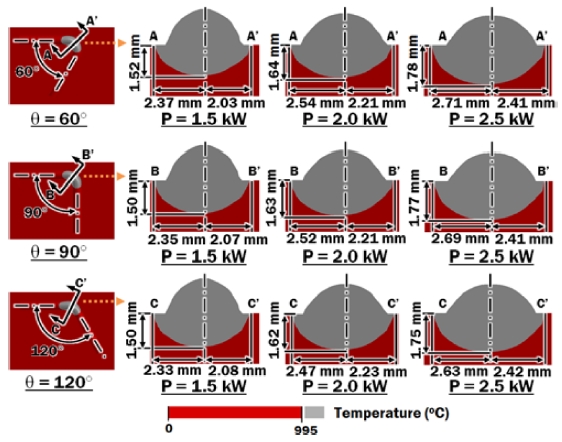
From the results of the temperature distributions, the heat affected zone (HAZ) at the deposited corner can be estimated. It is known that the beta grain growth occurs near the HAZ to the weld fusion line for Ti-6Al-4V.27 Hence, the HAZ is estimated by using the beta transus temperature of 995oC for Ti-6Al-4V.11,31 The estimated HAZs at the deposited corner are represented by the region with a gray color, as shown in Fig. 5. It is revealed that the shape of the HAZ is skewed towards the inner side of the corner deposition. Therefore, the inner distance of HAZ is longer than the outer distance of HAZ at the deposited corner. This is consistent with the overall temperature distribution of the specimen that the heat is accumulated within the small area at the inner region of the deposited corner.
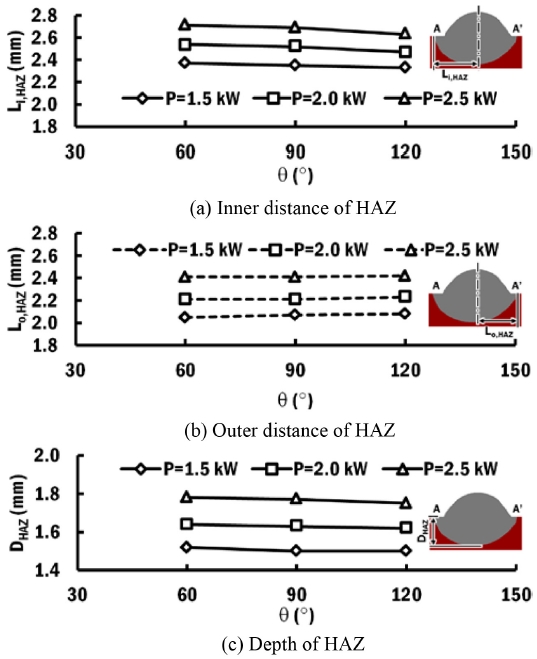
Fig. 6 shows the influence of the angle of corner deposition and power of laser on the formation of the HAZ in the vicinity of the deposited corner region. The HAZ extends towards the inner side of the deposited corner when the angle of corner deposition decreases, as shown in Fig. 6(a). Hence, the inner distance of HAZ (Li,HAZ) increases and the outer distance of HAZ (Lo,HAZ) decreases when the angle of corner deposition decreases. Besides, the depth of HAZ (DHAZ) slightly increases when the angle of corner deposition decreases, as shown in Fig. 6(c). This phenomenon occurs because the smaller angle of corner deposition results to larger amount of heat being accumulated at the small area at the inner region of the deposited corner.
From Fig. 6, it is revealed that the inner distance of HAZ, the outer distance of HAZ, and the depth of HAZ increases when the power of laser is intensified. The increase of heat flux contributes to a higher fusion temperature on the beads. Due to the increased temperature, the heat is transferred to a wider and deeper area when the power of laser is increased.
3.2 Residual Stress and Stress Influenced Region (SIR)
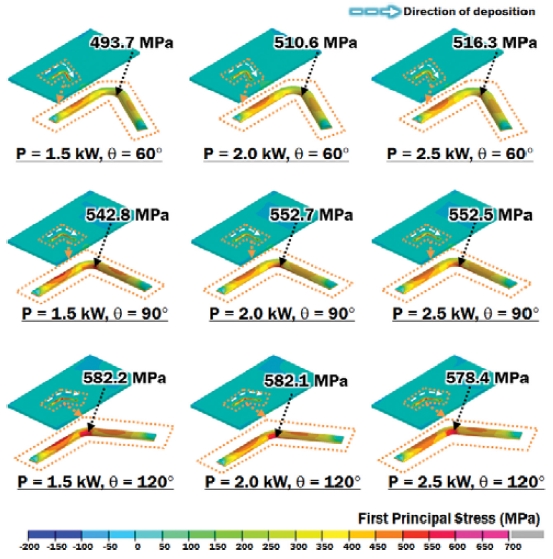
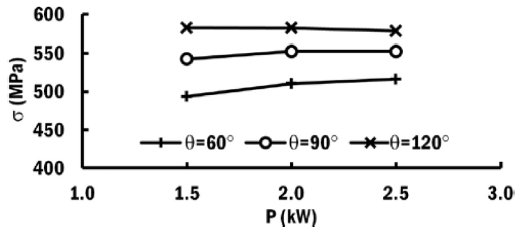
The influence of the angle of corner deposition on the residual stress distribution on the specimens after the cooling process is investigated via thermo-mechanical FEAs, as shown in Fig. 7. The thermal residual stress is induced when a cooler area contracts faster than the others due to the temperature difference. The residual stress at the deposited corner increases when the angle of corner deposition becomes larger. For the same power of laser, the larger angle of corner deposition has lower temperature than those with smaller angle θ, as shown in Fig. 4. This reveals that a higher cooling rate occurs at the deposited corner with larger angle θ. Hence, a higher residual stress is formed at the corner of the bead with larger θ. This trend is observed to be consistent for the cases with same power of laser, which has the same cross section of bead, as shown in Fig. 8.
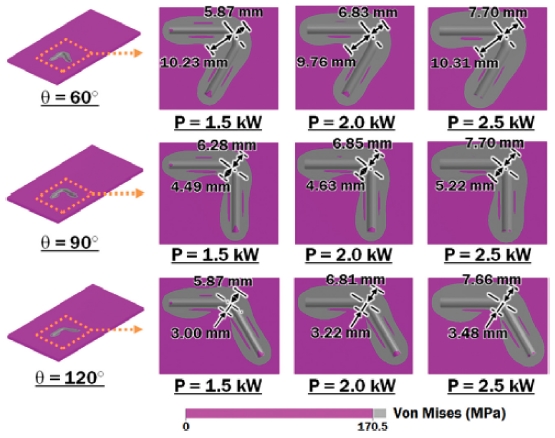
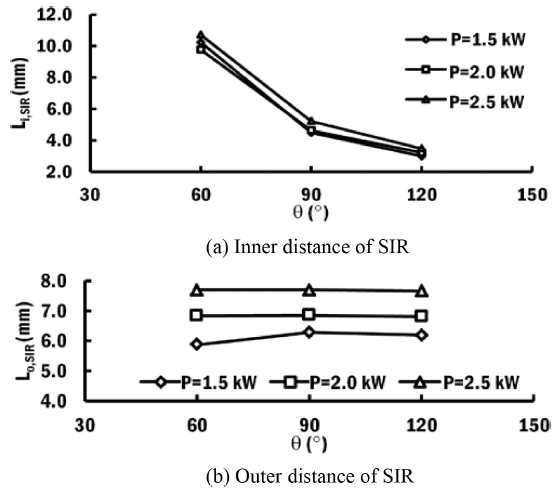
The residual stress distribution is crucial to estimate the stress influenced region (SIR). The SIR is referred as the region that has higher estimated thermal stress than the reference strength of the Ti-6Al-4V. In order to avoid the part from fatigue failure, Chua et al. apply the safety factor of 4.0 to the ultimate strength to estimate the fatigue limit of the Ti-6Al-4V to be 170.5MPa for the deposition cases at the travel speed of table of 8 mm/s.30 Using the estimated fatigue limit, the SIRs for different angle of corner deposition and power of laser are predicted as the region with a gray color, as shown in Fig. 9. The influence of the angle of corner deposition and power of laser on the formation of the SIR in the vicinity of the deposited corner region is shown in Fig. 10.
The SIR greatly extends towards the inner side of the deposited corner when the angle of corner deposition decreases, as shown in Figs. 9 and 10(a). Therefore, the inner distance of SIR (Li,SIR) rapidly increases and the outer distance of SIR (Lo,SIR) slightly decreases when the angle of corner deposition decreases. This is attributed that the formation of residual stress is peak at the inner side of the deposited corner. The inner distance and the outer distance of SIR at the deposited corner increase when the power of laser amplifies. The increase of power of laser results to higher temperature in the bead. Therefore, the SIR grows when the power of laser increases.
4. Conclusions
In this paper, the effect of the angle of corner deposition and power of laser on the temperature and residual stress of the specimen for a corner deposition using a wire-feeding type DED process was investigated by the application of uncoupled thermo-mechanical FEAs. A three dimensional finite element model with estimated profile of the deposited bead according to power of laser has been adopted for the FEAs.
The temperature distributions of the specimens were obtained from the thermal FEAs. The results of the thermal FEAs reveal that the heat is accumulated at the inner region of the deposited corner. The temperature at the inner region of deposited corner increased when the angle of corner deposition decreased. Subsequently, the influences of the angle of corner deposition and the power of laser on the formation of HAZ in the vicinity of the deposited bead were examined. The inner distance and the outer distance of HAZ lay in the ranges of 2.37 - 2.71 mm and 2.03 - 2.42 mm, respectively. The inner distance of the HAZ was greater than the outer distance of HAZ by the factor of 1.09 - 1.17 times. The depth of HAZ was estimated to be in the range of 1.50-1.78 mm.
A thermal stress distribution in the vicinity of the deposited bead was investigated through thermo-mechanical FEAs. The residual stress on the bead at the corner deposition lay in the range of 493.7 - 582.2 MPa. The SIR was predicted to avoid failure due to fatigue. The inner distance and outer distance of SIR lay in the ranges of 3.0 - 10.7 mm and 6.2 - 7.7 mm, respectively. The increment of the angle of corner deposition greatly reduced the inner distance of SIR and slightly increased the outer distance of SIR. Hence, the ratio of the inner distance to the outer distance of SIR varied by the factor of 0.5 - 1.7 times.
In the future, an additional thermo-mechanical analysis should be carried out to investigate the influence of radius of corner deposition on the HAZ and SIR. Finally, the appropriate gap between adjacent beads should be investigated experimentally.
NOMENCLATURE
| P : | Power of laser beam |
| Q : | Heat flux |
| DHAZ : | Estimated depth of heat affected zone |
| Dp : | Penetration depth of heat flux |
| Li,HAZ : | Inner distance of heat affected zone |
| Li,SIR : | Inner distance of stress influenced region |
| Lo,HAZ : | Outer distance of heat affected zone |
| Lo,SIR : | Outer distance of stress influenced region |
| Tm : | Maximum temperature of specimen |
| re : | Effective radius of laser beam on surface z = 0 |
| rz : | Effective radius of laser beam on surface z |
| ri : | Effective radius of laser beam on surface z = Dp |
| v : | Travel speed of table |
| z : | Z coordinate of the model |
| ze : | Z coordinate at surface of bead |
| η : | Efficiency of heat flux |
| θ : | Angle of corner deposition |
Acknowledgments
This work was supported by the National Research Council of Science & Technology (NST) grant by the Korea government (MSIT) (No. CRC-15-03-KIMM).
REFERENCES
- Gibson, I., Rosen, D. W., and Stucker, B., “Additive Manufacturing Technologies: 3D Printing, Rapid Prototyping and Direct Digital Manufacturing,” Springer, pp. 245-268, 2015.
-
Frazier, W. E., “Metal additive Manufacturing: A Review,” Journal of Materials Engineering and Performance, Vol. 23, No. 6, pp. 1917-1928, 2014.
[https://doi.org/10.1007/s11665-014-0958-z]

-
Ahn, D.-G., “Direct Metal Additive Manufacturing Processes and Their Sustainable Applications for Green Technology: A Review,” International Journal of Precision Engineering and Manufacturing-Green Technology, Vol. 3, No. 4, pp. 381-395, 2016.
[https://doi.org/10.1007/s40684-016-0048-9]

-
Kim, D.-I., Lee, H.-J., Ahn, D.-G., Kim, J.-S., and Kang, E. G., “Preliminary Study on Improvement of Surface Characteristics of Stellite 21 Deposited Layer by Powder Feeding Type of Direct Energy Deposition Process Using Plasma Electron Beam,“ Journal of the Korean Society for Precision Engineering, Vol. 33, No. 11, pp. 951-959, 2016.
[https://doi.org/10.7736/KSPE.2016.33.11.951]

-
Saboori, A., Gallo, D., Biamino, S., Fino, P., and Lombardi, M., “An Overview of Additive Manufacturing of Titanium Components by Directed Energy Deposition: Microstructure and mechanical properties,” Applied Sciences, Vol. 7, No. 9, pp. 883-905, 2017.
[https://doi.org/10.3390/app7090883]

-
Ahn, D.-G., Lee, H.-J., Cho, J.-R., and Guk, D.-S., “Improvement of the Wear Resistance of Hot Forging Dies Using a Locally Selective Deposition Technology with Transition Layers,” CIRP Annals-Manufacturing Technology, Vol. 65, No. 1, pp. 257-260, 2016.
[https://doi.org/10.1016/j.cirp.2016.04.013]

-
Chua, Z. Y., Ahn, I. H., and Moon, S. K., “Process Monitoring and Inspection Systems in Metal Additive Manufacturing: Status and Applications,” International Journal of Precision Engineering and Manufacturing-Green Technology, Vol. 4, No. 2, pp. 235-245, 2017.
[https://doi.org/10.1007/s40684-017-0029-7]

-
Mok, S. H., Bi, G., Folkes, J., and Pashby, I., “Deposition of TI–6AL–4V Using a High Power Diode Laser and Wire, Part I: Investigation on the Process Characteristics,” Surface and Coatings Technology, Vol. 202, No. 16, pp. 3933-3939, 2008.
[https://doi.org/10.1016/j.surfcoat.2008.02.008]

-
Kim, J.-D. and Peng, Y., “Plunging Method for ND: YAG Laser Cladding with Wire Feeding,” Optics and Lasers in Engineering, Vol. 33, No. 4, pp. 299-309, 2000.
[https://doi.org/10.1016/S0143-8166(00)00046-4]

-
Brandl, E., Palm, F., Michailov, V., Viehweger, B., and Leyens, C., “Mechanical Properties of Additive Manufactured Titanium (Ti–6AL–4V) Blocks Deposited by a Solid-State Laser and Wire,” Materials & Design, Vol. 32, No. 10, pp. 4665-4675, 2011.
[https://doi.org/10.1016/j.matdes.2011.06.062]

-
Brandl, E., Michailov, V., Viehweger, B., and Leyens, C., “Deposition of Ti–6AL–4V Using Laser and Wire, Part I: Microstructural Properties of Single Beads,” Surface and Coatings Technology, Vol. 206, No. 6, pp. 1120-1129, 2011.
[https://doi.org/10.1016/j.surfcoat.2011.07.095]

-
Hrabe, N., Gnäupel-Herold, T., and Quinn, T., “Fatigue Properties of a Titanium Alloy (Ti–6AL–4V) Fabricated Via Electron Beam Melting (EBM): Effects of Internal Defects and Residual Stress,” International Journal of Fatigue, Vol. 94, pp. 202-210, 2017.
[https://doi.org/10.1016/j.ijfatigue.2016.04.022]

-
Yang, Q., Zhang, P., Cheng, L., Min, Z., Chyu, M., et al., “Finite Element Modeling and Validation of Thermomechanical Behavior of Ti-6AL-4V in Directed Energy Deposition Additive Manufacturing,” Additive Manufacturing, Vol. 12, pp. 169-177, 2016.
[https://doi.org/10.1016/j.addma.2016.06.012]

-
Szost, B. A., Terzi, S., Martina, F., Boisselier, D., Prytuliak, A., et al., “A Comparative Study of Additive Manufacturing Techniques: Residual Stress and Microstructural Analysis of CLAD and WAAM Printed TI–6AL–4V Components,” Materials & Design, Vol. 89, pp. 559-567, 2016.
[https://doi.org/10.1016/j.matdes.2015.09.115]

-
Lietaert, K., Cutolo, A., Boey, D., and Van Hooreweder, B., “Fatigue Life of Additively Manufactured TI-6AL-4V Scaffolds Under Tension-Tension, Tension-Compression and Compression-Compression Fatigue Load,” Scientific Reports, Vol. 8, No. 1, pp. 1-9, 2018.
[https://doi.org/10.1038/s41598-018-23414-2]

-
Mukherjee, T., Zhang, W., and DebRoy, T., “An Improved Prediction of Residual Stresses and Distortion in Additive Manufacturing,” Computational Materials Science, Vol. 126, pp. 360-372, 2017.
[https://doi.org/10.1016/j.commatsci.2016.10.003]

-
Chiumenti, M., Cervera, M., Salmi, A., De Saracibar, C. A., Dialami, N., et al., “Finite Element Modeling of Multi-Pass Welding and Shaped Metal Deposition Processes,” Computer Methods in Applied Mechanics and Engineering, Vol. 199, Nos. 37-40, pp. 2343-2359, 2010.
[https://doi.org/10.1016/j.cma.2010.02.018]

-
Zhang, J., Wang, X., Paddea, S., and Zhang, X., “Fatigue Crack Propagation Behaviour in Wire+ Arc Additive Manufactured TI-6AL-4V: Effects of Microstructure and Residual Stress,” Materials & Design, Vol. 90, pp. 551-561, 2016.
[https://doi.org/10.1016/j.matdes.2015.10.141]

-
Griffith, M., Schlienger, M., Harwell, L., Oliver, M., Baldwin, M., et al., “Understanding Thermal Behavior in the Lens Process,” Materials & Design, Vol. 20, Nos. 2-3, pp. 107-113, 1999.
[https://doi.org/10.1016/S0261-3069(99)00016-3]

-
Denlinger, E. R., Heigel, J. C., Michaleris, P., and Palmer, T., “Effect of Inter-Layer Dwell Time on Distortion and Residual Stress in Additive Manufacturing of Titanium and Nickel Alloys,” Journal of Materials Processing Technology, Vol. 215, pp. 123-131, 2015.
[https://doi.org/10.1016/j.jmatprotec.2014.07.030]

-
Ding, D., Pan, Z., Cuiuri, D., and Li, H., “Wire-Feed Additive Manufacturing of Metal Components: Technologies, Developments and Future Interests,” The International Journal of Advanced Manufacturing Technology, Vol. 81, Nos. 1-4, pp. 465-481, 2015.
[https://doi.org/10.1007/s00170-015-7077-3]

-
Ding, J., Colegrove, P., Mehnen, J., Williams, S., Wang, F., et al., “A Computationally Efficient Finite Element Model of Wire and Arc Additive Manufacture,” The International Journal of Advanced Manufacturing Technology, Vol. 70, Nos. 1-4, pp. 227-236, 2014.
[https://doi.org/10.1007/s00170-013-5261-x]

-
Denlinger, E. R., Heigel, J. C., and Michaleris, P., “Residual Stress and Distortion Modeling of Electron Beam Direct Manufacturing TI-6AL-4V,” Proc. of the Journal of Engineering Manufacture Institution of Mechanical Engineers, Part B:, Vol. 229, No. 10, pp. 1803-1813, 2015.
[https://doi.org/10.1177/0954405414539494]

-
Deus, A. M. and Mazumder, J., “Three-Dimensional Finite Element Models for the Calculation of Temperature and Residual Stress Fields in Laser Cladding,” Proc. of the 25th International Congress on Applications of Laser and Electro-Optics, Vol. 1001, pp. 496-505, 2006.
[https://doi.org/10.2351/1.5060850]

-
Anca, A., Fachinotti, V. D., Escobar?Palafox, G., and Cardona, A., “Computational Modelling of Shaped Metal Deposition,” International Journal for Numerical Methods in Engineering, Vol. 85, No. 1, pp. 84-106, 2011.
[https://doi.org/10.1002/nme.2959]

-
Chua, B. L., Lee, H. J., Ahn, D. G., and Kim, J. G., “Investigation of Penetration Depth and Efficiency of Applied Heat Flux in a Directed Energy Deposition Process with Feeding of Ti-6Al-4V Wires,” Jornal of the Korean Society Precision Engineering, Vol. 35, No. 2, pp. 211-217, 2018.
[https://doi.org/10.7736/KSPE.2018.35.2.211]

-
Romano, J., Ladani, L., and Sadowski, M., “Thermal Modeling of Laser Based Additive Manufacturing Processes Within Common Materials,” Procedia Manufacturing, Vol. 1, pp. 238-250, 2015.
[https://doi.org/10.1016/j.promfg.2015.09.012]

- ESI Group, “Sysweld Visual-Weld 12.0,” ESI Group, https://www.esi-group.com/software-solutions/virtual-manufacturing/welding-assembly/esi-sysweld, (Accessed 13 AUG 2018)
- Carpenter Technology Corporation, “Titanium Alloy Ti 6Al-4V,” Datasheet, http://cartech.ides.com/datasheet.aspx?i=101&E=269&FMT=PRINT, (Accessed 2 AUG 2018).
-
Chua, B. L., Lee, H. J., Ahn, D. G., and Kim, J. G., “Influence of Process Parameters on Temperature and Residual Stress Distributions of the Deposited Part by a Ti-6Al-4V Wire Feeding Type Direct Energy Deposition Process,” Journal of Mechanical Science and Technology, Vol. 32, No.11, 2018 (In press, Corrected Proof, Doi No. 10.1007/s12206-018-1035-6, 2018)
[https://doi.org/10.1007/s12206-018-1035-6]

- Donachie, M. J., “Titanium: A Technical Guide,” ASM International, 2 Ed, p. 67, 2000.

