Fatigue Life Analysis and Experimental Study of the Input Shaft of 6-Speed Automatic Transmission
Copyright © The Korean Society for Precision Engineering
This is an Open-Access article distributed under the terms of the Creative Commons Attribution Non-Commercial License (http://creativecommons.org/licenses/by-nc/3.0) which permits unrestricted non-commercial use, distribution, and reproduction in any medium, provided the original work is properly cited.
Abstract
The input shaft of gearbox usually bears a cyclic variation of torque, which may lead to the risk of experiencing a fatigue fracture. To evaluate the fatigue life accurately and identify the weak parts, the ANSYS is used to simulate the torsional fatigue of the input shaft for the gearbox, and the fatigue life of the weak part is obtained, which is then tested and verified by the torsional fatigue testing in the MTS torsional fatigue test rig. The test results show that the maximum difference is 14% between the calculated life and the testing results, indicating that the simulation value can reflect the actual fatigue life accurately. Notably, the cracks appear in the large oil holes, and its life is mainly concentrated in the crack initiation stage, accounting for 99.2% of the total life. The analysis results show that the fatigue life of the software simulation has the guiding significance for the life evaluation. The fatigue life of the shaft can be quickly calculated by the simulation to reduce the number of fatigue tests and achieve cost-effectiveness.
Keywords:
Input shaft, ANSYS, Life prediction, Fatigue test1. Introduction
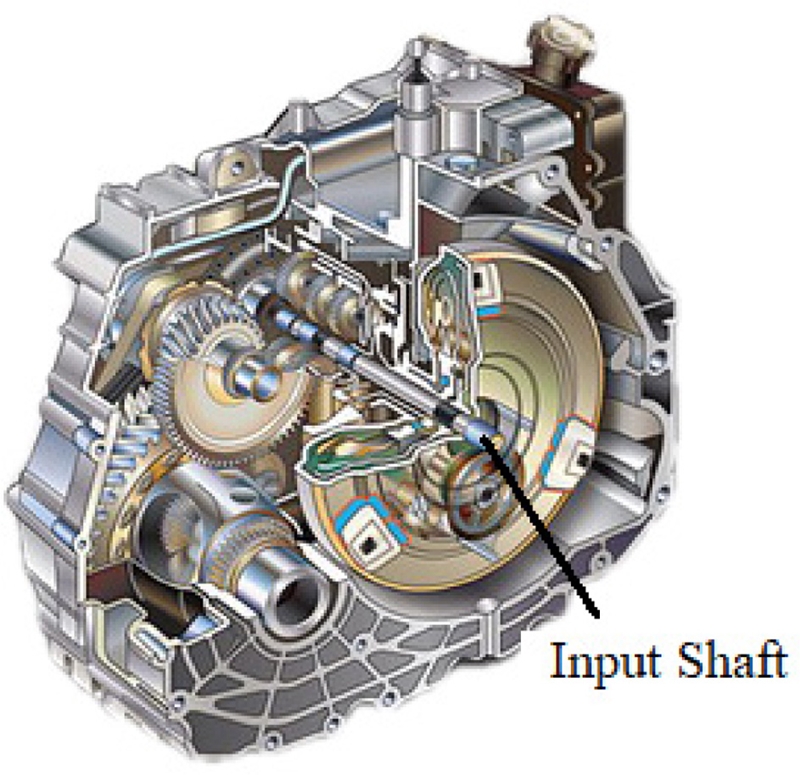
The automatic transmission (AT) is the power transmission system of the vehicle in which the input shaft is an important component in the transmission. Fig. 1 shows the schematic of a 6AT. The power output by the engine is transmitted to the input shaft through the torque converter, and then power is transmitted through gears on the input shaft. The gears on the transmission shaft can obtain a wide range of transmission ratios, to expand the range of variation of the rotational speed and torque of the driving wheels of the vehicle. As the speed of the vehicle is constantly changing, the input shaft is subject to cyclically changing torque. Under the action of alternating loads, the shaft is at risk of fatigue fracture.1 To avoid fatigue fracture of the transmission shaft and ensure the normal operation of the transmission during the life cycle, the reasonable design and life evaluation of the transmission shaft will become very important.
Many scholars and engineers have analyzed the fatigue life of key automotive parts, Wu Shengjun et al. used ANSYS software to analyze and study the fatigue strength of gearbox main shaft of the light vehicle,1 Li Xiaotian used different methods to analyze the difference of torsional fatigue life of transmission shaft parts under symmetrical alternating and unidirectional pulsating torque,2 Li Xinyu et al. studied the relationship between the crack propagation behavior of torsional fatigue fracture of gear steel and the relationship between the inclusion size and the torsional fatigue life through the torsional fatigue test,3 Zheng Yutian et al. compared the two methods for the study of shaft fatigue strength in the Chinese Mechanical Design Manual and the American National Standards (AGMA), and analyzed the adaptation of these two methods in practical applications,4 Han Guopeng et al. studied the relationship between the static torsional strength and the torsional fatigue life of the axle shaft, and used the torsional strength test data to predict the torsional fatigue life of the axle shaft.5 The above studies have only conducted finite element simulation analysis or fatigue test analysis, it is still very few to combine these two research together. Therefore, this paper studies the fatigue life of the transmission input shaft through a combination of simulation and experiment to determine the difference between simulation and actual results.
Fig. 2 shows the structure and size of the 6AT input shaft. This paper uses ANSYS software to perform fatigue life simulation analysis of the input bearing under double working torque.6 And the accuracy of the software simulation analysis was verified by torsional fatigue tests of the input shaft.7
2. Fatigue Damage Accumulation Theory
The failure of most engineering structures or machinery is caused by the accumulation of fatigue damage caused by a series of cyclic loading. Since fatigue damage cumulative theory is the norm cumulative fatigue damage in a lower amplitude fatigue loading and fatigue damage so that the prediction is very important in terms of fatigue life. The currently proposed fatigue cumulative damage theories include linear fatigue cumulative theory and nonlinear fatigue cumulative theory.8
2.1 Linear Fatigue Accumulation Theory
The linear fatigue damage theory refers to the fact that fatigue damage can be accumulated linearly under cyclic loading, and the stresses are independent of each other. The average damage caused by each cycle is 1/N, and the damage caused by n constant amplitude loads equal to its cycle ratio C = n/N. The damage D of the amplitude load is equal to the sum of its cycle ratios.
| (1) |
where; k: Stress level of variable amplitude load, ni: Number of cycles of the i-th load, Ni: Fatigue life under the i-th load.
When the damage has accumulated to the critical value Df, that is, when D = Df, fatigue failure occurs. Df is the critical damage sum, referred to as damage sum. When Df = 1, it is the typical Miner’s rule in linear cumulative damage.
2.2 Non-Linear Fatigue Accumulation Theory
Miner's rule is simple in form and easy to use and is widely used in engineering practice. However, Miner's rule does not consider issues such as the interaction between stresses, the order of loads, and the assumption that stress below the fatigue limit does not cause damage. Therefore, scholars have proposed the theory of non-linear fatigue cumulative damage, which the Carten-Dolan theory is more commonly used in engineering.
In Carten-Dolan theory, the damage caused by n cycles under the same amplitude load is:
| (2) |
Under variable amplitude load, the damage caused by n loads is:
| (3) |
In the formula, ni is the number of cycles of the i-th load; is the number of material damage cores, the greater the stress, the greater m; r is the damage development rate proportional to the stress level S; c and d are the material constants.
3. Finite Element Fatigue Analysis
The ANSYS fatigue analysis module takes the SAEM boiler and pressure vessel specifications as the basis for calculation and uses a simplified elastoplastic assumption and miner’s cumulative fatigue criterion to calculate the fatigue life of parts.9
3.1 Establishment of a Finite Element Model
The input shaft of the vehicle gearbox analyzed in this paper mainly transmits torque through splines, and there are multiple lubrication holes on the shaft. The three-dimensional model of the gearbox shaft is established by the three-dimensional modeling software Pro/E. Because the spline is not required to be analyzed, the spline is simplified to a cylindrical surface, the transitional part of the shaft and the oil hole are weak locations, which need to be accurately modeled. After modeling, the shaft model is imported into ANSYS which checks the model for errors.
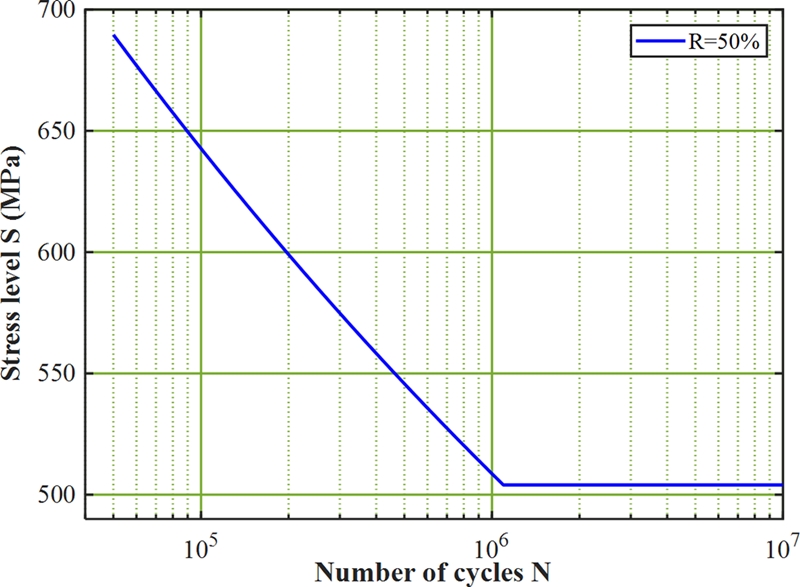
The material of the gearbox input shaft is 42CrMo. The accurate mechanical properties of the material are a necessary prerequisite for the finite element analysis. Table 1 lists the mechanical properties of the material. The fatigue analysis of the gearbox shaft also needs to define the S-N curve of the material,10 that is, the stress-life curve, as shown in Fig. 3 is the S-N curve of 42CrMo.
The transmission shaft is a slewing body with a more regular structure, so a hexahedron structure is selected for meshing. Because oil holes are distributed on the shaft, the transitional connection part of the shaft contains arcs with different curvatures. These parts are weak links when subjected to cyclic torsional stress. Therefore, the mesh should be refined for these parts. The meshed finite element model includes 91,965 body elements and 137,441 nodes. The meshing model is shown in Fig. 4.
3.2 Static Analysis
A fixed constraint is applied to the left spline of the transmission shaft, and a torque of 434 Nm is applied to the right spline, which is twice the usual working torque. After the static analysis, the equivalent stress distribution cloud diagram is obtained which is shown in Fig. 5. The maximum stress is located at the root of the left spline, which is consistent with the results of the static strength test. The static strength test is broken at the root of the left spline, and large stress is also distributed in the large oil hole in the middle. The maximum stress value is 569 MPa, which is less than the yield strength of the material, so no strength failure occurs.
3.3 Fatigue Analysis
The fatigue life of transmission parts (Such as Gears) is often simulated by Miner’s rule.11 By analyzing a large number of test data, it is found that the damage of input shaft is linear superposition. Therefore, performing fatigue analysis by ANSYS in this paper, the damage of the input shaft is calculated under cyclic load through Miner’s rule. First, the average stress through static calculation is obtained, and then the fatigue life of the analyzed object through interpolation calculation of the material life curve is calculated. If no material life curve is available, the average stress theory is used for approximate calculations, Goodman's equation is often used for approximate estimation.
Fatigue analysis is performed by applying about twice the working torque on the shaft, and loading is carried out with symmetrical cycle torque. The torque amplitude is 434 Nm and the average torque is zero. When the stress life analysis is performed in the software, the equivalent stress is selected for calculation.
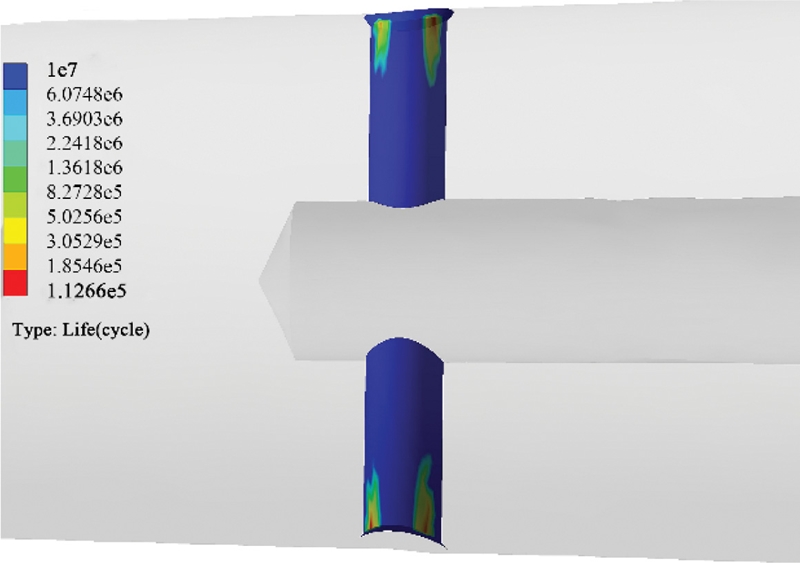
Since the shaft is mainly subjected to shear stress only under the action of torque, the calculation using shear stress can also obtain similar results. The fatigue failure of this shaft usually occurs at the large oil hole in the middle. The fatigue life analysis is performed for the large oil hole. The stress life nephogram of the oil hole is shown in Fig. 6. The minimum life is 112,660 times, which meets the minimum life.
3.4 Sensitivity of Fatigue Life to Load Amplitude
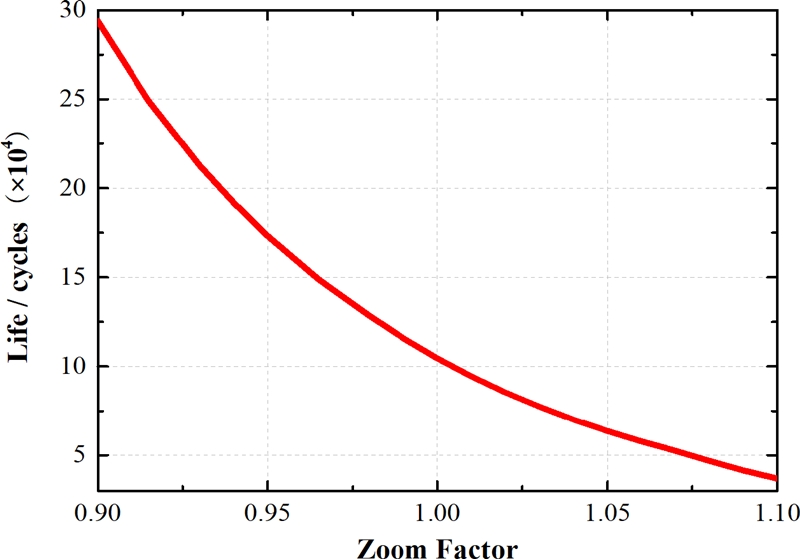
Various factors such as the torque fluctuation of the engine and different usage conditions will affect the magnitude of the torque received by the transmission input shaft. The torque of the above analysis is proportionally scaled between 0.9 and 1.1 times, and the fatigue life of the input shaft is calculated based on the scaled torque, and the sensitivity of the fatigue life to the torque amplitude is obtained12 as shown in Fig. 7. From the Fig. 7, the amplitude of torque has a greater impact on fatigue life. When the torque increases by 10%, the fatigue life decreases by 77.8%.
4. Torsional Fatigue Test
4.1 Sample Preparation
The test sample is an actual processed product, and the sample material is 42CrMo. The machining of the sample includes turning, grinding, drilling, spline splicing, and straightening. The heat treatment is subjected to intermediate frequency quenching and tempering.13 After the processing is completed, it can be used as a test sample for torsional fatigue only after passing the magnetic particle inspection and the roughness at the oil hole ≤ Ra0.32.
4.2 Test Equipment
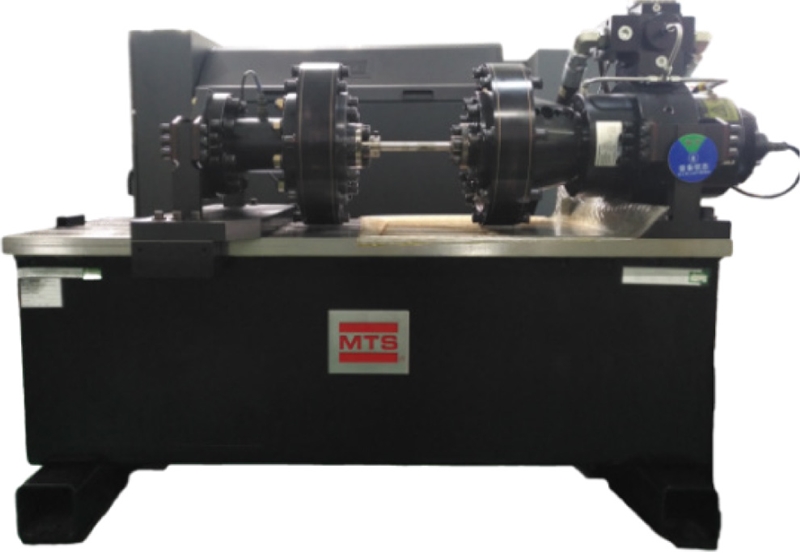
The torsional fatigue test is performed according to the standard ISO 1352: 2011 Metallic materials-Torque-controlled fatigue testing.14 The testing machine shall have the ability to load torque clockwise/counterclockwise. The accuracy of the torque sensor shall not be greater than 1%. When the sample breaks, the testing machine shall be able to stop automatically. The equipment used in this test is a torsional fatigue tester produced by MTS, as shown in Fig. 8. It is mainly composed of oil, twist cylinder, servo valve, torque sensor, angle sensor, controller and test software. The equipment is powered by hydraulic oil, and the torque control is stable, which can meet the requirements of the torque fatigue test.
4.3 Test Plan
The test sample is a transmission input shaft that is qualified in the same batch and is processed according to the actual load spectrum of the vehicle to obtain the torque T of the input shaft under common working conditions. and is loaded at twice the torque T.
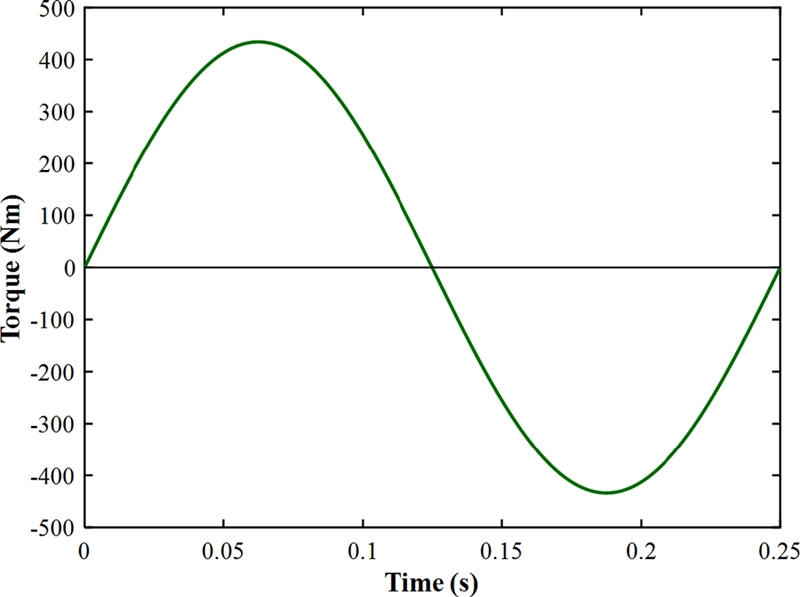
The loading waveform is a sine wave, as shown in Fig. 9, where the load ratio is -1, the amplitude is 434 Nm, and the test frequency is 4 Hz. During the test, the loading end of the sample swings cyclically within a certain angle [φ1, φ2]. When the angle is less than φ1 - 1 or greater than φ2 + 1, the sample is considered to be broken, and the equipment automatically stops, and the number of cycles is recorded.
4.4 Test Results and Discussion
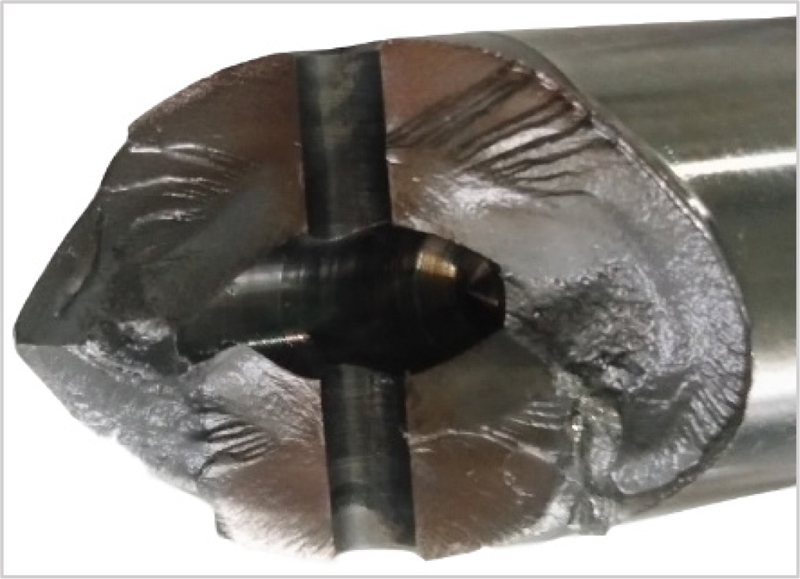
This test mainly obtains the fatigue life at a specific torque amplitude. The test carried out a torsional fatigue test on 6 input shafts of a certain gearbox. The test results are shown in Table 2. The test data are consistent and all the test data are valid. All the samples fractured at the large oil hole in the middle of the shaft, and the fracture direction was 45 degrees from the axis, as shown in Fig. 10. According to the fracture analysis, it can be seen that the fracture is divided into two obvious parts. As shown in Fig. 11, the fracture near the oil hole is smoother, the area far from the oil hole is rough and there are obvious tear marks. The two parts are crack growth zone and fault zone.
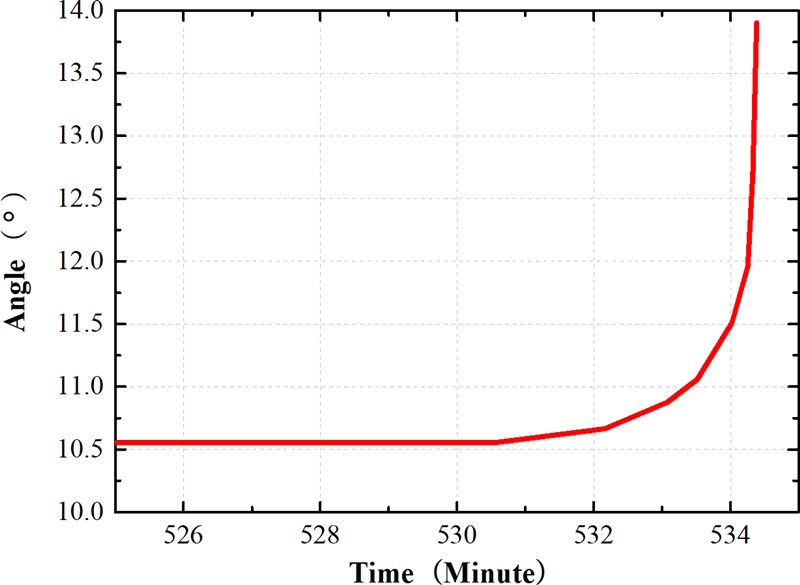
Fatigue failure usually goes through three stages, which are divided into crack initiation, crack propagation and fracture. For components made of high-strength materials, the fatigue life is mainly concentrated in the crack initiation stage.15,16 A fracture will occur within a period of time. The data recorded 10 minutes before the fracture of the axial fatigue test were analyzed. As shown in Fig. 12, the abscissa is time and the ordinate is the amplitude of the torsional angle. It can be seen that the angle amplitude starts to increase at 530 minutes and at 534 minutes The shaft fractured, and the crack propagation time to complete fracture was only 4 minutes, which only accounted for 0.8% of the fatigue life.
5. Conclusions
The fatigue life simulated by the fatigue module of ANSYS is 112,660 times, and the maximum difference between the simulation results and the fatigue test results is 14%, and the average difference is 9.1%, which indicates that the fatigue life calculated by the software can reflect the fatigue life of parts to a certain extent. The combination of a small number of tests and simulations to verify fatigue life can reduce the number of fatigue tests, thereby reducing test costs and shortening the product development cycle.
The 6AT input shaft fractured at the large oil hole. The crack firstly appeared on the outer surface near the oil hole. The fracture showed obvious crack propagation and fracture zones. The torsional fatigue life of the shaft was mainly concentrated in the crack initiation stage and the crack propagation zone was only 0.8% of the entire life.
Acknowledgments
This study was supported by the grant No. NRF-2019R1A5A8083201 from the Regional Leading Research Center of NRF and MOCIE and many thanks from the support of Science Technology Department of Zhejiang Province.
References
- Wu, S. J. and Xu, Y., “The Analysis of Fatigue for Light Vehicle Gearbox First Shaft,” Journal of Machinery Design & Manufacture, Vol. 5, pp. 111-112, 2008.
- Li, X., “Difference of CV Driveshaft Fatigue Life under Symmetrical and Pulsating Dynamic Torque,” Journal of Research and Development, Vol. 5, pp. 53-54, 2013.
- Li, X., Yang, M., Zhou, X., and Guo, J., “Torsion Fatigue Characteristics and Crack Propagation Behaviour of 15Cr14Co12Mo5Ni2 Gear Steel,” Chinese Society for Metals, Vol. 52, No. 9, pp. 84-91, 2017.
- Zheng, Y. and Liu, S., “Comparison and Analysis of Two Methods of Axial Fatigue Strength Calculation,” Journal of Mechanical Strength, Vol. 39, No. 1, pp. 188-193, 2017.
- Han, G., Zheng, D., and Feng, Z., “Determining the Life of Torsional Fatigue Test by the Results of the Semi-Axial Static Torsion Test,” Journal of Automobile Applied Technology, Vol. 7, pp. 28-29, 2017.
- Zhang, L., Tang, L. Q., and Fu, D., “An Evaluation Method of Fatigue Life under Multi-Axial Loading based on Damage Accumulation Theory,” Journal of Harbin Institute of Technology, Vol. 41, No. 4, pp. 123-125, 2009.
- Wu, Z., Hu, X., and Song, Y., “Estimation Method for Fatigue Life under Multi-Axial Random Loading,” Journal of Aerospace Power, Vol. 29, No. 6, pp. 1403-1409, 2014.
- Xia, T., Yao, W., and Ji, Y., “State-of-the-Art of the Accumulative Damage Rules under Multiaxial Variable Fatigue Loadings for Metal Materials,” Journal of Mechanical Strength, Vol. 36, No. 4, pp. 605-613, 2014.
- Zhu, M., Qian, Y., and Zhou, P., “Cumulative Fatigue Damage Calculations based on ANSYS,” Journal of Chemical Equipment Technology, Vol. 34, No. 2, pp. 24-26, 2013.
- Fang, X., Wu, M., and Wu, G., “Mechanical Engineering Material Performance Data Book,” Machinery Industry Press, pp. 232-233, Beijing, 1995.
- Zhang, W., Sheng, Y., Yu, L., and Wu, G., “Contact Stress Analysis and Fatigue Life Calculation on Gears of Gearbox in Fuel Cell Car,” Journal of Computer Aided Engineering, Vol. 16, No. 4, pp. 36-39, 2007.
- Zhang, Y. S., Wang, G. Q., Wang, J. X., Hou, X. T., Zhang, E. P., et al., “Load Spectrum Compiling and Fatigue Life Prediction of Wheel Loader Axle Shaft,” Journal of Jilin University (Engineering and Technology Edition), Vol. 41, No. 6, pp. 1646-1651, 2011.
- Yang, B., “Gearbox Input Shaft Heat Treatment Process,” Journal Metal Working, Vol. 11, p. 52 2011.
- ISO 1352: 2011, “Metallic Materials-Torque-Controlled Fatigue Testing,” 2011.
- Tan, W., Xu, X., and Zhang, W., “Prediction of Crack Initiation Life of Torsional Component,” Journal Heavy Machinery, Vol. 4, pp. 52-54, 2007.
- Cheng, C., “Fatigue and Fracture,” Huazhong University of Science and Technology Press, pp. 2-6, Wuhan, 2018.

Master, Engineer in Zhejiang Shuanghuan Driveline Co., Ltd. His research interest is Mechanical System Design & Testing.
E-mail: jianhualv@gearsnet.com

Bachelor, Engineer in Zhejiang Shuanghuan Driveline Co., Ltd. His research interest is Machining Process and Heat Treatment.
E-mail: xingzhong@gearsnet.com

Bachelor, Engineer in Zhejiang Shuanghuan Driveline Co., Ltd. His research interest is Mechanical Properties of Materials.
E-mail: zhourui1@gearsnet.com

Master Candidate in the Department of Mechanical Engineering at Gyeongsang National University. His primary research interest is Mechanical System Design.
E-mail: musicboy163@naver.com

Ph.D., Senior Engineer in Zhejiang Shuanghuan Driveline Co., Ltd. His research interest is Mechanical System Design & Testing.
E-mail: zhangqi@gearsnet.com

PhD, Professor in the Department of Mechanical Engineering at Gyeongsang National University. His research interest is Gear, Gearbox, and Mechanical System Design.
E-mail: sklyu@gnu.ac.kr

