The Investigation of the Sensitivity and Direction of the Maximum Surface Error in Peripheral Milling
Copyright © The Korean Society for Precision Engineering
This is an Open-Access article distributed under the terms of the Creative Commons Attribution Non-Commercial License (http://creativecommons.org/licenses/by-nc/3.0) which permits unrestricted non-commercial use, distribution, and reproduction in any medium, provided the original work is properly cited.
Abstract
In this paper, we developed a virtual model predicting the tool deflection induced surface error and investigated the sensitivity and direction of the maximum surface error in various tool geometries and cutting conditions. The characteristics of the error were classified into the axial sensitive, radial sensitive, robust, overcut, and overlap zones according to the depth of cut. The maximum surface error was sensitive to the uncertainty of the radial depth of cut and robust to axial depth variation at the finishing process using a small radial depth of cut. The radial sensitivity was reduced by a large helix angle of tool. The sensitivity was decreased by increasing the depth of cut and it arrived at zero in the robust zone where the maximum surface error was not changed by both radial and axial depths of cut. An overcut occurred if axial and radial depths were deep and the overcut zone was enlarged by the helix angle and the number of teeth.
Keywords:
Peripheral milling, Down milling, Up milling, Cutting force, Tool deflection, Surface error, Sensitivity, Robust, Undercut, Overcut1. Introduction
The machining tolerances of the precision molds and the aerospace parts are becoming tighter to produce high quality automobiles and aircrafts. The vertical surfaces of them parallel to the spindle axis are machined by the side teeth of an end mill which is deflected by a cutting force in process. The static deflection of the end mill produces the surface error of which the maximum value should be smaller than the design tolerance of them. So, the maximum surface error satisfying the design tolerance should be predicted at the cutting condition and tool geometry selection step in virtual space. In draft, a unilateral tolerance is used when a target dimension is given along with a tolerance that allows variation to occur in only one direction. In expensive aircraft part or precision mold machining, the overcut is un-recoverable defect to be predicted and avoided. So, the direction of the surface error named undercut and overcut should be predicted in machining process planning step. The virtual model includes error caused from the resolution and the discretization algorithm. For example, the z-map model is precise to vertical direction but includes large error same to the grid interval to the other directions. The real workpiece fabricated by bulk forming or rough machining process includes geometrical errors which could be transferred to the finishing surface error. So, the sensitivity of the maximum surface error to the uncertainty of the workpiece geometry should be researched.
The cutting force models that adoptable to tool deflection and surface error prediction were developed by many researchers.1-11 The instantaneous cutting force of endmill is calculated by adding element cutting forces along the tooth engaged in workpiece. Kline, Montgomery, and Li developed geometric cutter-workpiece models for end milling.1-3 The element cutting forces of the finite teeth engaged in workpiece are calculated by multiplying chip cross section with cutting pressure coefficient extracted empirically.4-8 Koenigsberger4 introduced the cutting force coefficients to predict the cutting forces under the assumption that the tangential component of cutting forces is proportional to the un-deformed chip area. Budak8 proposed an orthogonal cutting geometry-based method to predict cutting pressure coefficients. Shin and Waters9 introduced a concept of instantaneous pressure coefficients which was possible to extract a range of coefficients from a single sweep of the cutter using effective chip thickness. Ko and Cho10 demonstrated, with a ball endmill, that instantaneous pressure coefficient from one cutting geometry can be applied to different geometries. Li and Shin11 used the model to simulate chatter in time domain. Among the different cutting force models, this research selected the model of Shin which can be applied to various geometries.
The shape of the surface error was calculated by the cutting force and tool deflection model.12-16 Kline13 developed an end milling model to predict static forces and predicted surface errors by considering static deflection model of cutting tool and workpiece. Sutherland14 improved the model by considering a cutting force feedback using a static deflection model. Desai15 classified the type of the surface error in peripheral milling based on the radial depth of cut and axial depth of cut. Chiang16 analyzed the shape and kink position of a surface error profile by the axial and radial immersion angle and flute space angle in down milling and up milling. These studies showed that heavy cutting conditions of large cutting depth result in a kinked surface profile and did not consider that the maximum surface error satisfying the design tolerance should be predicted at the cutting condition and tool geometry selection step.
There were feed per tooth optimization and successive down and up milling researches to adjust the required tolerance of aerospace and mold industry.17-20 Budak17 predicted maximum surface error for different radial width of cut and feed per tooth in up milling and minimize the ratio of maximum dimensional error to the material removal per revolution. He18 predicted cutting forces and dimensional surface errors due to deflections of the tool and plate structures, and scheduled feeds along the tool path to keep the surface errors within the specified limit. Ryu investigated the different surface errors in down milling and up milling of die and mold and reduced the surface error using successive down and up milling process.19,20 Most of these researches used large axial depth of cut conditions and does not considered the sensitiveness of the maximum surface error to the workpiece error.
The mirror method that moves tool location points to revers opposite direction of the error iteratively was researched to shift the surface error near to the design position.21-24 Dépinc21 predicted and compensated milled surface for various radial depth of cut using a contact point method, cutting force model, and cantilever beam model. Rao22 adopted deflection model of Kline to predict the average value of feature error in curved tool paths. These researches selected half or quarter emersion down milling used in heavy rouging process in which the precision is not important compared to material removal rate. Habibi23 and Soori24 compensated tool deflection and the geometrical error of machine tool together by tool path modification. But the machining process was limited to rectangular groove. The FEM analysis was adopted to cover the deformation of thin pate and complex 3D aerospace parts.25-28 Wan25,26 predicted maximum surface error for different radial width of cut and feed per tooth in down milling of thin-walled workpiece and controlled the surface error by feed per tooth and tool path point simultaneously. Li27,28 compensated the deformation induced surface error via regulate tool path point and tool orientation in the five-axis flank milling of the flexible blades. Most of these researches have neglected the geometric uncertainty of the virtual model caused from the resolution and the discretization algorithm. The surface of the real workpiece fabricated by bulk forming or rough machining process is different to the digital model too. So, the sensitivity of the maximum surface error to the uncertainty of the workpiece geometry should be researched.
This paper researches the sensitivity and the direction of the maximum surface error in end milling. Especially, the depth of cut is classified to sensitive, robust and overcut zone by the sensitiveness and direction of the maximum surface error in up milling. The surface error prediction model is programed with C++ language based on the physical models of previous researches which is verified. The maximum surface errors are calculated in various tool geometries and cutting conditions in virtual space. The sensitivity of it at the finishing process with small depth of cut, the robustness of it at the medium depth of cut, and the over cut at the large depth of cut in up milling are investigated.
2. Cutting Force and Surface Error Prediction Model
2.1 Cutting Force Model
The cutting force models that adoptable to tool deflection and surface error prediction were developed by many researchers.1-11 Among the different cutting force models, this research selected the model of Shin9-11 which can be applied to various geometries. The cutting force is simulated with friction cutting pressure, normal cutting pressure and chip flow angle in of peripheral milling based on the cutting force model of the previous research.
The cutting edge of the flat endmill is divided into small elements with the width w along the axial distance of the tool. The normal component fn and friction component ff of the element cutting forces are calculated by the instantaneous cutting pressure coefficients kn, kf, the uncut chip thickness tc, and the width.
| (1) |
The static chip thickness is calculated by the feed per tooth ft and the tool rotation angle θ. The chip thickness considers the runout length ρ, tool runout angle λ, and lag angle of cutter ψ.
| (2) |
The element forces are transformed into the component in the tangential, radial and axial coordinate system, represented by ft, fr, and fa, respectively with the radial rake angle ηr, the helix angle ηh and chip flow angle ηc.
| (3) |
They are transformed into the force components fx, fy and fz in the global Cartesian coordinate system and they are added into the resultant cutting forces.
| (4) |
2.2 Cutting Force Model Validation
The cutting force model programmed by C++ in this research was validated by comparing the simulation results to the experiment in the previous research with tool diameter 19.05 mm, chip flow angle 26.4o, the cutting pressure coefficient (Unit psi), and aluminum 7075-T6 workpiece.11
| (5) |
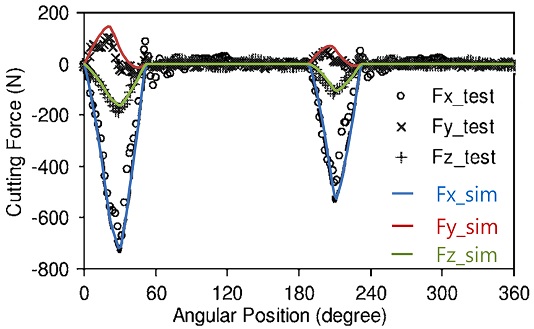
Fig. 1 shows the cutting force with 1.27 mm radial depth of cut, 6.1 mm axial depth of cut, 0.254 mm feed per tooth, and 0.015 mm runout. The simulated cutting forces in solid lines are good agreement with the tested results of the reference in dots.
2.3 Surface Error Prediction
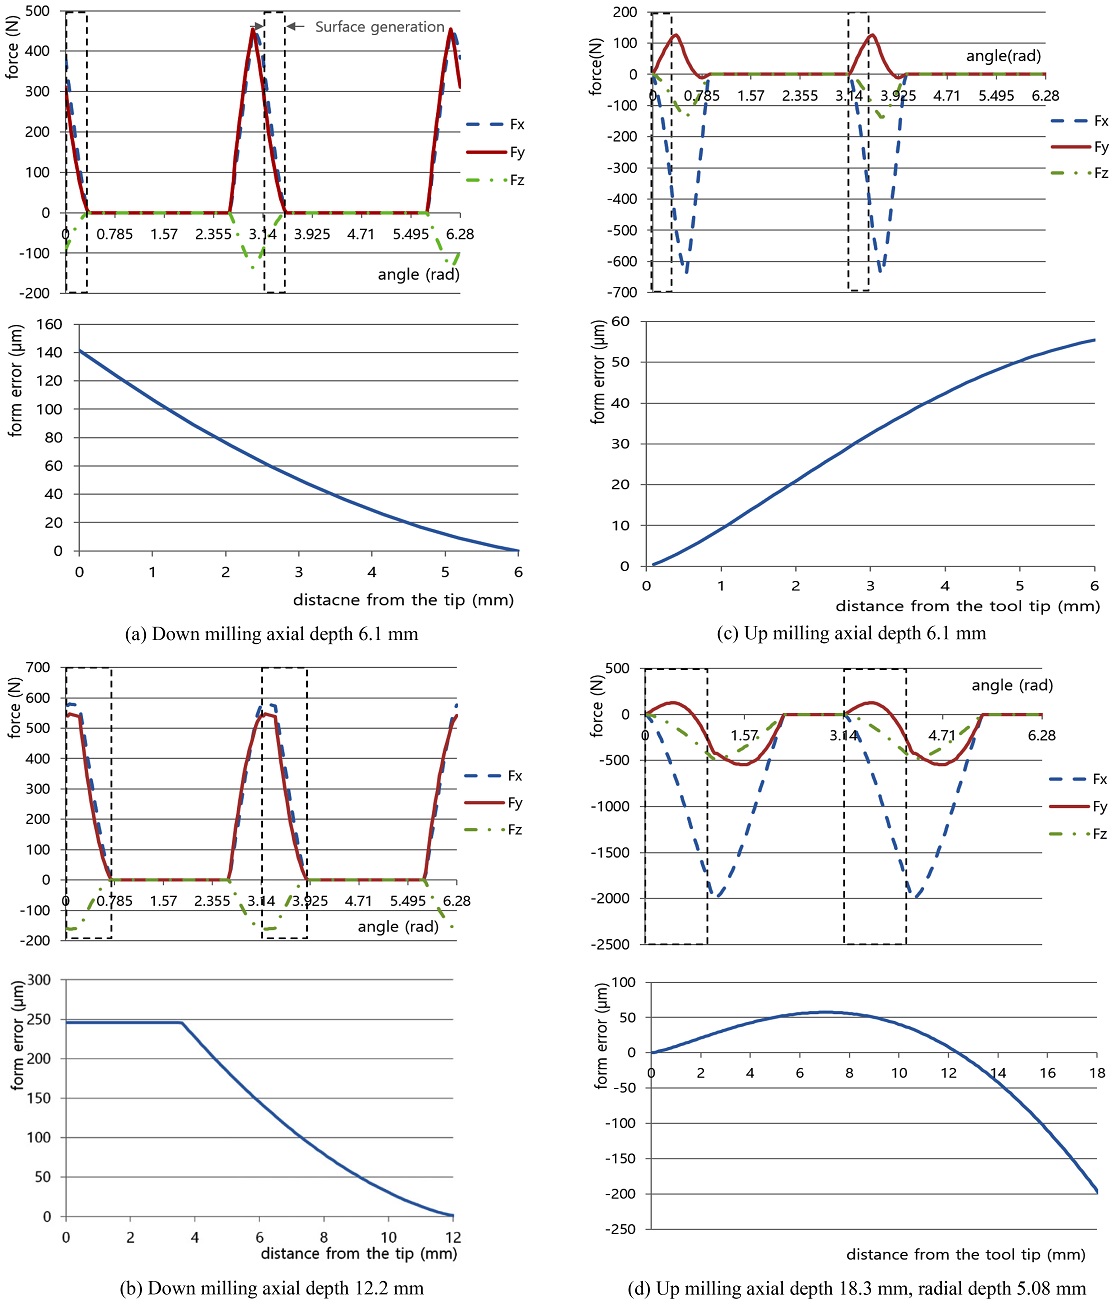
The surface error is predicted by the tool deflection calculated according to the tool rotational angle and the axial distance from the tool tip.12-20 The tool deflection is calculated by dividing the cutting force with the stiffness of it 2.2 MN/m which was measured in the previous research.11 The feed directional deflection and the cusp height were neglected and only the surface normal directional displacement was used to predict surface error. The patterns of the simulated surface error in Fig. 2 were compared to that of the previous researches. The tool rotation angle and the cutting force when the cutting edge generates the surface are shown inside the dot line window. The pattern of the Y directional cutting force in the window is same to the shape of the surface error graph.
In down milling with small axial depth of cut, the surface error is the largest at the tool tip and reduced to zero at the top surface because the cutting force is large when the bottom cutting edge starts to generate the surface and decreased to zero with decreasing engaged section as shown in Fig. 2(a). The shape of the surface error is good agreement to the experimental results of Desai15 and the simulation of Ryu.20 In large axial depth of cut condition, the maximum surface error keeps a constant from the tool tip to some distance as shown Fig. 2(b) because the maximum cutting forces are constant under the conditions of small radial depth of cut and large axial depth of cut. The shape of the surface error is good agreement to the experiment of Ryu.19
In up milling, the surface error is zero at the tool tip because all the other edges are not cutting when the bottom cutting edge starts cutting with zero chip thickness. The surface error is increase with the distance from the tool tip and becomes the maximum at the top surface of workpiece as shown in Fig. 2(c) because the cutting force increase with tool rotation angle and the axial distance from the tool tip. The pattern of the surface error is good agreement to the experiment of Chiang.16 The up milling in heavy cutting condition with 18.3 mm axial depth of cut and 5.08 mm radial depth of cut produces overcut as shown in Fig. 2(d). The Y directional cutting force is increased from beginning of tool rotation until the peak angle θp and decreased as tool rotate more. The peak angle was 0.44 rad in the simulation of this research. It is changed to negative Y direction at the critical rotation angle θc which was 0.74 rad in this simulation. The surface error is also small undercut with the distance from the tool tip and changed to large overcut after 12.4 mm like the cutting force pattern.
This chapter showed the surface error in heavy cutting conditions and the patterns which were same to the research of Desai15 and Chiang16 who classified the type of the surface error in peripheral milling based on the radial depth of cut and axial depth of cut.
3. Maximum Surface Error
3.1 Experiment in Virtual Space
The maximum cutting error caused by tool deflection should be smaller than the designed tolerance when the tool geometry and cutting condition are decided in peripheral milling. Chapter 2 introduced static cutting forces and surface error prediction software developed with C++ language based on the mathematical model of previous researches. In this chapter, the maximum surface error was predicted in various tool geometry and cutting condition in virtual space.
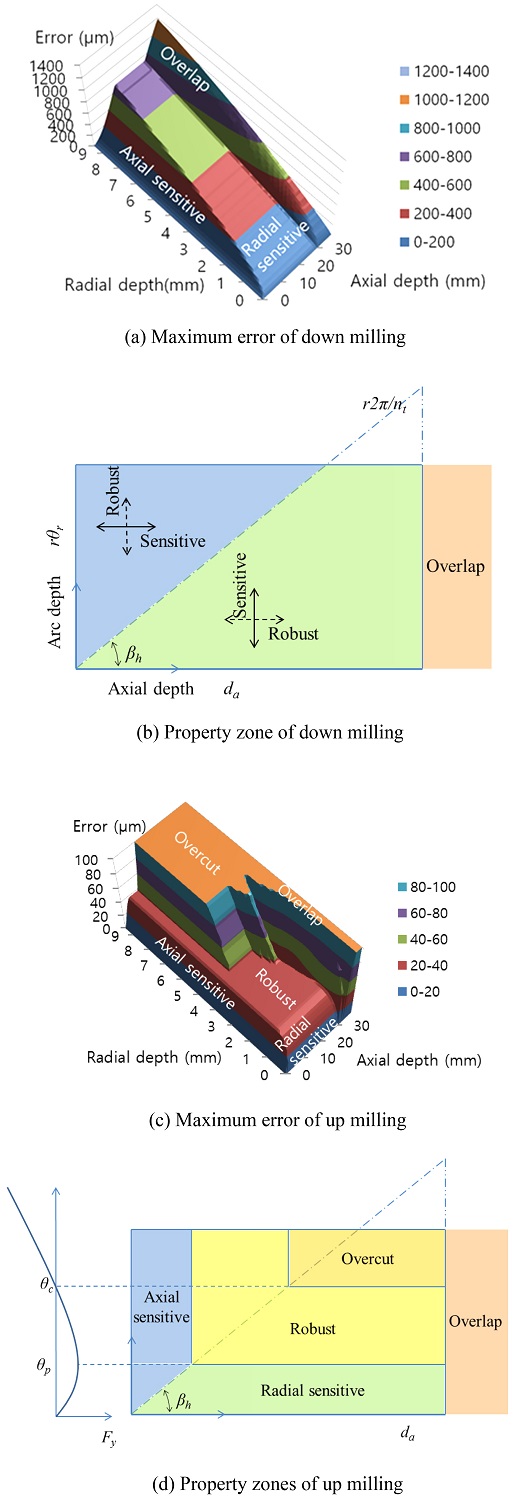
The milling tool and material are the same as in the previous chapter, the number of teeth was changed to 2 and 4 teeth and the helix angle was changed from 15 to 60 degrees in 15 degrees intervals. The radial depth of cut was changed from 0.1 to 9 mm, which was slightly smaller than the tool radius, and the axial depth of cut was varied from 1 to 30 mm. Total 53 thousand experiments that were impossible in the real space could be simulated with developed software in virtual space. Among them, the maximum error of the flat end mill with two teeth and 45 degrees helix angle is shown in Fig. 3.
This paper focused on the maximum surface error that should be predicted at the machining process planning step to satisfy the design tolerance. In expensive aircraft part or precision mold machining, the overcut is un-recoverable defect to be predicted and avoided. So, the direction of the surface error named undercut and overcut should be predicted in machining process planning step. The virtual model includes error caused from the resolution and the discretization algorithm. The real workpiece fabricated by bulk forming or rough machining process includes geometrical errors which could be transferred to the finishing surface error. So, the sensitivity of the maximum surface error to the uncertainty of the workpiece geometry should be researched.
3.2 Five Property Zones
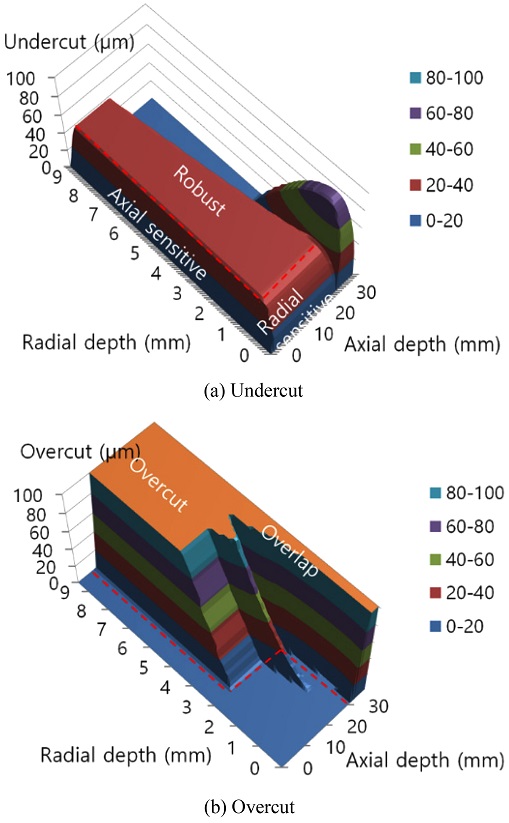
This paper classifies the axial depth of cut and radial engaged length based on the sensitiveness and the direction of the maximum surface error. The separated five zones are axial sensitive, radial sensitive, robust, overcut, and overlap zone as shown in Fig. 3.
The Y directional cutting force that produces surface error starts from zero and increases as radial engagement increases. Both radial depth of cut and axial depth of cut increased the maximum error and the region is named sensitive zone because the surface error is changed by the depth of cut conditions. In down milling, the graph is divided to the axial sensitive zone in left surface where the axial depth of cut is small and the radial sensitive zone in right surface where the radial depth of cut is small as shown in Fig. 3(a). The maximum error is sensitive to one condition and robust to the other conditions and the axial sensitive and radial sensitive zone are divided by the helix angle of cutter as shown in Fig. 3(b). The sensitive direction of the maximum surface error to the radial depth or the axial depth of cut is changed by the ratio of the tool radius r, the radial engaged angle θr, the axial depth of cut da and the helix angle β in Eq. (6). If the left term is small maximum surface error is sensitive to radial depth and in the other case it is sensitive to axial depth of cut.
| (6) |
If two teeth are engaged into the workpiece at the same time, double cutting forces enlarge machining error. It happens when the axial depth of cut and the helix angle of tool are larger than the arc length between teeth as Eq. (7), where nt is the number of teeth.
| (7) |
In the up milling, the maximum surface error does not increase by the depth of cut after the Y directional cutting force arrives to maximum value at the peak angle. The region in which the maximum error does not change even when the depth of cut is changed is named a robust zone as shown in Fig. 3(d). In the robust zone, the radial engagement angle is greater than the peak angle θp, and the product of the axial depth of cut and the tangent helix angle is greater than the product of the radius and the peak angle as Eq. (8).
| (8) |
After the robust zone in the up milling, the Y component of the cutting force decreases and crosses zero at the critical angle θc. The overcut zone is after the critical angle where the direction of cutting force and surface error is negative. The robust zone and overcut zone exist in up milling but is not in down milling because two zones are caused by the maximum and negative value of Y directional cutting forces.
3.3 Sensitive and Overlap Zone in Down Milling
The maximum value of the surface error is the tolerance given in draft and the finishing endmill and cutting condition is decided to accept the value. In this paper the tool geometry and the depth of cut were changed and simulated the maximum surface error. The maximum surface error of down milling in various tool geometry and the depths of cut is shown in Fig. 4. The area is classified to axial sensitive, radial sensitive, and overlap zone. The robust and overcut zone does not exist because the Y directional component of the cutting force increases continuously in down milling. The maximum surface error of finished surface is changed by the axial depth of cut or the radial depth of cut in end milling process as shown in Figs. 4(a) and 4(b). The graph is divided to the axial sensitive zone in left surface where the axial depth of cut is small and the radial sensitive zone in right surface where the radial depth of cut is small. The radial depth of cut does not increase cutting error in axial sensitive zone where the axial depth of cut is small compared to the radial depth of cut.
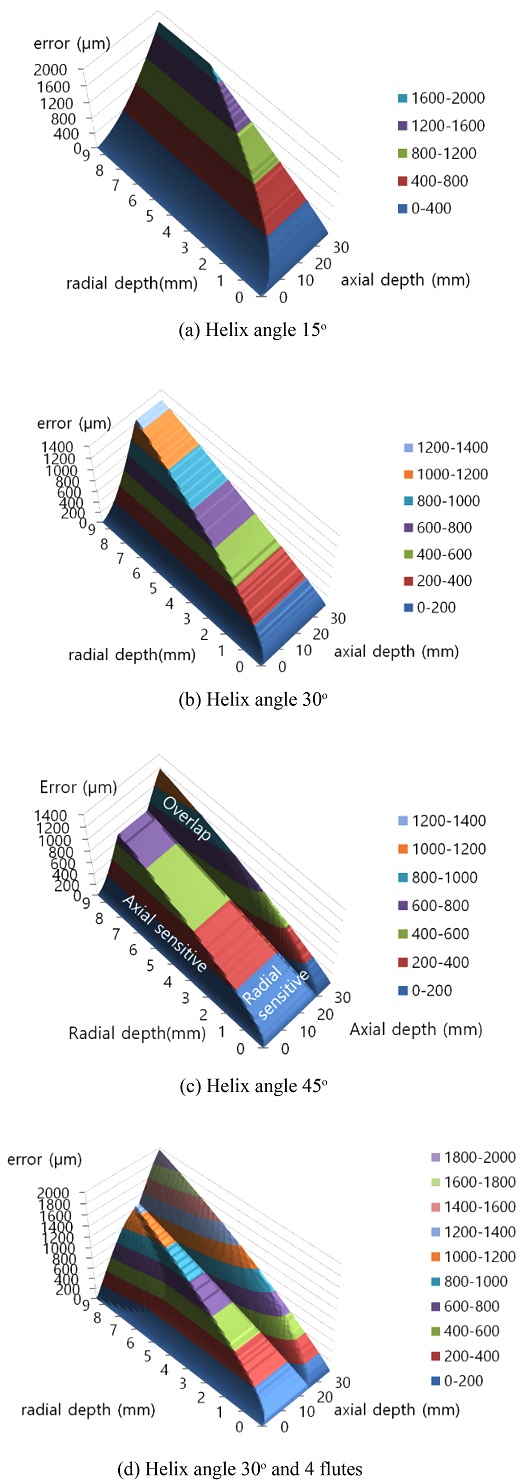
But the large radial depth that makes two flutes cut together increases the error in case of the fore teeth endmill as shown in Fig. 4(d). The axial depth of cut does not increase cutting error until single tooth engaged in workpiece in radial sensitive zone where the radial depth of cut is small compared to the axial depth of cut. In the overlap zone where the axial depth is over the critical depth the error is increased double because two flutes cut together at the same time. The large helix angle in Figs. 4(c) and the increased number of teeth in 4(d) decreases the critical axial depth that two flutes are engaged in cutting at the same time. So, the productivity of the peripheral finish milling defined by the machining area over the required time can be maximized by increasing the axial depth of cut until it does not over the critical depth where two teeth engaged in workpiece.
3.4 Robust and Overcut Zone in Up Milling
The up milling remains smaller surface error compared to down milling but the over cut happens at large axial and radial depth of cut condition. This paper simulates the undercut and overcut of the up milling and discusses the effect of the tool geometry and cutting condition.
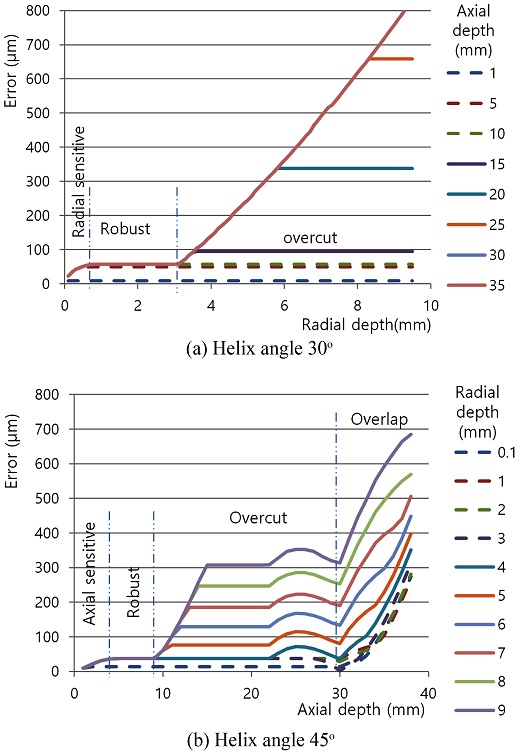
The radial depth and the maximum surface error graph when the helix angle of tool is 30 is classified to axial sensitive, robust and overlap zones based on the depth and slope of the graph in Fig. 5(a). The absolute maximum error is almost constant in robust zone until radial depth of cut is 3.2 mm, which is same to the experiment of Budak,17 and increase again after this value considerably in overcut zone. The robust zone is undercut where the axial depth of cut is smaller than 14 mm or the radial depth of cut is smaller than 3.2 mm. A large overcut happens if both radial and axial depth of cut is bigger than these critical values.
The axial depth and the maximum surface error graph when the helix angle is 45 is shown in Fig. 5(b). The robust zone is undercut where the axial depth of cut is smaller than 9 mm. The helix angle of tool decreases the axial depth of cut required to get undercut surface in up milling. The large overcut happens if axial depth of cut is bigger than 30 mm in which case two teeth are engaged in cutting at the same time. In the other conditions undercut or overcut happens by the combination of axial and radial depth of cut.
The undercut and overcut are drawn separately in Fig. 6 when the helix angle of the endmill is 45. The axial sensitive, radial sensitive and robust zones are under cut. The maximum surface error is sensitive to the axial depth of cut but it is not affected by radial depth of cut in the axial sensitive zone where the axial depth of cut is smaller than 4 mm. In the radial sensitive zone where the radial depth of cut is smaller than 1 mm the maximum surface error is increased by radial depth of cut but not changed by axial depth of cut until axial depth is smaller than overlap zone. If depth of cut is increased a little more there are a robust zone where the maximum surface error is not increased by the depth of cut. The maximum undercut in the rigid zone is 38 μm which is affected by the helix angle of tool.
The large overcut happens in the overcut and overlap zones where the cutting depth is large shown in Fig. 6(b). The overcut data larger than 100 μm which is not interesting in finish milling process is cut off in the overcut graph. The robust undercut is changed to overcut zone if the axial depth of cut is bigger than 9 mm and the radial depth of cut is bigger than 3.2 mm. The overcut happens at the overlap zone where the axial depth of cut is larger than 30 mm. The axial depth of cut condition of overlap zone is decreased when helix angle is increases.
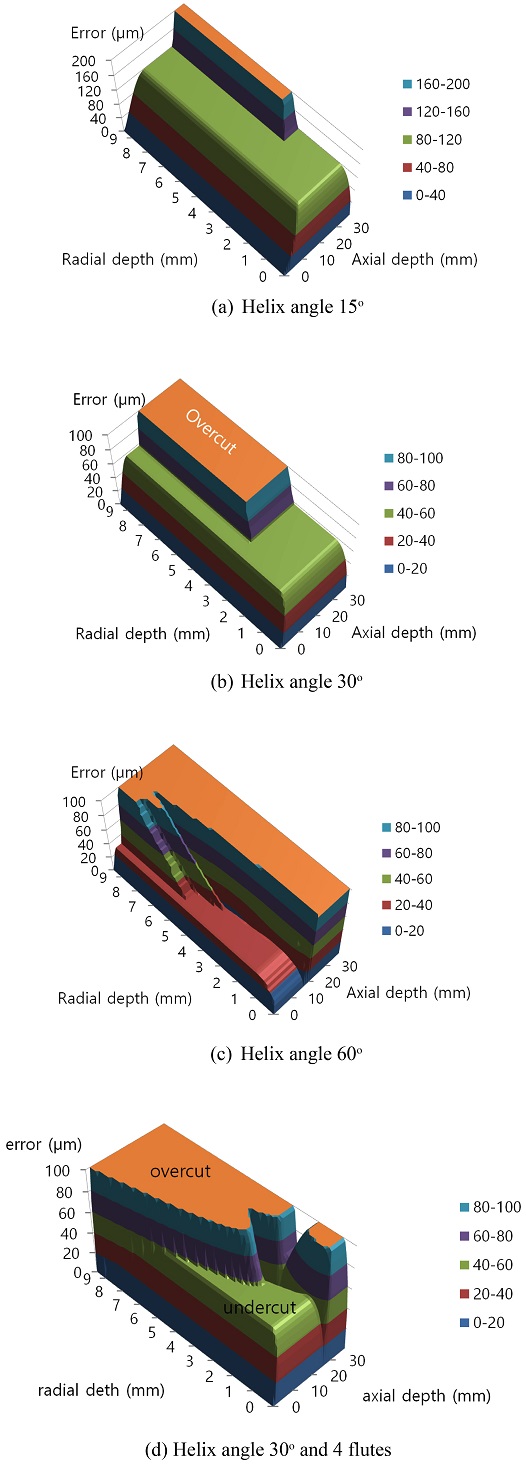
To evaluate the relation of the tool geometry with the maximum surface error, the helix angle of the endmill was changed from 15 to 60 and the number of teeth was changed from two to four in Fig. 7. The overcut region in overcut zone and overlap zone are enlarged along the axial depth of cut axis as the helix angle of the tool increases in Figs. 7(a)-7(c). It is because the radial engaged angle where the Y directional cutting force decrease to negative value happens at smaller axial depth of cut if helix angle is increased. The axial depth of the overlap zone is decreased when the helix angle is increased. The number of flutes decreased the radial depth of cut and axial depth of cut condition of the overcut zone shown in Fig. 7(d). It does not change maximum undercut in robust zone and the maximum surface error in sensitivity zone where the radial and axial depth of cut is small.
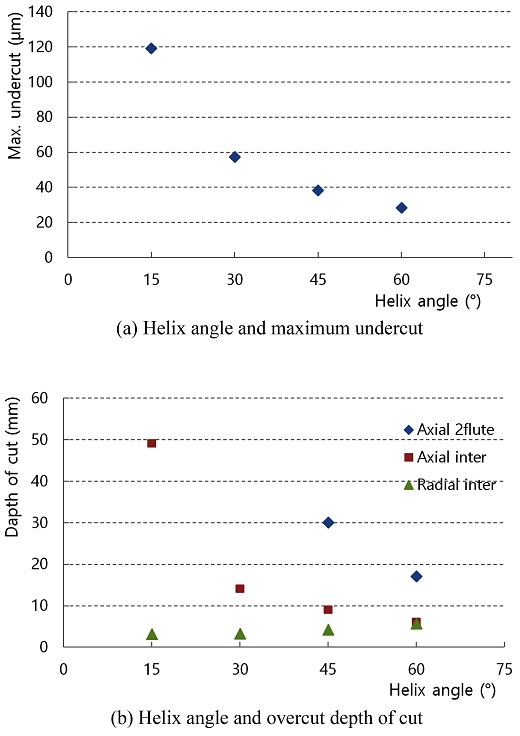
The maximum undercut in the rigid zone and the axial depth condition starting overcut is decreased by the helix angle of the tool as shown in Fig. 8. The tool with large helix angle is better to reduce the undercut in robust zone as shown in Fig. 8(a). Reversely, the tool with smaller helix angle is better to avoid overcut as shown in Fig. 8(b).
3.5 Sensitivity to Uncertainty
The 3D workpiece model in virtual machining includes error and the real stock prepared by forming or rough machining process is rough. Because the error of stock could be transferred to the final surface through the finishing process the sensitivity of the maximum surface error to the uncertainty of the radial depth of cut and axial depth of cut is researched in this paper. The partial derivative of the maximum error along the axial depth of cut is defined as the axial sensitivity. The radial sensitivity of the maximum error is the partial derivative of the graph along the radial depth of cut. The uncertainty of the radial depth of cut and the axial depth of cut is transferred to the uncertainty of the maximum error.
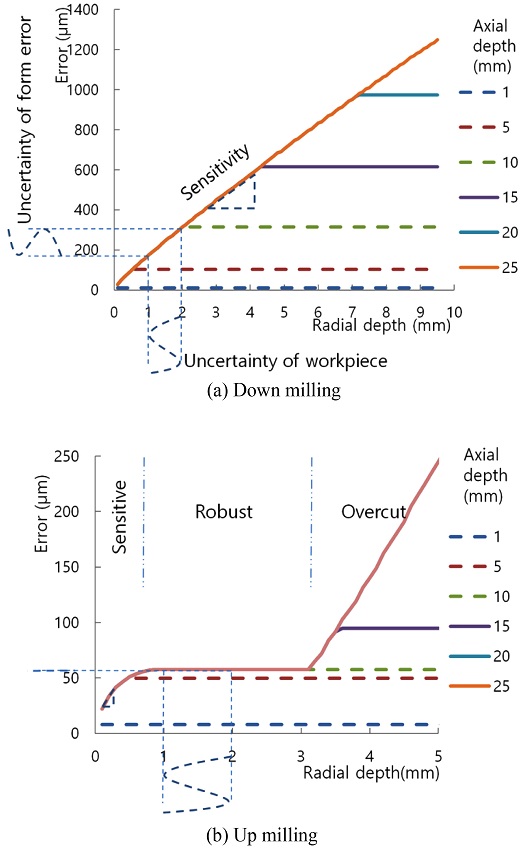
The radial depth of cut and the maximum surface error graph when helix angle of the tool is 30o and the number of tooth is two is shown in Fig. 9. The sensitivity zone of down milling in Fig. 9(a) is wide as shown. The maximum error is sensitive to the radial depth of cut and it is robust to the axial depth of cut at radial sensitive zone where the radial depth is small and the axial depth is large. The slope of the graph is the sensitiveness of the maximum surface error to the uncertainty of the radial depth of cut. The radial sensitivity is about 15% and it decreases by the radial depth of cut. It means that the axial uncertainty of workpiece does not affect to the surface error but the radial undercity of workpiece is transferred to the error of finishing surface. In virtual machining, the vertical precision of discretized 3D workpiece geometry does not affects to the surface error simulation result but about the radial directional precision of the model reduces the reliability of to the maximum surface error prediction results.
The fluctuation of stock geometry is transferred to the maximum surface error if it is sensitive direction but it does not affect to the error if it is robust direction. About 30% of the stock geometry error along the radial direction is transferred to the maximum surface error of finished surface if the axial depth of cut is larger than 10 mm in Fig. 9(a). The radial error is not transferred to the maximum surface error if the axial depth of cut is smaller than 5 mm. So, precise finishing is possible by reducing the axial depth of cut.
In the axial sensitive zone where the radial depth is large and axial depth is small, the maximum error is robust to the radial depth of cut but it is sensitive to axial depth of cut. The axial sensitivity is about 1.3% and it is increased little by axial depth of cut. In this case, the uncertainty of the radial depth of cut does not affect to the finishing surface and small portion of axial depth change is affects to the maximum error. It also means that the resolution of discretized workpiece geometry affects little to the prediction of surface error in axial sensitive condition.
The sensitivity zone of up milling is finished at the radial depth 0.6 mm and robust zone where the maximum surface error is not changed is continued until the radial depth 3.2 mm as shown in Fig. 9(b). The radial sensitivity is about 22% and it decreases by the radial depth of cut and become zero at the robust zone. The maximum surface error is affected by the uncertainty of the radial depth of cut in the sensitive zone. The maximum surface error is fixed to 57 μm and does not changed by the uncertainty of the radial depth of cut and axial depth of cut if the at the robust zone. So, the robust zone in up milling is the best cutting condition to get same maximum surface error when the tolerance of input workpiece geometry is large.
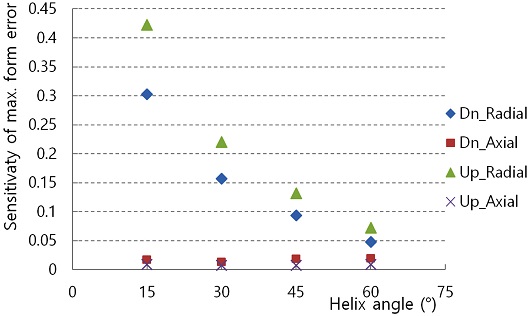
The sensitivity at the various helix angle of the tool was investigated as shown in Fig. 10. The radial sensitivity is decreased when the helix angle of tool is increased but the axial sensitivity is very small and is not changed by the helix angle. The number of teeth does not affect to the sensitivity. The large helix angle of tool is effective to decreases the radial sensitivity at the finishing process with small radial depth of cut.
4. Conclusion
This paper investigated the sensitivity of the maximum surface error in finishing condition and the overcut in up milling with large depth of cut using the tool deflection and surface error prediction software developed with C++ language based on the mathematical model of previous researches. The maximum surface error was predicted in various tool geometry and cutting condition.
The condition area was classified to axial sensitive, radial sensitive, robust, overcut and overlap zone based on the sensitivity and the direction of the maximum surface error. The sensitive direction is changed by radial engagement angle, axial depth of cut and helix angle of tool. The maximum surface error is sensitive to the uncertainty of the radial depth of cut and robust to axial depth variation at the finishing process using small radial depth of cut. The radial sensitivity is reduced by large helix angle of tool.
The robust zone and overcut zone happen in up milling where the Y directional cutting force is increased to the maximum value and decreased to minus value. The sensitiveness is decreased by increasing depth of cut and arrives to zero at the robust zone of up milling where the maximum surface error is not changed by both radial and axial depth of cut. The overcut happens when the axial and radial depth of cut is increased large or two flues are engaged in together. The depth of cut should be decreased to avoid overcut in up milling when the number of tooth and the helix angle of tool are increased.
Acknowledgments
This work was supported by the Gyeongsang National University Fund for Professors on Sabbatical Leave, 2018.
REFERENCES
-
Kline, W., DeVor, R., and Lindberg, J., “The Prediction of Cutting Forces in End Milling with Application to Cornering Cuts,” International Journal of Machine Tool Design and Research, Vol. 22, No. 1, pp. 7-22, 1982.
[https://doi.org/10.1016/0020-7357(82)90016-6]

-
Montgomery, D. and Altintas, Y., “Mechanism of Cutting Force and Surface Generation in Dynamic Milling,” Vol. 113, No. 2, pp. 160-168, 1991.
[https://doi.org/10.1115/1.2899673]

-
Li, H. and Shin, Y. C., “A Comprehensive Dynamic End Milling Simulation Model,” Journal of Manufacturing Science and Engineering, Vol. 128, No. 1, pp. 86-95, 2006.
[https://doi.org/10.1115/1.2035694]

-
Koenigsberger, F. and Sabberwal, A., “An Investigation into the Cutting Force Pulsations during Milling Operations,” International Journal of Machine Tool Design and Research, Vol. 1, Nos. 1-2, pp. 15-33, 1961.
[https://doi.org/10.1016/0020-7357(61)90041-5]

- Tlusty, J., “Dynamics of Cutting Forces in End Milling,” Annals of CIRP, Vol. 24, No. 1, pp. 22-25, 1975.
-
Kline, W., DeVor, R., and Lindberg, J., “The Prediction of Cutting Forces in End Milling with Application to Cornering Cuts,” International Journal of Machine Tool Design and Research, Vol. 22, No. 1, pp. 7-22, 1982.
[https://doi.org/10.1016/0020-7357(82)90016-6]

-
Kline, W. and DeVor, R., “The Effect of Runout on Cutting Geometry and Forces in End Milling,” International Journal of Machine Tool Design and Research, Vol. 23, Nos. 2-3, pp. 123-140, 1983.
[https://doi.org/10.1016/0020-7357(83)90012-4]

-
Budak, E., Altintas, Y., and Armarego, E., “Prediction of Milling Force Coefficients from Orthogonal Cutting Data,” Journal of Manufacturing Science and Engineering, Vol. 118, No. 2, pp. 216-224, 1996.
[https://doi.org/10.1115/1.2831014]

-
Shin, Y. C. and Waters, A. J., “A New Procedure to Determine Instantaneous Cutting Force Coefficients for Machining Force Prediction,” International Journal of Machine Tools and Manufacture, Vol. 37, No. 9, pp. 1337-1351, 1997.
[https://doi.org/10.1016/S0890-6955(96)00093-4]

-
Ko, J. and Cho, D. W., “3D Ball-End Milling Force Model Using Instantaneous Cutting Force Coefficients,” Journal of Manufacturing Science and Engineering, Vol. 127, No. 1, pp. 1-12, 2005.
[https://doi.org/10.1115/1.1826077]

-
Li, H. and Shin, Y. C., “A Comprehensive Dynamic End Milling Simulation Model,” Journal of Manufacturing Science and Engineering, Vol. 128, No. 1, pp. 86-95, 2006.
[https://doi.org/10.1115/1.2035694]

-
Kline, W., DeVor, R., and Lindberg, J., “The Prediction of Cutting Forces in End Milling with Application to Cornering Cuts,” International Journal of Machine Tool Design and Research, Vol. 22, No. 1, pp. 7-22, 1982.
[https://doi.org/10.1016/0020-7357(82)90016-6]

-
Kline, W., DeVor, R., and Shareef, I., “The Prediction of Surface Accuracy in End Milling," Journal of Engineering for Industry, Vol. 104, No. 3, pp. 272-278, 1982.
[https://doi.org/10.1115/1.3185830]

-
Sutherland, J. and Devor, R. E., “An Improved Method for Cutting Force and Surface Error Prediction in Flexible End Milling Systems,” Journal of Engineering for Industry, Vol. 108, No. 4, pp. 269-279, 1986.
[https://doi.org/10.1115/1.3187077]

-
Desai, K. and Rao, P., “On Cutter Deflection Surface Errors in Peripheral Milling,” Journal of Materials Processing Technology, Vol. 212, No. 11, pp. 2443-2454, 2012.
[https://doi.org/10.1016/j.jmatprotec.2012.07.003]

-
Chiang, H. N. and Wang, J. J., “Generating Mechanism and Formation Criteria of Kinked Surface in Peripheral End Milling,” International Journal of Machine Tools and Manufacture, Vol. 51, Nos. 10-11, pp. 816-830, 2011.
[https://doi.org/10.1016/j.ijmachtools.2011.07.004]

-
Budak, E. and Altintas, Y., “Peripheral Milling Conditions for Improved Dimensional Accuracy,” International Journal of Machine Tools and Manufacture, Vol. 34, No. 7, pp. 907-918, 1994.
[https://doi.org/10.1016/0890-6955(94)90024-8]

-
Budak, E. and Altintas, Y., “Modeling and Avoidance of Static Form Errors in Peripheral Milling of Plates,” International Journal of Machine Tools and Manufacture, Vol. 35, No. 3, pp. 459-476, 1995.
[https://doi.org/10.1016/0890-6955(94)P2628-S]

-
Ryu, S. H., Lee, H. S., and Chu, C. N., “The Form Error Prediction in Side Wall Machining considering Tool Deflection,” International Journal of Machine Tools and Manufacture, Vol. 43, No. 14, pp. 1405-1411, 2003.
[https://doi.org/10.1016/S0890-6955(03)00183-4]

-
Ryu, S. H. and Chu, C. N., “The Form Error Reduction in Side Wall Machining Using Successive Down and Up Milling,” International Journal of Machine Tools and Manufacture, Vol. 45, Nos. 12-13, pp. 1523-1530, 2005.
[https://doi.org/10.1016/j.ijmachtools.2005.01.027]

-
Dépincé, P. and Hascoet, J. Y., “Active Integration of Tool Deflection Effects in End Milling. Part 2. Compensation of Tool Deflection,” International Journal of Machine Tools and Manufacture, Vol. 46, No. 9, pp. 945-956, 2006.
[https://doi.org/10.1016/j.ijmachtools.2005.08.014]

-
Rao, V. and Rao, P., “Tool Deflection Compensation in Peripheral Milling of Curved Geometries,” International Journal of Machine Tools and Manufacture, Vol. 46, No. 15, pp. 2036-2043, 2006.
[https://doi.org/10.1016/j.ijmachtools.2006.01.004]

-
Habibi, M., Arezoo, B., and Nojedeh, M. V., “Tool Deflection and Geometrical Error Compensation by Tool Path Modification,” International Journal of Machine Tools and Manufacture, Vol. 51, No. 6, pp. 439-449, 2011.
[https://doi.org/10.1016/j.ijmachtools.2011.01.009]

-
Soori, M., Arezoo, B., and Habibi, M., “Tool Deflection Error of Three-Axis Computer Numerical Control Milling Machines, Monitoring and Minimizing by a Virtual Machining System,” Journal of Manufacturing Science and Engineering, Vol. 138, No. 8, 2016.
[https://doi.org/10.1115/1.4032393]

-
Wan, M. and Zhang, W., “Efficient Algorithms for Calculations of Static Form Errors in Peripheral Milling,” Journal of Materials Processing Technology, Vol. 171, No. 1, pp. 156-165, 2006.
[https://doi.org/10.1016/j.jmatprotec.2005.07.001]

-
Wan, M., Zhang, W., Qin, G., and Wang, Z., “Strategies for Error Prediction and Error Control in Peripheral Milling of Thin-Walled Workpiece,” International Journal of Machine Tools and Manufacture, Vol. 48, Nos. 12-13, pp. 1366-1374, 2008.
[https://doi.org/10.1016/j.ijmachtools.2008.05.005]

-
Li, Z. L., Tuysuz, O., Zhu, L. M., and Altintas, Y., “Surface Form Error Prediction in Five-Axis Flank Milling of Thin-Walled Parts,” International Journal of Machine Tools and Manufacture, Vol. 128, pp. 21-32, 2018.
[https://doi.org/10.1016/j.ijmachtools.2018.01.005]

-
Li, Z. L. and Zhu, L. M., “Compensation of Deformation Errors in Five-Axis Flank Milling of Thin-Walled Parts via Tool Path Optimization,” Precision Engineering, Vol. 55, pp. 77-87, 2019.
[https://doi.org/10.1016/j.precisioneng.2018.08.010]


Professor in the School of Mechanical and Aerospace Engineering, Gyeongsang National University. His research interest is CAM and CNC Machining.
E-mail: sujinkim@gnu.ac.kr

Professor in the Department of Mechanical Engineering, Purdue University. His research interest is Laser assisted material processing.
E-mail: shin@purdue.edu

