Effects of the Deposited Area on the Thermo-Mechanical Characteristics for the Case of Deposition of Inconel 718 Powder on AISI 1045 Substrate Using the DED Process
Copyright © The Korean Society for Precision Engineering
This is an Open-Access article distributed under the terms of the Creative Commons Attribution Non-Commercial License (http://creativecommons.org/licenses/by-nc/3.0) which permits unrestricted non-commercial use, distribution, and reproduction in any medium, provided the original work is properly cited.
Abstract
Metal additive manufacturing processes such as directed energy deposition process (DED), can be used to manufacture high value metal parts, with improved mechanical properties and efficiency. However, parts produced by DED can suffer from excessive temperature gradients, and heat accumulation due to the deposition process. The purpose of this study was to investigate the impact of the deposited area on thermos-mechanical characteristics for the case of deposition of Inconel 718 powder, on the AISI 1045 substrate, using the DED process through finite element analyses (FEAs). Nine types of FE models were developed. Temperature dependent cooling conditions were analyzed, and applied to the model. Laser heat source was defined, as the three-dimensional volumetric heat source based on the Gaussian distribution model. Temperature dependent properties were assigned to the models. The influence of the width and the length of the deposited region, on residual stress distributions in the vicinity of deposited region were investigated. Additionally, the impacts of the deposited area on deformation characteristics were examined.
Keywords:
Deposited area, Thermo-mechanical characteristics, Directed energy deposition, Finite element analysis1. Introduction
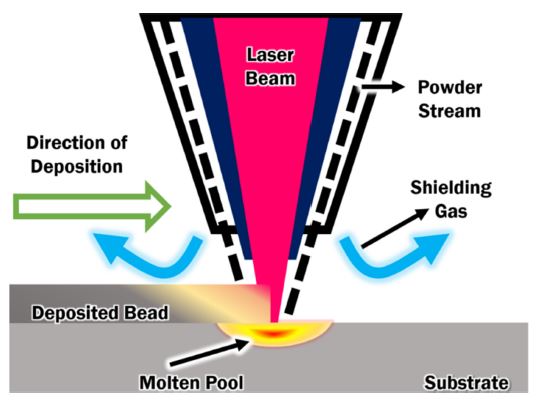
Metals are widely utilized engineering materials. Some of the valuable properties of metals are high strength, durability and reusability. Among multiple manufacturing processes additive manufacturing (AM) has a potential to greatly reduce lead times, cost and manufacturing waste. In addition, AM shown great results in production of functional materials and design optimization to increase efficiency of the part [1]. Directed energy deposition process (DED) such as laser engineering net shaping (LENS) is a metal AM process which uses laser heat source to melt metal powder on the surface of the substrate instantaneously as it is being supplied as can be seen on DED process scheme on Fig. 1 [1-4]. Melted material is rapidly solidified creating deposited bead. The process is repeated layer after layer until part is finished. The process of rapid heating and cooling of powder material results in high thermal gradients across the part and substrate [5]. Excessive thermal gradients are primary cause of negative effects such as thermal residual stress, displacement and distortion.
Each step of experimental study requires lengthy and costly preparations. Thus, FE analysis method a used in this study. FE methods can greatly reduce investigation time when a lot of parameters must be studied. Intensive research of the DED process started with the improvement of capabilities of computational equipment [6]. Since then multiple works have been performed to study the deposition process. Heigel et al. researched proper cooling conditions for improved accuracy of FE analysis when thin wall is deposited on cantilever beam substrate structure [7]. Lu, et al. investigated the effects of “S” and rectangular shape hallow bead on residual stresses and distortion using numerical methods [8]. Lu, et al. researched effects of substrate design on thermal stress and displacement distribution [9]. Above mentioned works contributed towards development of methods and techniques to accurately predict thermo-mechanical characteristics of deposited parts. A review of the literature related to thermo-mechanical analysis reveals that the shape of deposited area can impact residual stresses and defamation of manufactured components.
The goal of this study is to investigate the effect of deposited area on thermo-mechanical characteristics for the case of deposition of Inconel 718 powder on AISI 1045 substrate using DED process through finite element analyses (FEAs). The influence of the width and the length of the deposited region on residual stress distributions is examined. In addition, the effects of the deposited area on deformation characteristics are examined.
2. Thermo-Mechanical Analysis
2.1 Heat Source
Volumetric three-dimensional heat source model with Gaussian distribution is adopted for this study. The flux model for FEAs are assumed to be Eqs. (1), (2), and (3) [10].
| (1) |
| (2) |
| (3) |
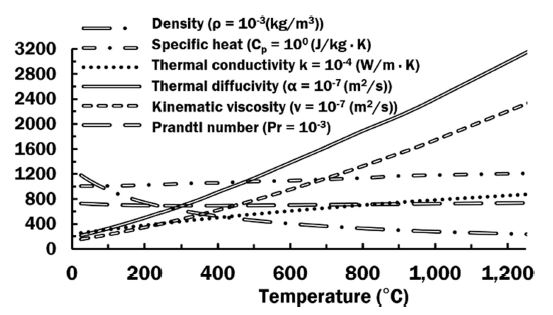
During deposition process the surface temperature is different across the specimen. The difference in surface temperature causes variation in heat losses due to buoyancy forces of air. Shielding gas, such as Argon (Ar) also contributes to heat losses due to forced convection. In order to improve accuracy of computations temperature dependent properties of Air and Ar are used to estimate coefficients of natural convection. Temperature dependent properties of air are show on Fig. 2. Estimation of coefficient of convection is accomplished by Eq. (4) [6,11].
| (4) |
Considering the position of surface Nusselt number can be calculated by Eqs. (5), (6), and (7) [6,11].
| (5) |
| (6) |
| (7) |
The Rayleigh number and temperature of air are estimated from Eqs. (8), and (9) [6,11].
| (8) |
| (9) |
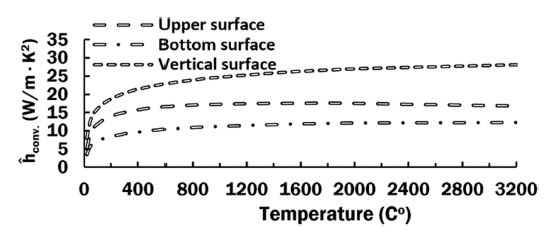
The initial and ambient temperature are set to 20oC. Estimated natural convection coefficient for each surface of the substrate are illustrated on the graph on Fig. 3.
2.2 Finite Element Analysis
Inconel 718 and AISI 1045 are chosen as a powder materials of powder and substrate, respectively. Corresponding temperature dependent material properties are assigned to the analysis materials. The data of temperature dependent properties of materials is obtained from SysWeld and JmatPro softwares [12,13].
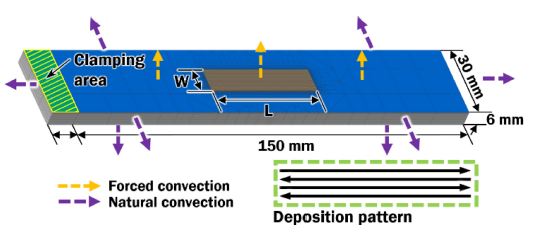
Total of 9 models were created according to combination of the width and the length of the deposited region. Table 1 shows dimensions of deposited region. The dimensions and thermal boundary conditions are shown in Fig. 4. Heat loss induced by convection is considered for all surfaces except for clamp area. During deposition process heat loss due to forced convection is applied on top surface.
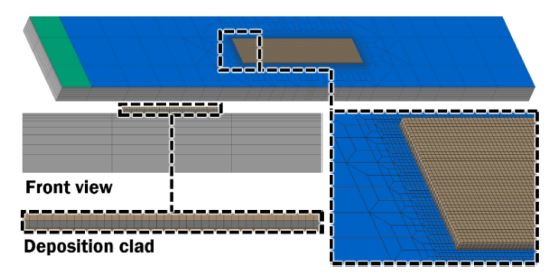
The model creation and analysis are performed by SysWeld software. The region of the specimen near deposition region and around the heat affected zone (HAZ) is designed with fine mesh structure. The region is affected by high heat flux and rapid temperature changes. Hence, fine mesh structure is essential in the vicinity of the deposited region to improve accuracy of FE analysis. Mesh structure of the models is shown on Fig. 5.
Deposition of three layers of Inconel 718 powder over AISI 1045 carbon steel is analyzed in the present work. Parameters of FEAs are cited from research work of Kim, et al [10]. Deposition conditions are shown in Table 2 [10].
3. Results & Discussion
3.1 Thermal Residual Stress Characteristics
The analysis results include 40 minutes cooling process after deposition process. All models reach temperature around 30oC at the end of cooling stage. This temperature is sufficient to properly evaluate thermo-mechanical characteristics of the specimen after deposition. Fig. 6(a) shows global effective stress distribution of each model in ISO view. From Fig. 6(a) can be observed that the stress is concentrated along the corner between substrate and deposited bead. Specifically, along the corner of starting and ending location of each bead. Typically, effective stress is distributed in the surrounding area of deposited bead.
Estimated effective stresses on overall surfaces are in a range between 600-700 MPa. The stress distribution is almost similar irrespective of the deposited area. From this result, it is revealed that surface stress distribution pattern is not significantly affected by deposition width and length.
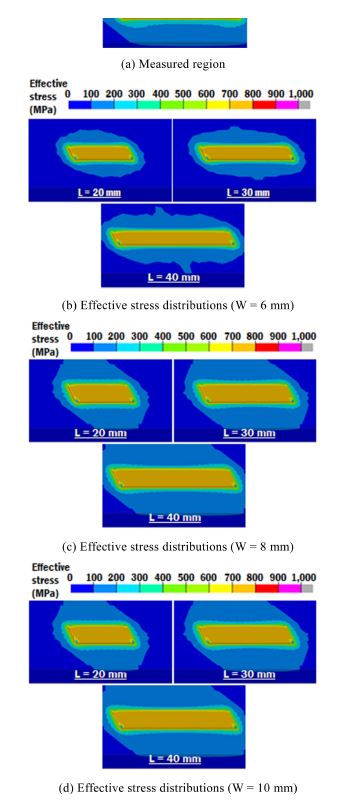
For the evaluation of inside stress, the cross-section along the center line is selected, as can be seen in Fig. 7(a). The mid-section is adopted to obtain residuals stress distribution in steady state conditions. Most of the deposited bead build under steady state conditions. This means similar post-process thermo-mechanical characteristics can be observed inside the most of the specimen. Hence, evaluation of stresses in the mid-section can give insights on the effects of deposition process on mechanical properties of the build part. Fig 7(b) shows effective stress distribution in the vicinity of deposited clad. Stresses are distributed in the heat affected zone and surrounding area. For all cases stress concentration region is under deposited bead and on top surface of the substrate. The excessive stresses are under the first and the last deposited bead. Increased length of deposition caused decreased residual stresses for the case of W = 6, and 10 mm. The location of the maximum effective stress is almost similar except for the case of W = 10, and L = 20 mm.
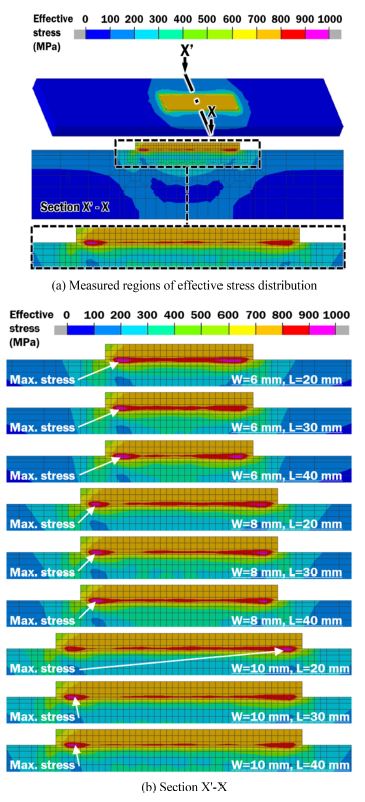
Effective stress distributions in the vicinity of deposited region for different area of the deposited region (After cooling)
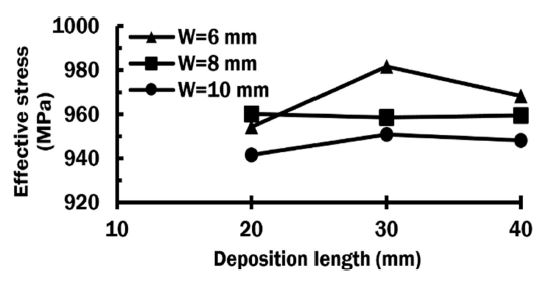
The graph in Fig. 8 shows maximum effective stresses in cross-section X’-X. For the case of W = 6 and 10 mm, the lowest maximum effective stress is estimated at L = 20 while the highest maximum effective stress is predicted at L = 30 mm. The maximum effective stress decreases when the width of the deposited region increases. The maximum effective stress is almost identical irrespective of the deposited length for the case of W = 8 mm. But overall, maximum stresses in case of 8 width are in between W = 6, and W = 10 mm. This result suggests that overall maximum stresses tend to get lower with increasing the width of the deposited region. The maximum effective stress is greatly influenced by the deposition length for the case of W- 6 mm. From this result, it is noted that the width and length of deposited region slightly affect residual stress distribution pattern and maximum stress location. However, the magnitude of the maximum effective stress can be influenced by both the width and the length of the deposited region. In addition, it is noted that the maximum effective stress is sensitively changed when the deposition length is reduced.
3.2 Deformation Characteristics
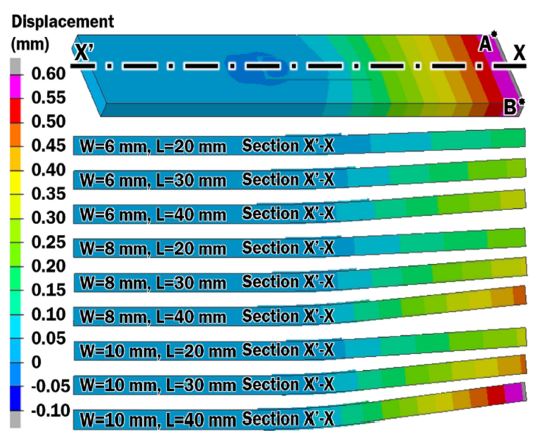
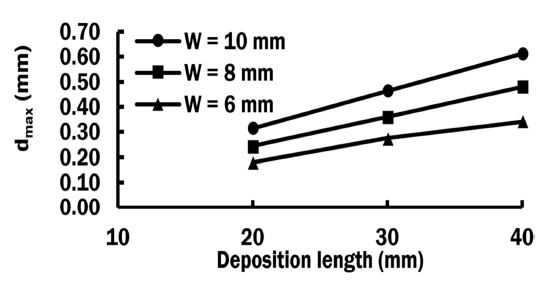
According to the results of the analysis the displacement in all the models is upward at the free end of the substrate, as shown in Fig. 9. The results on Fig. 9 are magnified 15 times for better visual representation.
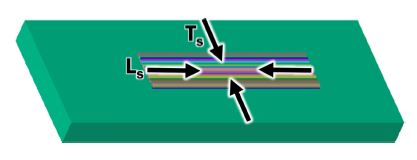
From Fig. 9, it is noted that both increased width and increased length resulted in greater displacement. Points A and B are the edges of the substrate. A is point at the starting side of deposition. Each model has maximum displacement at one of these points. Maximum displacement for each case can be observed on the graph on Fig 10. For each width of the deposited region, increase in length shows almost linear increase in displacement. This is in contrast to the maximum residual stress. The stress-area relation is not as direct as in the case of displacement. During the deposition process by DED two types of stresses occur due to shrinkage of solidification and cooling of deposited metal [14]. These stresses are transverse (Ts) and longitudinal (Ls) directions, as shown in Fig. 11 [14]. Transverse stresses act perpendicularly towards direction of deposition. Longitudinal stresses are acting along the deposition direction. The predicted upward displacement at the free end of substrate is primarily caused by longitudinal stresses. Increased width and length of deposition region facilitate growth of cumulative effect of longitudinal stresses. The analysis results showed greater stresses in the vicinity of deposited region of smaller width.
However the of the effect of increased area of deposition clad on thermal residual stresses is considerably more significant. From this result it can be concluded that maximum displacement is highly affected by the area of deposition region.
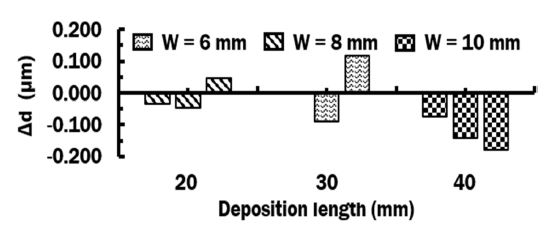
Distortion is represented as a difference in maximum displacement between opposite edges of the substrate, as shown in Eq. (10). The maximum distortion is estimated by subtracting distortion at point B from displacement at point A of Fig. 9.
| (10) |
Point A is located at the side closer to starting point of deposition and point B is closer to the side of the ending side of deposition. Fig. 12 shows predicted maximum distortions for different deposition area. The distortion pattern is changed for the case of W = 6, and 8, while that is identical for the case of W = 10 mm. From the Fig. 12, it is noted that the distortion increases when the deposited area augments except for W = 8, and L = 30 mm.
From these results, it is revealed that the distortion behavior of small width of deposition has less distortion but it is difficult to predict when change in length of deposited bead is applied. The larger width of deposition shows larger distortion however it also exhibits more predictable behavior. Similarly to welding process, predictable behavior of metal substrate can be used to mitigate negative effects of deposition process during preprocessing and preparation stage [14].
4. Conclusion
In this study, the effect of deposited area on thermos-mechanical characteristics for the case of deposition of Inconel 718 powder on AISI 1045 substrate using DED process were investigated through FEAs. The following was obtained from the results of the analysis:
(1) From the evaluation of residual stress in the vicinity of deposited bead, it was revealed that high stress concentration was located at top surface of the substrate under the deposition area. The pattern of the residual stress distribution and the location of maximum effective stresses are almost similar irrespective of the deposited area except for W = 10, and L = 20 mm. The magnitude of maximum stress was influenced by both the width and the length of the deposited region. The maximum effective stress affected to a greater extend with increasing the length of the deposited region when the width of the deposited region is reduced.
(2) Displacement was highly influenced by deposition area. Predicted results showed almost linear increase in displacement with increasing area of deposited region. The displacement increased with the increase of deposition area due to the accumulated residual stress caused by metal shrinkage after solidification and cooling. The distortion increased when the deposited area augmented except for W = 8, and L = 30 mm. The distortion pattern was changed for the case of W = 6, and 8, while that was identical for the case of W = 10 mm.
In future works, more cases of various length and width should be analyzed to obtain better understanding of effects of the deposited shape on thermo-mechanical characteristics of deposited part. Different strategies should be used to improve stress distribution and decrease displacement of the part at the end of the deposition process. In addition, the validity of the FE model should be improved through comparison of the results of experiments and those of FEAs.
NOMENCLATURE
| Q : | Energy at Any Point within Heat Source |
| Q0 : | Maximum Energy at the Center of Laser |
| η : | Efficiency of Heat Source |
| c : | Shape Factor |
| r : | Radius within the Heat Source |
| x ,y : | Planar Coordinates of Heat Source |
| rz : | Maximum Radius at Any Depth |
| rz : | Maximum Radius at Any Depth |
| re : | Top Radius of Laser Beam |
| ri : | Bottom Radius of Laser Beam |
| zi : | Top Coordinates of Laser Beam |
| ze : | Bottom Coordinates of Laser Beam |
| z : | Vertical Coordinates Heat Source |
| NuL : | Nusselt Number |
| k : | Thermal Conductivity |
| Lc : | Characteristics Length |
| RaL : | Rayleigh Number |
| Pr : | Prandtl Number |
| Ts : | Surface Temperature |
| T∞ : | Ambient Temperature |
| Tf : | Gas Temperature |
| g : | Gravitational Acceleration |
| vk : | Kinematic Viscosity |
| α : | Diffusivity |
| W : | Width of Deposited Region |
| L : | Length of Deposited Region |
| P : | Power of Laser |
| D : | Diameter of Laser |
| V : | Scan speed of Laser |
| σ : | Stress |
| : | Force |
| A : | Area |
| dmax : | Maximum Displacement |
| Δd : | Distortion |
Acknowledgments
This work was supported by Industrial Technology Innovation Program (No. 20009839, Development of manufacturing technology for regeneration and functional enhancement of medium and large military parts based on multi-material metal 3D printing technology) and Energy technology development program (No. 20206310200010, Advanced remanufacturing of industrial machinery based on domestic CNC and building infrastructure for remanufacturing industry) funded by the Ministry of Trade, Industry & Energy (MOTIE, Korea).
REFERENCES
-
Ahn, D.-G., (2021), Directed energy deposition (DED) process: State of the art, International Journal of Precision Engineering and Manufacturing-Green Technology, 8(2), 703-742.
[https://doi.org/10.1007/s40684-020-00302-7]

-
Kim, H.-S., Lee, H., Ahn, D.-G., (2021), A preliminary study on the lamination characteristics of inconel 718 superalloy on S45C structural steel using LENS process, Journal of the Korean Society of Manufacturing Process Engineers, 20(1), 16-24.
[https://doi.org/10.14775/ksmpe.2021.20.01.016]

-
Shamsaei, N., Yadollahi, A., Bian, L., Thompson, S. M., (2015), An overview of direct laser deposition for additive manufacturing; Part II: Mechanical behavior, process parameter optimization and control, Additive Manufacturing, 8, 12-35.
[https://doi.org/10.1016/j.addma.2015.07.002]

-
Yu, J., Lin, X., Ma, L., Wang, J., Fu, X., Chen, J., Huang, W., (2011), Influence of laser deposition patterns on part distortion, interior quality and mechanical properties by laser solid forming (LSF), Materials Science and Engineering: A, 528(3), 1094-1104.
[https://doi.org/10.1016/j.msea.2010.09.078]

-
Chua, B.-L., Ahn, D.-G., (2020), Estimation method of interpass time for the control of temperature during a directed energy deposition process of a Ti-6Al-4V planar layer, Materials, 13(21), 4935.
[https://doi.org/10.3390/ma13214935]

- Chua, B., (2019), Investigation of development of thermo-mechanical analysis method for a wire feeding type directed energy deposition process, Docter Thesis, Department of Mechanical Engineering of Chosun University.
-
Heigel, J., Michaleris, P., Reutzel, E. W., (2015), Thermo-mechanical model development and validation of directed energy deposition additive manufacturing of Ti-6Al-4V, Additive Manufacturing, 5, 9-19.
[https://doi.org/10.1016/j.addma.2014.10.003]

-
Lu, X., Lin, X., Chiumenti, M., Cervera, M., Hu, Y., Ji, X., Ma, L., Yang, H., Huang, W., (2019), Residual stress and distortion of rectangular and S-shaped Ti-6Al-4V parts by directed energy deposition: Modelling and experimental calibration, Additive Manufacturing, 26, 166-179.
[https://doi.org/10.1016/j.addma.2019.02.001]

-
Lu, X., Chiumenti, M., Cervera, M., Li, J., Lin, X., Ma, L., Zhang, G., Liang, E., (2021), Substrate design to minimize residual stresses in directed energy deposition AM processes, Materials & Design, 202, 109525.
[https://doi.org/10.1016/j.matdes.2021.109525]

-
Kim, H., Lee, K.-K., Ahn, D.-G., Lee, H., (2021), Effects of deposition strategy and preheating temperature on thermo-mechanical characteristics of inconel 718 super-alloy deposited on AISI 1045 substrate using a DED process, Materials, 14(7), 1794.
[https://doi.org/10.3390/ma14071794]

- Cengel, Y., Ghajar, A., (2014), Heat and mass transfer: Fundamentals and applications (5th edition), McGraw Hill.
- ESI Group Inc., Visual-environment version 16.0. https://myesi.esi-group.com, /
- JmatPro, JmatPro Version 13.0. https://www.sentesoftware.co.uk/news/jmatpro-version-13-0
- Jenney, C. L., O'Brien, A., (2011), Welding handbook-9th edition, Volume 1, Welding and cutting science and technology, American Welding Society.

Master course at the School of Mechanical Engineering, Chosun University. His research interests are development, application and simulation of metal additive manufacturing technology.
E-mail: Aliyev.alisultan@gmail.com

Ph.D candidate at the School of Mechanical Engineering, Chosun University. His research interests include development, application and simulation of metal additive manufacturing technology.
E-mail: otq_center@naver.com

Professor at the School of Mechanical Engineering, Chosun University. He received his M.S. and Ph.D. degrees from KAIST, Korea in 1994 and 2002, respectively. His research interests include development and application of additive manufacturing technology, rapid manufacturing, lightweight sandwich, and mold & die.
E-mail: smart@chosun.ac.kr

