Study on the Effects of Operating Diametral Clearance Change on the Characteristics of Angular Contact Ball Bearings
Copyright © The Korean Society for Precision Engineering
This is an Open-Access article distributed under the terms of the Creative Commons Attribution Non-Commercial License (http://creativecommons.org/licenses/by-nc/3.0) which permits unrestricted non-commercial use, distribution, and reproduction in any medium, provided the original work is properly cited.
This paper was presented at KSPE Spring Conference in 2024
Abstract
This study investigates the influence of operating diametral clearance on the performance of angular contact ball bearings (ACBBs). It examines critical factors affecting diametral clearance, including mounting conditions, external loads, temperature fluctuations, and rotational speeds. A novel model combining quasi-static and fit-up approaches is proposed to analyze the effects of operating diametral clearances on ACBB performance. This model incorporates key elements such as ball-race contact loads, interactions between the shaft and inner ring, interference fits between the housing and outer ring, centrifugal expansion of the rotating shaft and inner ring, and temperature-induced changes. Internal clearance variations are computed using the thick-ring theory. Simulations are conducted to predict ACBB characteristics under various fit-up conditions, including contact load distribution and stiffness, with results validated using commercial software. The study also explores the impact of various operating diametral clearances on ACBB performance under differing fitting conditions, external loads, and rotational speeds.
Keywords:
Angular contact ball bearings, Diametral clearance, Internal clearance, Fit-up, Interference fit키워드:
각접촉 볼베어링, 직경 틈새, 내부 틈새, 맞춤 상태, 간섭 맞춤1. Introduction
Rolling bearings are essential components in mechanical systems, widely used across various industrial applications. Angular contact ball bearings (ACBBs) are particularly advantageous due to their ability to handle both axial and radial loads simultaneously while maintaining precision at high rotational speeds [1,2]. Consequently, significant research has focused on the dynamic performance of ACBBs, attracting global attention [3].
In practical applications, an appropriate interference fit is applied to prevent relative movement between the inner ring and shaft, and between the outer ring and housing. However, this interference fit can cause slight expansion of the inner ring and compression of the outer ring, reducing the bearing’s internal clearance. Excessive interference can eliminate the bearing clearance altogether, leading to interference between rolling elements and races. Such a reduction in internal clearance can increase contact pressure during operation, shortening the bearing’s fatigue life and generating excessive heat [4,5]. Oswald et al. [6] demonstrated that interference fits on the inner ring of cylindrical roller bearings (CRB) can significantly reduce fatigue life. They also investigated the relationship between bearing life and internal clearance as a function of roller diameter adjusted for load [7]. Additionally, interference fits introduce a preloading effect on load distribution, impacting the bearing’s stiffness [8]. Bearing rings, with their slender cross-sections, undergo elastic deformation under load and exhibit uniform expansion or contraction at each rolling element position [8].
For high-speed bearings exposed to elevated temperatures, design engineers must carefully estimate changes in internal clearance from the unmounted state to operating conditions [9]. To accurately assess internal clearance changes during dynamic conditions, it is essential to consider factors such as the initial and operating fit between the shaft and housing, temperature fluctuations, radial growth due to ring rotation, and the radial components of rolling element contact loads [10-12].
Many researchers have investigated clearance changes in rolling-element bearings under various conditions. Most studies use thick-ring theory [13] to describe radial ring deformation in response to radial stresses and rotational speed. Additionally, some studies incorporate Harris’s [2] formulation to account for temperature effects on interference fitting at operating temperatures. Ricci [14] focused on internal clearance changes in statically loaded bearings under combined loads, considering interference fitting and temperature effects but did not include ring rotation at higher speeds or contact loads from the races.
Other researchers have explored the centrifugal expansion of the shaft and inner ring during high-speed operation. For instance, Ma et al. [15] showed that centrifugal force significantly impacts interference fit in high-speed spindles, requiring a much greater interference fit than in static conditions. Liu et al. [16] examined the effects of interference fitting and ring rotation on internal clearance changes, using their findings to calculate ACBB stiffness. Their model also predicted potential loosening between the inner ring and shaft at high speeds, although it did not consider temperature-induced clearance changes. Crecelius and Pirvics [17] evaluated internal clearance changes in tapered roller bearings by accounting for interference fit, contact loads, centrifugal expansion, and temperature variations. Li et al. [18] estimated bearing stiffness by considering thermal-mechanical coupling effects, including thermal deformation due to temperature changes and interference fits during assembly.
This study investigates the effect of various fit-up conditions, rotational speeds, and temperature variations on the operating diametral clearance of ACBBs. The fit-up model builds on concepts of incorporating the effects of contact loads, interference/clearance fits in shaft-inner ring and housing-outer ring assemblies, centrifugal expansion of the rotating inner ring and shaft, and temperature variations. Unlike most prior studies that primarily focused on ring deformation under tight fit conditions influenced by rotational speed, this study examines a range of fit-up conditions and incorporates the pressure exerted by the balls.
By integrating quasi-static and fit-up models, this study provides a more comprehensive analysis by iteratively solving for clearance changes and contact load-induced pressures using a quasi-static approach. The proposed method’s validity was confirmed through comparisons with results from commercial bearing software. Simulations were conducted to demonstrate the internal clearance changes during operation and their effects on bearing performance.
2. Quasi-static Model of ACBB
To account for changes in internal clearances, a fit-up model should be incorporated into the quasi-static model for ACBBs. Fig. 1 illustrates the coordinate system with five degrees of freedom (DOF) in both load and displacement. The quasi-static model for ACBBs is thoroughly detailed in the references [19-21]. In this study, the inner ring rotates while the outer ring remains stationary. The vectors representing external load and displacement are denoted by
| (1) |
| (2) |
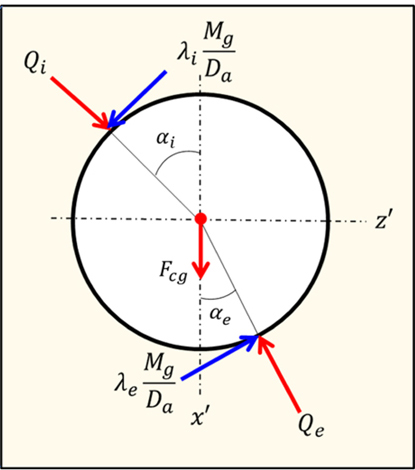
The ACBB model can be solved using the methods described in Refs. [19-21]. According to the ball’s free-body diagram in Fig. 2, the ball's equilibrium equation is represented as [19]:
| (3) |
By applying Eq. (3), the displacement of the ball center, as well as the contact loads between the ball and races, can be determined. The resultant values are essential for solving the global equilibrium equation for the inner ring, as follows:
| (4) |
where j and Z indicate the ball index and the total number of balls. The transformation matrix [Rϕ] can be determined using:
| (5) |
In Eq. (5), ϕ denotes the angular position of the ball.
To solve for the displacements of the inner ring, the global equilibrium equation (Eq. (4)) must be resolved. Given the nonlinear characteristics of ACBBs, this study employs an iterative Newton-Raphson method. Upon completing the calculation, the [5 × 5] ACBB stiffness matrix can be determined as described in [20]:
| (6) |
where Q' is the ball Jacobian matrix [20].
3. Fit-up Model
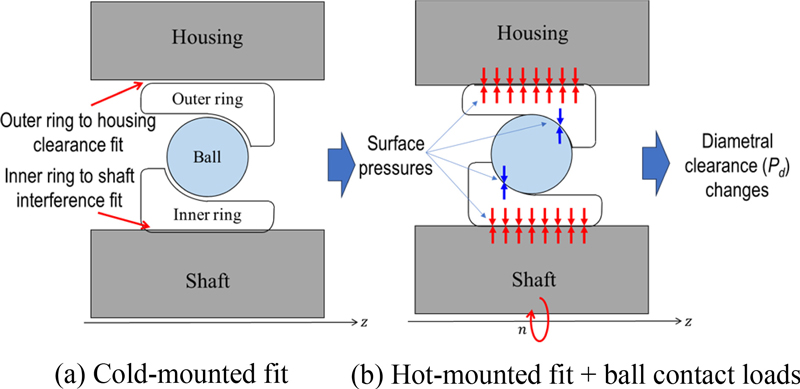
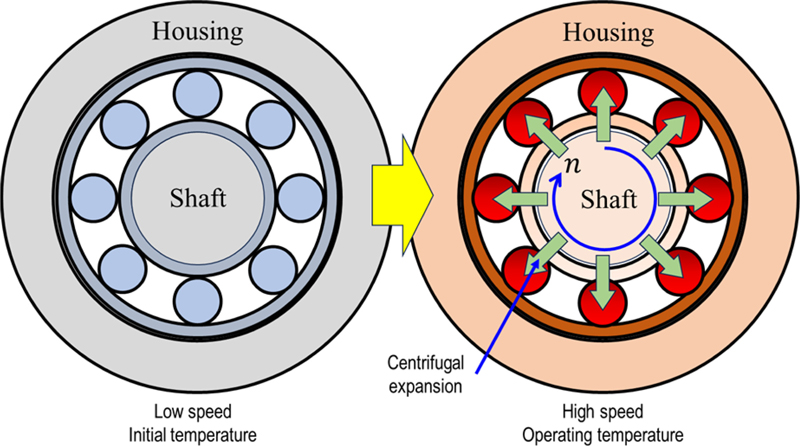
Fig. 3 illustrates the changes in fit-up conditions as the bearing operates. The shaft and rings are modeled as thick cylinders subjected to uniform internal and external pressures, following the approach in [13]. Due to centrifugal forces and thermal effects, the shaft and rings undergo radial deformation, impacting the bearing’s diametral clearance, as shown in Fig. 4. The proposed analytical approach estimates variations in internal clearance within ACBBs and determines the resulting fit pressures under these conditions. Pressure assessments are provided for operational scenarios. This model can also calculate the speed at which loosening occurs, resulting in zero pressure between the shaft and inner ring, depending on the operating parameters. These are crucial for evaluating the initial shaft fit's suitability and refining bearing installation processes.
This study explores the internal clearances of ACBBs in both their reference and operating states. The reference state is defined by the cold-mounted fit, where the shaft is stationary, ambient temperature is maintained, and no pressure is present between the least loaded balls and the races. In contrast, the operating state corresponds to the hot-mounted fit, characterized by the rotating shaft, temperature fluctuations, and pressure variations between the least loaded balls and the races.
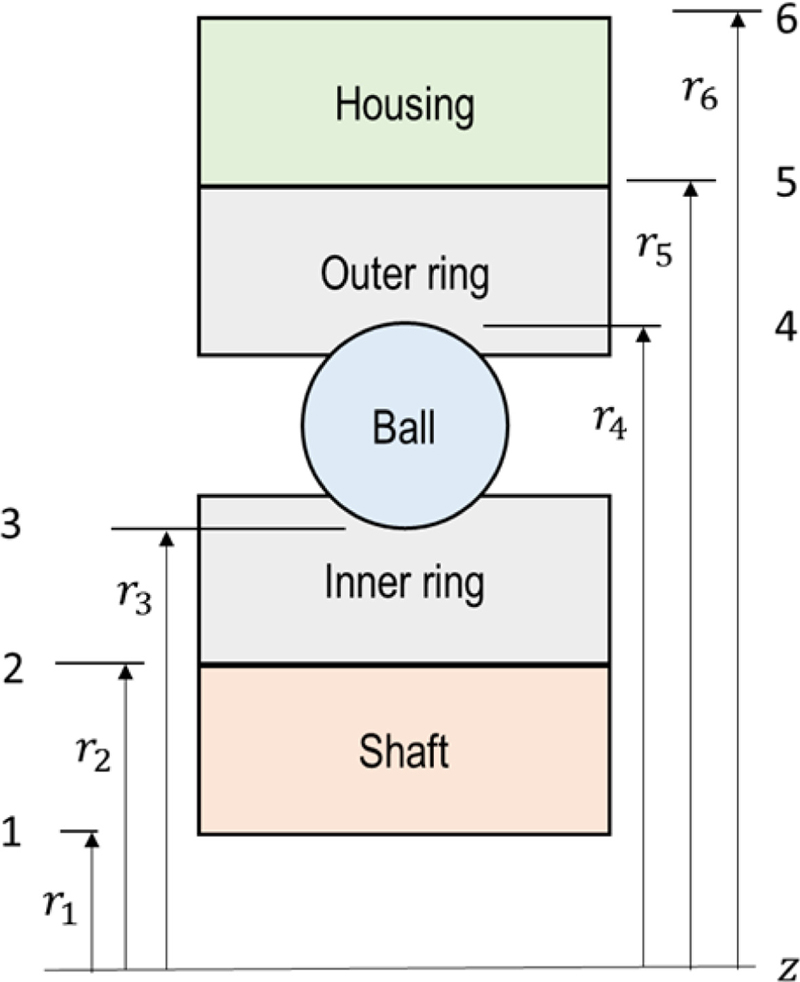
The equivalent radii are visualized in Fig. 5 and summarized as follows:
| (7) |
In this context, d represents the bore diameter of the ACBB, while D denotes its outside diameter. The pitch diameter of the ACBB is dm, and the ball diameter by Da. The variables dS and dH correspond to the inner diameter of the shaft and the outer diameter of the housing, respectively. The numbers shown in Fig. 5 identify the specific locations of pressure and radial deformations.
The radial deformation from each race can be represented by
i) For the inner race:
| (8) |
ii) For the outer race:
| (9) |
The change in diametral clearance is given by
| (10) |
Here, the subscripts i, e, b refer to the inner race, outer race and ball, respectively. The index TOT represents the total sum of the radial deformation from induced pressure by hot-mounted operating fit (subscript HM), temperature change (subscript T), and centrifugal force effect due to ring rotation (subscript Ω). Detailed information for the radial deformations is summarized below.
3.1 Radial Deformations due to Temperature Variation
The transition from ambient to operating temperatures affects the internal clearance of ACBBs. This temperature change leads to linear expansion, which alters the bearing geometry as follows:
| (11) |
| (12) |
| (13) |
Here, Tamb denotes the ambient temperature Tk, k = i, e, b denotes the temperature of each component and Γk, k = i, e, b is the thermal expansion coefficient of the corresponding component. These temperatures may be measured through experiments [18], or estimated through simulation programs, employing, for instance, a thermal network model [22].
3.2 Radial Deformations due to Surface Pressures
A thick-walled circular cylinder deforms under internal and external pressures. This deformation is symmetrical around the cylinder’s axis and is typically assumed not to affect the cylinder’s length under uniformly distributed pressures [13]. If there is an interference fit in the relevant section, pressure exists from the external surface of the shaft to the inner surface of the bearing (P2), and from the internal surface of the housing to the external surface of the bearing outer ring (P5). For simplicity, it is assumed here that there are no pressures on the internal surface of the shaft or the external surface of the housing.
To estimate variations in internal clearances in ACBBs, it is essential to consider the deformations between the ball and the inner race, as well as between the ball and the outer race. These radial deformations reflect the effects of the hot-mounted fit between the inner ring and shaft, and the outer ring and housing, as well as the pressures induced between the balls and races. By knowing all relevant pressures, the changes in radial deformation at the ball contacts can be defined as [11,12]
| (14) |
| (15) |
Here, Ek, ξk k = i, e denote the elastic moduli and the Poisson’s ratios of inner ring and outer ring, respectively. The details for other unknowns such as P2, P3 for inner race and P4, P5 for outer race are obtained as follows:
i) Pressure induced by the ball-race contact loads
To account for the elastic effect of uniform radial components from ball contact loads on the ring dimensions, two equivalent pressures are assessed: the external pressure for the inner ring, P3, and the internal pressure for the outer ring, P4. These are derived from the least radial load among the contact loads on each race [13].
| (16),(17) |
where Qij and Qej denote the ball-race contact loads at the inner and outer race at the j-th ball position, respectively. B stands for the bearing width.
ii) Pressures induced by shrink fits
To create contact pressure between a hub and a shaft, or between two rings where one is mounted inside the other, it is common practice to design the inner radius of the outer component to be slightly smaller than the outer radius of the inner component. During assembly, this difference results in contact pressure between the two components, referred to as shrink-fit pressure.
Here, the input is defined by Fc, which is essentially from the interference fit, I, defined in locations 2 and 5 as:
| (18),(19) |
Temperature variations influence the transition of the reference fit from cold to operating conditions denoted as Fh. This fit can be computed based on the initial fit and the temperature difference between the two adjacent components as follows [12]:
| (20) |
| (21) |
where TS, TH are defined as the temperatures of the shaft and housing, respectively.
The deformation resulting from the shrink-fit condition is the sum of the increase in the inner radius of the outer cylinder and the decrease in the outer radius of the inner cylinder [13]. This combined deformation, caused by pressure P, should equate to Fh as follows:
| (22),(23) |
These unknown pressures can be ascertained by ensuring Eqs. (24) and (25) [12,13]. Then, using the general expression for normal stress in Ref. [18],
| (24) |
| (25) |
3.3 Ring Radial Deformations due to Rotational Speed
Considering the rotation of the shaft and inner ring, the general expressions are as follows:
i) For the external surface of the inner ring:
| (26) |
ii) For the internal surface of the inner ring:
| (27) |
iii) For the external surface of the shaft:
| (28) |
iv) For the internal surface of the shaft:
| (29) |
where
| (30),(31) |
Here, ρ denotes the material density, ω being the angular speed in rad/s. The variations in deformations on the inner surface of the inner ring and the outer surface of the shaft can be determined, respectively, by
| (32),(33) |
Additionally, the difference ∆δ2 between the deformations of the inner ring and shaft due to rotational speed is:
| (34) |
It is assumed that no pressure variation occurs on the external surface of the inner ring (∆P3 = 0) and the internal surface of the shaft (∆P1 = 0). Moreover, ωi and ωS are identical. The four integration constants K1i, K2i, K1S, and K2S, along with the pressure change ∆P2, remain undetermined. The centrifugal force generated when the inner ring and shaft operate at high speeds reduces some of the compressive stress from the interference fit, thereby lowering the contact stress between them. As rotational speed increases, the contact pressure between the inner ring and shaft decreases, which can lead to a transition from a tight-fit to a loose-fit condition. This phenomenon, known as loosening, can result in fretting wear, increased shaft vibration, and rotor eccentricity [12]. The loosening speed is defined as the maximum rotational speed at which the bearing remains in a tight-fit condition between the shaft and the inner ring. The variation in radius due to rotation, denoted as ui,Ω, is affected by fit-up conditions. The radial deformation equations for two fit-up scenarios are detailed below.
i) Initially tight
In the case of initially tight, the four integration constants and ∆P2 are unknowns, and ∆δ is set to zero. If P2 + ∆P2 > 0, a tight-to-tight condition is realized. The five unknowns can be determined by solving Eqs. (26)-(29) and Eq. (34). Then, the radial deformation between the ball and inner race for initially tight can then be solved using Eq. (35). If P2 + ∆P2 ≤0, a tight fit becomes loose. Addressing this condition requires a multi-step approach as follows:
- 1) Set ∆P2=− P2 and ∆δ = 0. Then calculate ui,Ω from Eq. (35) and set it as ui,TL by solving the four integration constants and loosening speed (ωl) from Eqs. (26)-(29) and Eq. (34).
- 2) Set ∆P2 = 0, then calculate ui,Ω from Eq. (35) and set as ui,TL from Eq. (35) by solving Eqs. (26)-(29) with inner ring speed (ωi).
- 3) Set ∆P2 = 0, then calculate ui,Ω from Eq. (35) and set it as ui,LL by solving Eqs. (26)-(29) with ωl obtained in Step 1.
- 4) Calculate the radial deformation using Eq. (36).
In this context, additional subscripts are used with specific meanings. The first subscript denotes the initial fit state: ‘T’ for tight and ‘L’ for loose. The second subscript refers to rotational speeds: ‘T’ for the total speed range and ‘L’ for the limited speed range.
ii) Initially loose
In this case, the four integration constants remain undetermined and ∆P2 are zero. The primary task is to solve Eqs. (26)-(29), and then to determine ∆δ. If Fh@2 + ∆δ ≤ 0, then the loose fit persists under operating conditions, which corresponds to the case when the resultant radial deformation at the inner ring ball path is described by Eq. (35) in Table 1. If Fh@2 + ∆δ > 0, then the fit transits from a loose to a tight condition.
- 1) Set ∆δ = Fh@2, and ∆P2 = P2 and calculate ui,Ω from Eq. (35) and set it as ui,LL by obtaining the four integration constants and loosening speed (ωl) from Eqs. (26)-(29) and Eq. (34).
- 2) Set ∆δ = 0, then calculate ui,Ω from Eq. (35) and set it as ui,TL by obtaining the unknown four integration constants and ∆P2 using Eqs. (26)-(29) and Eq. (35) with ωl.
- 3) Set ∆δ = 0, then calculate ui,Ω from Eq. (35) and set it as ui,TT by solving the four integration constants and ∆P2 using Eqs. (26)-(29) and Eq. (35) with inner ring operating speed (ωi).
- 4) Calculate the radial deformation using Eq. (37).
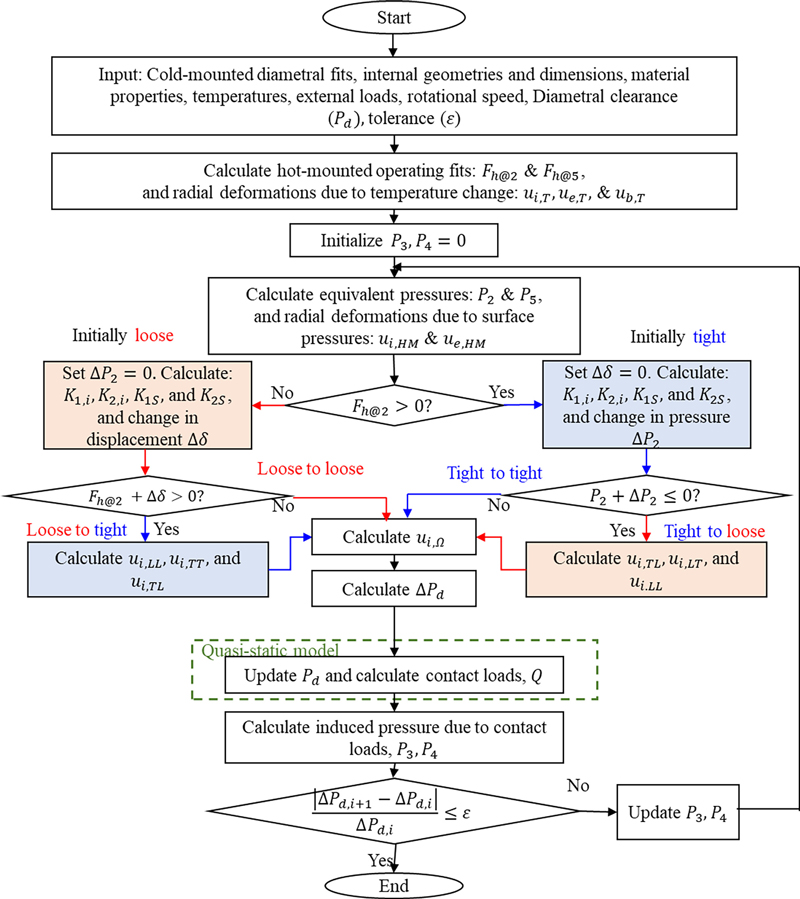
An iterative calculation procedure is employed to assess the interplay between thermal expansion and mechanical fit within the bearing assembly as shown in Fig. 6. The process begins by defining input parameters, and initial conditions, including initial diametral clearance (Pd) and tolerance (ε). The calculation procedure then determines hot-mounted operating fits (Fh@2, Fh@5), accounting for radial deformations due to temperature fluctuations (ui,T, ue,T, ub,T). Following these initial calculations, the process iterates through a decision-making loop to ascertain the initial state of fit-up, categorized as either loose or tight. For a loose fit, the procedure seeks to increase tightness by resetting the initial radial pressure (∆P2) to zero and recalculating critical parameters (K1i, K2i, K1S, K2S), as well as the deformation change (∆δ). In contrast, an initially tight fit undergoes recalibration aimed at reducing tightness. Central to this iterative process is the update of equivalent pressures (∆P2, ∆P5) and radial deformations due to surface pressures, calculated with the quasi-static model that adjusts the internal clearances and computes contact loads (Q). This refinement is repeated until the change in diametral clearance (∆Pd) is within the predetermined tolerance (ε).
4. Model Verification
The proposed method was validated by comparing it with commercial software: COBRA-AHS [23]. The investigated ACBB was assumed to experience an axial load of Fz = 4,000 N at the rotational speed of 30,000 RPM. The shaft was assumed as a solid cylinder and the housing has an outer diameter of 100 mm. The basic parameters of the investigated ACBB are listed in Table 2.
All the elements are assumed to have identical material properties. The modulus of elasticity is 211 GPa, the material density is 7,870 kg/m3, and the Poisson’s ratio is set to 0.29. For brevity, the temperature is assumed to be constant. The fit between the outer ring and the housing is set to be loose. During validation, operating temperatures were assumed to be at ambient levels.
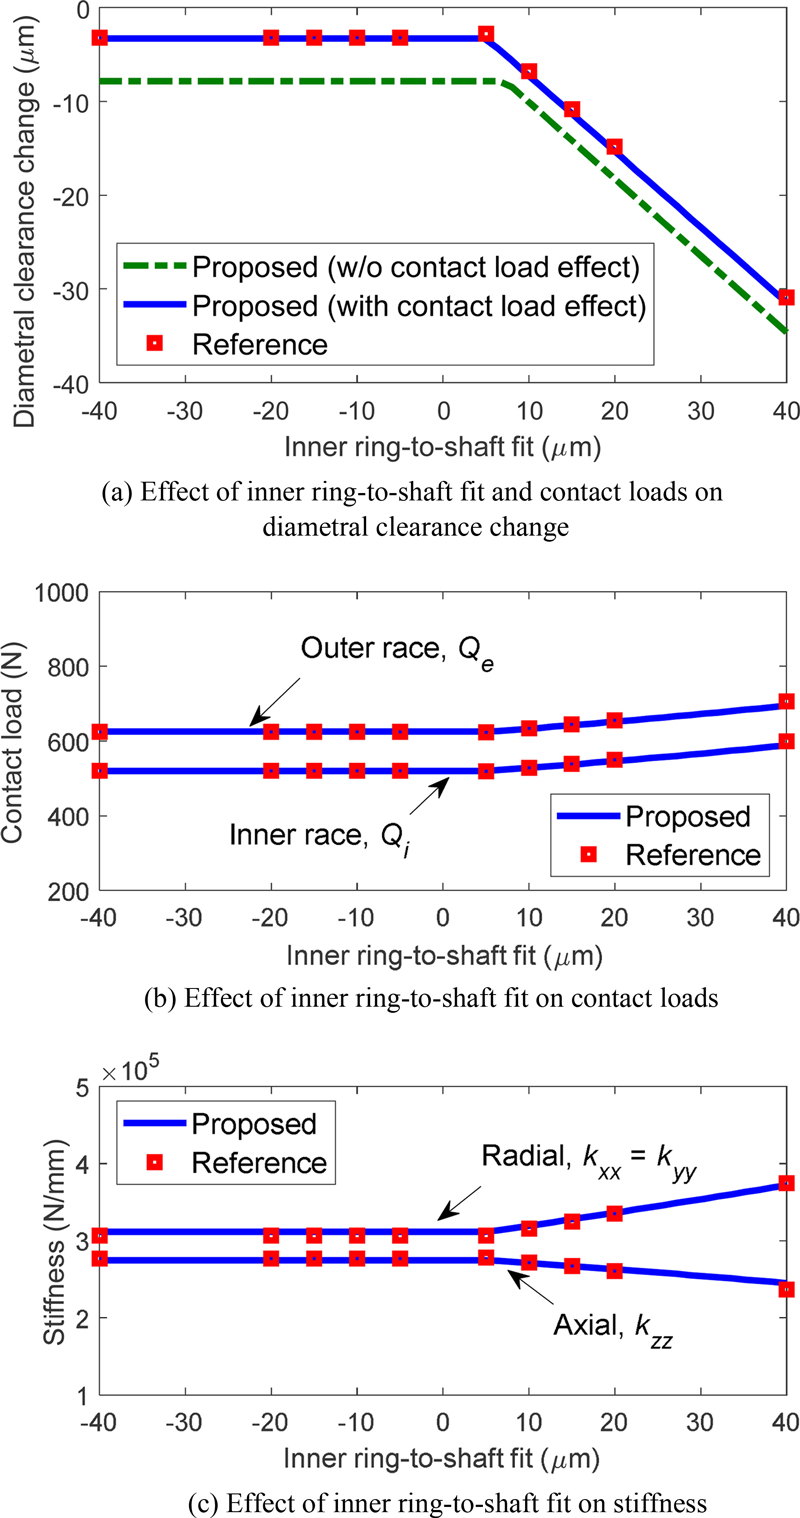
Fig. 7 shows the variations in diametral clearance as a function of interference fit between the inner ring and shaft. The proposed model aligns well with results from commercial software (COBRA[23]). In particular, Fig. 7(a) shows that the contact load effect is very important for this kind of analysis. For the interference fit region from negative to approximately 5 μm, the internal clearance between the shaft and inner ring becomes positive; it implies that the interference fit does not affect the diametral clearance. Figs. 7(b) and 7(c) show equivalent pressures from ball-race contact loads affect the internal clearance on both the inner and outer races. As the fits become tighter, contact loads increase, leading to reduced axial stiffness and increased radial stiffness. Conversely, with loose fits, the characteristics of the ACBB remain largely unchanged.
5. Simulation and Discussions
The 7208 ACBB with properties listed in Table 2 was used for simulation in this section.
5.1 Effect of Various Factors on the Clearances
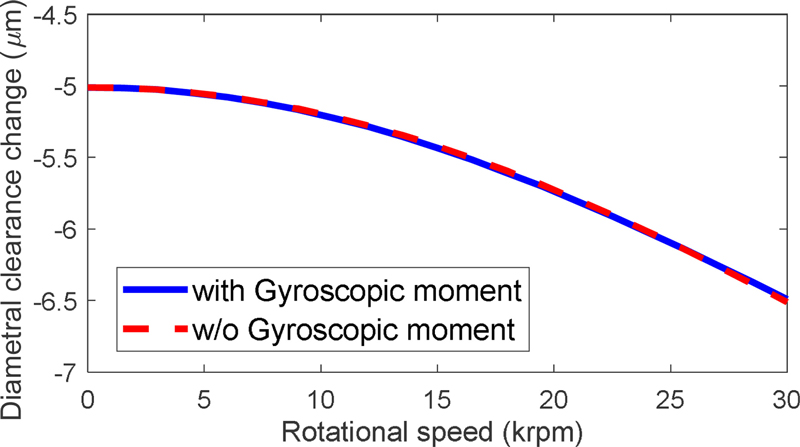
Fig. 8 shows ∆Pd as a function of rotational speed. The rotational speed decreases the diametral clearance due to the effect of centrifugal force that causes the inner ring expansion as well as increases the internal clearance between the inner ring and shaft. However, the gyroscopic moment has an almost negligible effect on diametral clearance because it acts only along the ball center and does not contribute directly to the radial deformations of inner and outer rings.
The outer ring-to-housing fit I5 influences the diametral clearance of an ACBB. I5 applies pressure on the outer ring-to-housing contact, initially compressing the outer ring thus causing negative internal clearance, leading to a decrease in diametral clearance as shown in Fig. 9. Decreasing I5 can increase diametral clearance but only up to a certain point where the internal clearance becomes zero. Starting from I5 ≈ -0.005 mm, the change in diametral clearance remains constant in this case. This behavior indicates that the outer ring-to-housing fit has reached the loose fit condition, i.e., P4 = 0, where further decrease in I5 does not induce any more expansion of the outer ring.
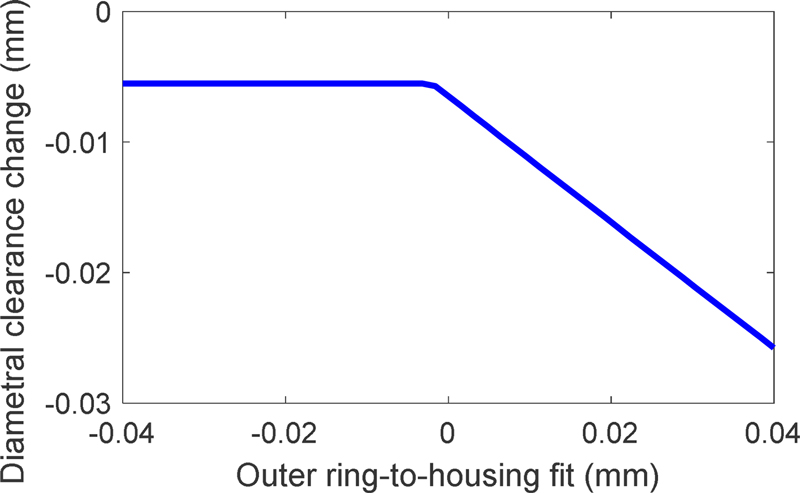
Diametral clearance change as a function of outer ring-to-housing fit, Fz = 1 kN, I2 = 20 μm, n = 30 krpm, TBR = 70°C
Heat generation in bearings is inevitable, and friction from a rotating bearing can raise the system temperature, leading to thermal expansion of all components. Fig. 10 illustrates the impact of varying temperatures. In this simulation, the ambient temperature is set at 20°C. As the temperature increases, the cumulative expansion of the bearing components leads to an increase in diametral clearance.
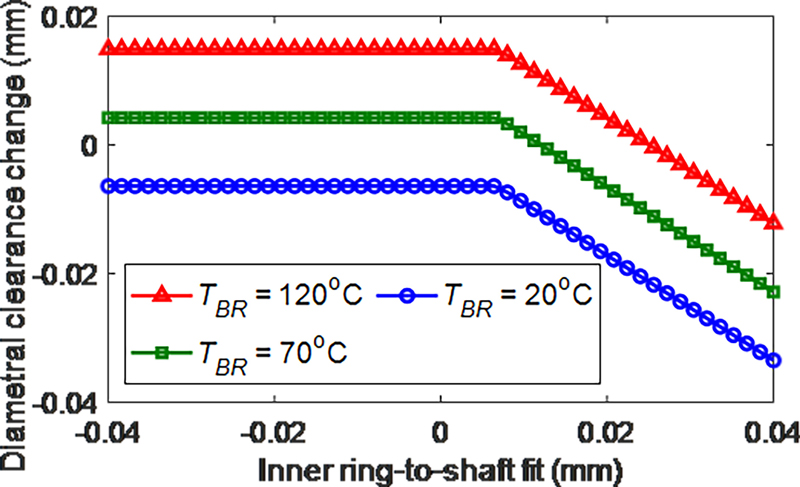
Operating diametral clearance as a function of inner ring-to-shaft fit, Fz = 1 kN, I2 = 20 μm, n = 30 krpm
This additional clearance is mainly due to the thermal expansion of the outer ring and housing. The constant diametral clearance change observed in the figure suggests a positive internal clearance or loose fit between the shaft and the inner ring.
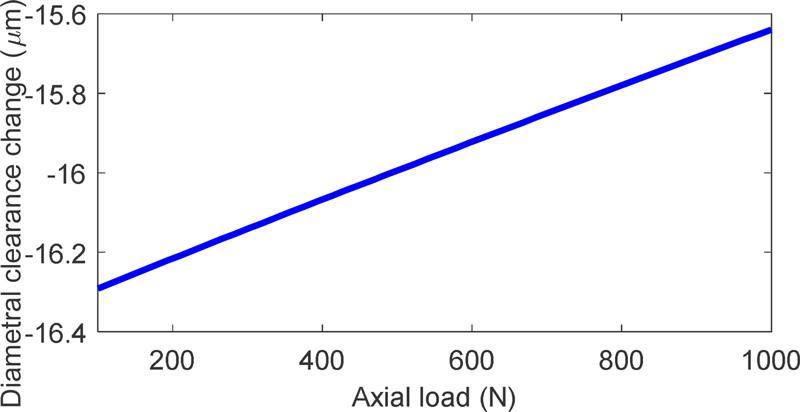
Applying an axial load to the shaft results in equal contact pressure on each ball, which distributes uniformly around the circumference of the rings and affects radial deformations. Fig. 11 shows how the diametral clearance of the ACBB changes with increasing axial load, demonstrating an approximately linear increase in clearance with axial load. Fig. 11 also illustrates how the pressure from the balls influences the fit-up characteristics of the bearing. Under axial load, the balls exert pressure towards the inner ring, as well as the outer ring, decreasing the internal clearances between the outer ring and housing, and the shaft and inner ring. This motion also creates additional space between the inner and outer races, leading to a change in diametral clearance.
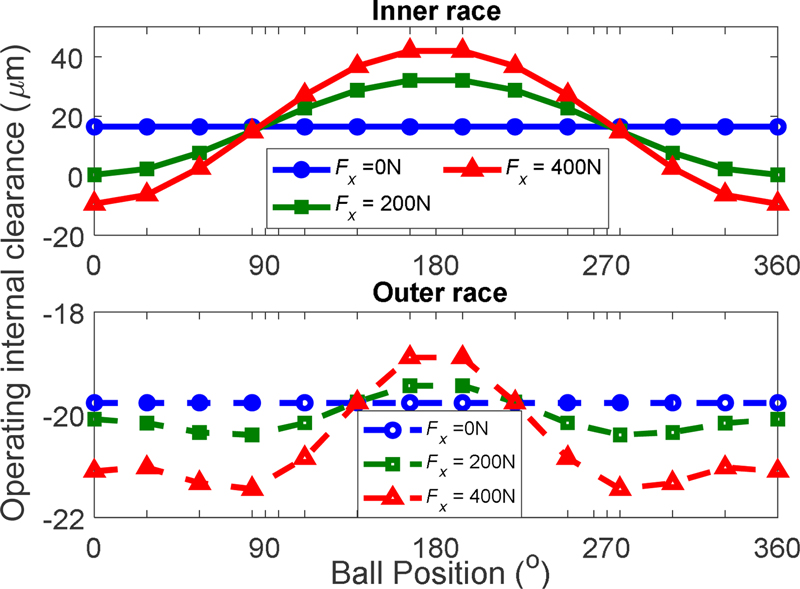
Since the diametral clearance is not well defined under radial load, the effect of radial load on operating internal clearances with respect to ball position is examined for both the inner and outer races. Fig. 12 illustrates how the internal clearances vary with increasing radial load. Here, the operating internal clearances are defined as the combined radial displacements of the ball and inner race for the inner clearance, and the ball and outer race for the outer clearance at a certain ball position considering the change in operating diametral clearance. The outer ring clearance is consistently less than the inner ring clearance due to the centrifugal force. The applied radial load causes radial shift to the ACBB in the same direction: the operating internal clearance becomes minimum at ϕ = 0° and maximum at ϕ = 180°. This variation in internal clearance leads to the axial excursion of individual balls.
5.2 Effect of Operating Diametral Clearance on Bearing Performance
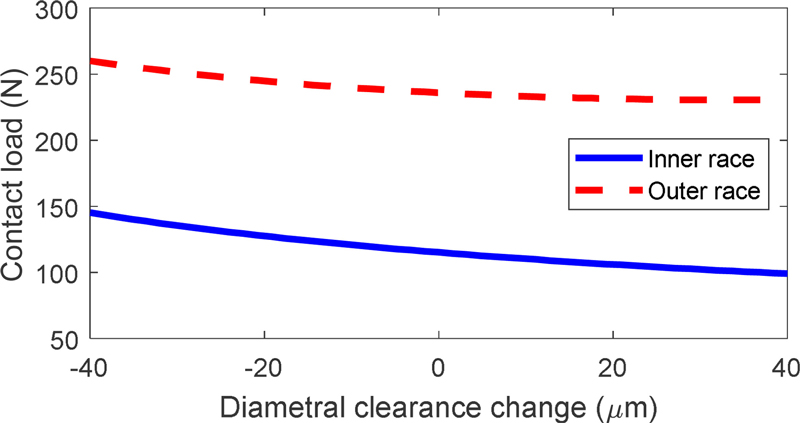
Diametral clearance is a critical internal clearance that significantly impacts bearing performance. As the diametral clearance changes, the balls undergo varying levels of compression, influencing their stress levels. Fig. 13 illustrates how changes in diametral clearance affect the contact loads on the balls. Under axial load, an increase in diametral clearance leads to a reduction in contact load. Consequently, increasing diametral clearance can improve bearing performance by lowering ball loads, which reduces friction and heat generation.
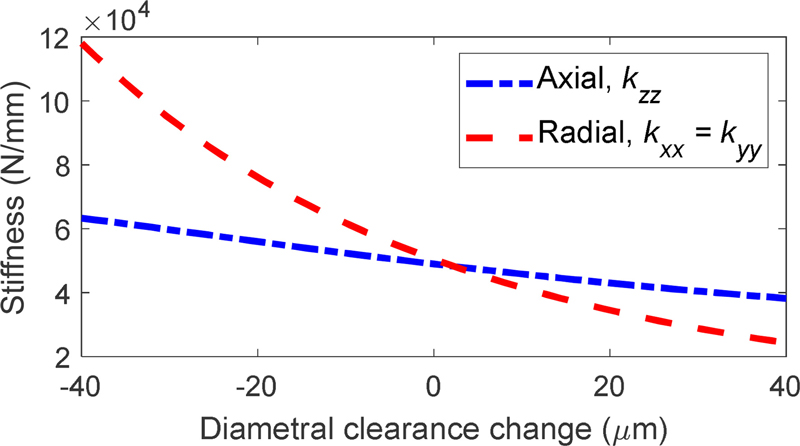
Bearing stiffness is a crucial characteristic, as diametral clearance influences the rigidity of the assembly. Fig. 14 shows that both axial and radial stiffness decrease as diametral clearance increases, with radial stiffness declining more rapidly than axial stiffness. As illustrated in Fig. 13, increasing diametral clearance reduces the contact loads, thereby lowering stress at the ball-race contacts and alleviating some deformations. This reduction in contact stress decreases stiffness as observed in Fig. 14.
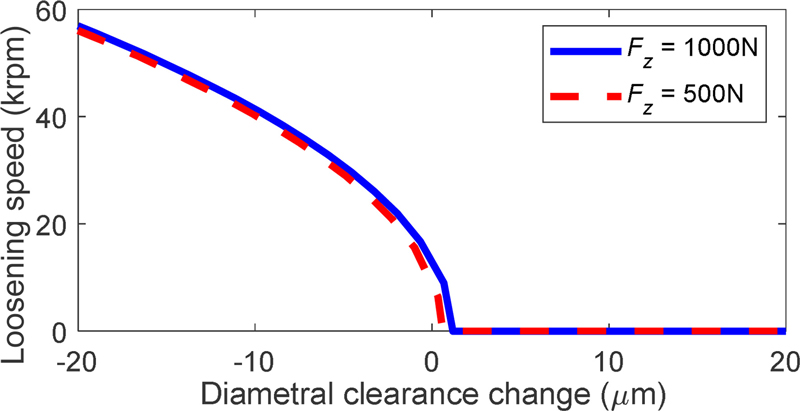
Fig. 15 shows the relationship between the loosening speed and the diametral clearance. In this simulation, the change in diametral clearance is induced by applying I2 = -0.04 to I2 = 0.04 mm and bearing temperature of 20°C to exclude the temperature effects. The loosening speed is highest at the smallest diametral clearance due to the high pressure between the balls and the races, which prevents loosening at lower speeds. As the diametral clearance increases, the pressure resisting centrifugal expansion diminishes, leading to greater ring expansion and, consequently, lowering the loosening speed.
6. Conclusions
This paper presents a novel approach for estimating the diametral clearances of ACBBs during operation by combining a quasi-static model with a fit-up model. The proposed model accounts for critical factors such as ball-race contact loads, interactions between the inner ring and shaft, and the outer ring and housing fits, as well as centrifugal expansion and temperature variations. By integrating ball pressures and fit-up conditions during assembly, the method provides accurate estimates of operating clearance. The validity of the approach was confirmed through comparison with commercial bearing software. Key findings include:
- 1) Rotational speed significantly reduces diametral clearance, although the effect of gyroscopic moments on this change is negligible.
- 2) Increasing the fit between the outer ring and housing, as well as between the inner ring and shaft, almost linearly reduces diametral clearance. Conversely, decreasing these fits increases the clearance until loose-fit conditions are reached.
- 3) Axial load reduces the change in diametral clearance by compressing the inner ring and shaft while causing the outer ring and housing to expand.
- 4) Radial load affects the operating internal clearance, which varies with angular position.
- 5) Increased diametral clearance tends to reduce the contact loads and stiffness of angular contact ball bearings.
- 6) Greater diametral clearance leads to increased ring expansion and, consequently, lowers the onset speed at which loosening occurs between the inner ring and shaft.
NOMENCLATURE
| B : | Bearing Width, mm |
| E : | Young’s Modulus, N/mm2 |
| K : | Integration Constant |
| r : | Ring Radius, mm |
| Fc : | Radial Cold Fit (before Mounting), mm |
| Fcg : | Centrifugal Force, N |
| Fh : | Radial Hot Fit (after Mounting), mm |
| I : | Interference Fit, mm |
| P : | Equivalent Pressures, N/mm2 |
| Pd : | Diametral Clearance, mm |
| T : | Temperature, °C |
| w : | Internal Clearance during Operation, mm |
| u : | Radial Displacement, mm |
| Γ : | Expansion Coefficient, /°C |
| ∆Pd : | Change in Diametral Clearance, mm |
| ξ : | Poisson’s Ratio |
| ρ : | Density, kg/mm3 |
| ω : | Rotational Speed, rad/s |
| Q : | Ball-race Contact Load Effect |
| T : | Temperature Effect |
| Ω : | Rotational Speed Effect |
Subscripts
| amb : | Ambient |
| b : | Ball |
| BR : | Bearing |
| e : | Outer Race |
| H : | Housing |
| HM : | Hot-mounted |
| i : | Inner Race |
| S : | Shaft |
| LL : | Loose Limit |
| LT : | Loose Total |
| TL : | Tight Limit |
| TT : | Tight Total |
Indices
| 1 : | Shaft Internal Surface |
| 2 : | Shaft External Surface or Inner Ring Internal Surface |
| 3 : | Inner Ring External Surface |
| 4 : | Outer Ring Internal Surface |
| 5 : | Housing Internal Surface or Outer Ring External Surface |
| 6 : | Housing External Surface |
| j : | Ball Index |
Acknowledgments
This work was conducted during the sabbatical year of the corresponding author at Kumoh National Institute of Technology (2023-2024).
REFERENCES
- Harris, T. A., (2001), Rolling bearing analysis, 4th edition, John Wiley and Sons.
-
Harris, T. A., Kotzalas, M. N., (2006), Advanced concepts of bearing technology: Rolling bearing analysis, 5th edition, Taylor & Francis Group.
[https://doi.org/10.1201/9781420006582]

-
Hong, S.-W. Tong, V.-C., (2016), Rolling-element bearing modeling: A review, International Journal of Precision Engineering and Manufacturing, 17(12), 1729-1749.
[https://doi.org/10.1007/s12541-016-0200-z]

-
Harris, T. A., Kotzalas, M. N., (2006), Rolling bearing analysis: essential concepts of bearing technology, Taylor & Francis.
[https://doi.org/10.1201/9781420006582]

-
Leonov, O., Golinitskiy, P., Antonova, U., Vergazova, J., Grinchenko, L., (2023), Justification of the type of fit depending on the type of loading and radial clearance in rolling bearings, E3S Web of Conferences, 402, 10031.
[https://doi.org/10.1051/e3sconf/202340210031]

-
Oswald, F. B., Zaretsky, E. V., Poplawski, Z. V., (2009), Interference-fit life factors for roller bearings, Tribology Transactions, 52(4), 415-426.
[https://doi.org/10.1080/10402000802687890]

-
Oswald, F. B., Zaretsky, E. V., Poplawski, Z. V., (2012), Effect of internal clearance on load distribution and life of radially loaded ball and roller bearings, Tribology Transactions, 55(2), 245-265.
[https://doi.org/10.1080/10402004.2011.639050]

-
Cao, Y., Altintas, Y., (2004), A general method for the modeling of spindle-bearing systems, Journal of Mechanical Design, 126(6), 1089-1104.
[https://doi.org/10.1115/1.1802311]

- Taylor, C., (1977), Estimation of stiffening effect of shaft and housing material outside projected area of a rolling element bearing, (Report No. E-9034), https://ntrs.nasa.gov/citations/19770014500
-
Philips, G., (1979), Bearing performance investigations through speed ratio measurements, ASLE Transactions, 22(4), 307-314.
[https://doi.org/10.1080/05698197908982929]

- Crecelius, W. J., Milke, D. R., (1973), Dynamic and thermal analysis of high-speed tapered roller bearings under combined loading, (Report No. NASA CR-121207), https://ntrs.nasa.gov/citations/19730017755
- Hadden, G. B., Kleckner, R. J., Ragen, M. A., Sheynin, L., (1981), Steady state and transient thermal analysis of a shaft bearing system including ball, cylindrical and tapered roller bearings, (Report No. NASA-CR-165365), https://ntrs.nasa.gov/citations/19820024093
- Timoshenko, S., (1940), Strength of materials Part II: Advanced theory and problems, 2nd edition, D. Van Nostrand Company.
-
Ricci, M. C., (2010), Internal loading distribution in statically loaded ball bearings, subjected to a combined radial and thrust load, including the effects of temperature and fit, Proceedings of the 11th Pan-American Congress of Applied Mechanics.
[https://doi.org/10.1155/2009/471804]

-
Ma, P., Liao, C. X., Duan, M. L., Li, J. K., Li, D. N., Zhang, B. L., (2004), Analysis of step interference fit of the high-speed motorized spindle with finite element method, Materials Science Forum, 471-472, 844-849.
[https://doi.org/10.4028/www.scientific.net/MSF.471-472.844]

-
Liu, G., Hong, J., Wu, W., Sun, Y., (2018), Investigation on the influence of interference fit on the static and dynamic characteristics of spindle system, The International Journal of Advanced Manufacturing Technology, 99, 1953-1966.
[https://doi.org/10.1007/s00170-018-2567-8]

- Crecelius, W. J., Pirvics, J., (1976), Computer program operation manual on SHABERTH: A computer program for the analysis of the steady state and transient thermal performance of shaft-bearing systems, (Report No. AFAPL-TR-76-90), https://apps.dtic.mil/sti/citations/ADA042981
-
Li, Z., Wang, C., Hu, X., Xu, E., Yang, L., (2024), Thermal-mechanical coupling performance and its influence on thermal stiffness of cylindrical roller bearings, Journal of Aerospace Engineering, 37(4), 04024031.
[https://doi.org/10.1061/JAEEEZ.ASENG-5168]

-
Tong, V.-C., Hong, S.-W., (2018), Study on the running torque of angular contact ball bearings subjected to angular misalignment, Proceedings of the Institution of Mechanical Engineers, Part J: Journal of Engineering Tribology, 232(7), 890-909.
[https://doi.org/10.1177/1350650117732921]

-
De Mul, J., Vree, J., Maas, D., (1989), Equilibrium and associated load distribution in ball and roller bearings loaded in five degrees of freedom while neglecting friction-Part I: General theory and application to ball bearings, ASME Journal of Tribology, 111(1), 142-148.
[https://doi.org/10.1115/1.3261864]

-
De Mul, J., Vree, J., Maas, D., (1989), Equilibrium and associated load distribution in ball and roller bearings loaded in five degrees of freedom while neglecting friction-Part II: Application to roller bearings and experimental verification, ASME Journal of Tribology, 111(1), 149-155.
[https://doi.org/10.1115/1.3261865]

-
Rivera, G., Park, S., Kang, C.-S., Kim, D., Hong, S.-W., (2024), Study on thermo-mechanical modeling and analysis of high-speed angular contact ball bearings under oil-jet lubrication, Journal of the Korean Society for Precision Engineering, 41(7), 569-579.
[https://doi.org/10.7736/JKSPE.024.048]

- Poplawski, J. V., COBRA-AHS: Advanced High-speed Computer Optimized Bearing Analysis (Version 5.6.0.122), J.V. Poplawski & Associates.

B.S. degree in Mechanical Engineering from Mapúa University in the Philippines in 2019. He is presently enrolled in a M.S. program in Mechanical Engineering at Kumoh National Institute of Technology (KIT), Korea. His current research interests include rolling bearing analysis and structural vibration analysis for mechanical systems.
E-mail: pmpo@kumoh.ac.kr

M.E. degree in Mechanical Engineering in 2021 from Kumoh National Institute of Technology (KIT), Korea. Currently, he serves as a Postmaster Researcher at KIT, Korea. His current research interests include rolling-element bearing modeling and analysis.
E-mail: gibsrivera@kumoh.ac.kr

B.E. degree in Mechanical Engineering from Kumoh National Institute of Technology (KIT), Korea in 2023. He is currently in graduate school, pursuing M.S. degree in Mechanical Engineering at KIT, Korea. His current research interests include rolling bearing modeling analysis.
E-mail: 20170552@kumoh.ac.kr

M.S. and Ph.D. degrees in Mechanical Engineering from KAIST, Korea, in 1985 and 1989, respectively. Currently, he is a Professor in the School of Mechanical System Engineering at KIT. His current research interests include spindle and bearings modeling and analysis, command shaping for positioning systems, vibration control, and structural vibration analysis for mechanical systems.
E-mail: swhong@kumoh.ac.kr


