A Flexible Solid 3D Model Reconstruction System for Mechanical CAD /CAM Systems
Copyright © The Korean Society for Precision Engineering
This is an Open-Access article distributed under the terms of the Creative Commons Attribution Non-Commercial License (http://creativecommons.org/licenses/by-nc/3.0) which permits unrestricted non-commercial use, distribution, and reproduction in any medium, provided the original work is properly cited.
Abstract
Three-dimensional CAD models are usually used by designers because of their applications in the areas of CAD/CAM/ CAE/CAQ. A desirous trend to create this model, long been studied by scientists globally, is 3D model reconstruction from views. With this method, geometric information can be easily entered as well as using existing 2D drawings. Most of the previous studies used three views, but many of the common parts needed only two views. A flexible reconstruction system that responds to both forms is the subject of this study. The proposed method has been installed and tested by an ADSRX program running on AutoCAD software. The 3D model results have been checked for the compatibility with CAD/CAM systems.
Keywords:
CAD, CAM, Orthographic views, Reconstruction1. Introduction
The solid 3D model on computers becomes essential in modern mechanical engineering because of its applications such as dynamic and static simulation, digital machining, visual observation, etc. There are three main trends to create this model: Use 3D CAD software such as SolidWork, Inventor, Catia, NX. to directly create basic geometry blocks, then link them together by Boolean operators; Automatically recreate solid 3D from available engineering drawings based on 2D representations (called automatic reconstruction); Draw new views and automatically reconstruct to 3D Solid. The first method has been extremely successful, initially appearing from 1990 with Auto CAD R12, getting better and almost perfect, but besides its advantages, designers should have the skills to read and understand technical drawings as well as proficiently use the 3D CAD systems, this is inconvenient for long-time engineers who are familiar with the traditional design only, these 3D Solid Files also have poor compatibility between 3D CAD software and even with the same software but different versions (due to commerciality). Also editing a 3D CAD File is much more complicated than editing a 2D CAD File. With the second and third methods, the designer only needs to create (or be available) 2D technical drawings, which are easy, fast and very familiar to the engineers. Compatibility between 2D CAD versions is also very good (the higher version will read the file of the lower version and can convert the file of the higher version to the lower version form). In addition, most of the current products have been and will be still performed and stored by technical drawings.
With their advantages, the second and the third methods were founded since 1970 by Idesawa1 and are continuously focused on research by scientists worldwide, whose works can be basically classified into two major categories: B-rep oriented approach1-14 and CSG oriented approach.15-18 The survey of these works allows for the following assessments: Recently, the B-Rep based reconstruction method is more appreciated than the CSG based method. This is mainly because CSG-based methods are less suitable for complex shapes and structures (especially when basic blocks interact that will lose the ability to identify them) and often require more user interaction than the B-Rep based method. However, there are still some problems that exist in the B-Rep based method: Most of the reconstruction methods require the input of three views while the technical drawings usually use only two views to describe the common machine details, which eliminate all the wrong objects often incompletely, and have not used line type information on the views leading to the need for more views to remove these wrong objects, very few works find all the possibilities of reconstruction results, the scope of object types is limited, many methods are only appropriate and proposed for polyhedral subjects, others have expanded the polyhedral approach to a quadratic face containing object but have not yet dealt with complex intersections and interactive structures (union, subtraction, intersection) of basic blocks containing curved surfaces. There has not been a single work that has achieved all three main advantages: reconstructing to an object containing revolving surfaces, from two views and giving enough solutions.
The above analyses are the reason for conducting our previous works11-14 on the issue of automatic reconstruction based on only two views, and Ref. 14 based on only three views. These works have gradually overcome the above problems and succeeded with many types of objects, however various problems still need to be studied and solved, in which: “how to build an integrated reconstruction system that flexibly responds to situations of the input: 2 views allowing sufficient reconstruction; 3 views; 2 views not allowing sufficient reconstruction” is the content of this work.
2. The Proposed Flexible Reconstruction Method
2.1 Basis of Typical B-Rep based Reconstruction Method
The following synthetic reconstruction method6 combines and develops polyhedron reconstruction methods of Wesley and Yan with Sakurai’s reconstruction method of objects with curved faces. Let f be a mapping function from an object O to its view Ps, set Ps = f(O). The 3D model reconstruction is to find a reverse mapping f-1 such that O* = f-1(Ps), where O* is the 3D solid object model of object O. f-1 can be analyzed in the following five main functions as follows:
f-1(Ps) = fSL(fBL(fFA(fED(fVR(Ps)))))
Where: fVR is a mapping function from 2D vertices in Ps to 3D vertices,
fED is a mapping function from 3D vertices to 3D edges,
fFA is a mapping function from 3D edges to faces,
fBL is a mapping function from the faces to the candidate blocks,
fSL is a mapping function from blocks to a solid model.
In each mapping function, rules along with some constraints are applied to low-level objects to create higher-level objects and eliminate “ghost” elements.
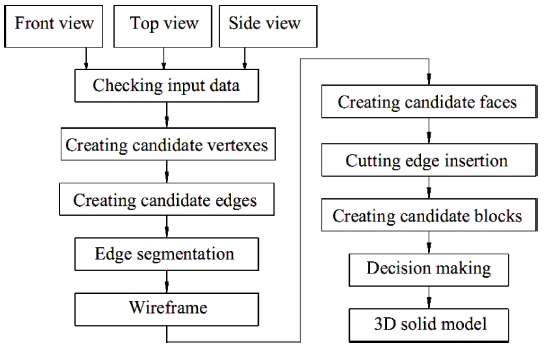
Fig. 1 shows the steps of a typical B-Rep based 3D model automatic reconstruction method. The method consists of eight steps. The main steps are candidate vertex formation, candidate edge formation, candidate face creation, candidate block creation, and decision making. These steps correspond to the mapping functions. When two edges intersect, they are divided into four edges in the edge segmentation step. If the two faces intersect, they are also divided into four faces in the cutting edge insertion step.
2.2 Proposed Flexible Reconstruction Method
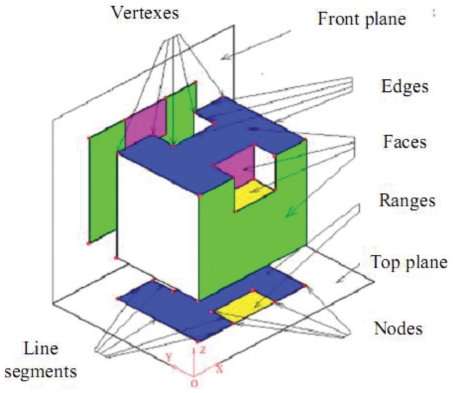
*Definitionst in 2D View: (see Fig. 2)- Lines are divided into line segments by intersecting points- A node is an endpoint of a line segment. - A curved line containing extreme points should be divided into two segments (e.g. a circle should be divided into two arcs)- A view is a set of nodes and line segments. * Definitions in the 3D object: (see Fig. 2)- A Solid is a body occupying a range in the three-dimensional space enclosed by several surfaces. - A face is a segment of surface which constitutes a boundary between the solid and the exterior space. - An edge line is an intersection of two different faces, and if we desire to distinguish the line added for the identity of a curved surface from the others, the added line is called an auxiliary edge line. - A vertex is an intersecting point of more than three edge lines.
The reconstruction problem is that from the two (or more) given View1 View2 (and View3) to find out the solid considered as a set {{V}; {E}; {F}} satisfying two groups of conditions below
□ The projection conditions
SL1 ≡ View1 SL2 ≡ View2 (SL3 ≡ View3)□ Topology conditions of a solid
In which: {V} is the set of vertices; {E} is the set of edges; {F} is the set of faces; SL: solid; SL1 is the projection of the solid onto the front plane; SL2 is the projection of the solid onto the top plane; View1, View2, View3: front view, top view, side view on the given engineering drawing.
A general way to solve the problem consists of two main phases:
- From View1, View2, (and View3), to find out a set of candidate objects (vertices, edges, faces - that objects satisfy only the condition of projection)- To find out a subset in the set of candidate objects in order to satisfy two groups of conditions above, that means some false candidate objects must be removed. The growing problems are:- The algorithm to create the candidate objects should be general for many types of surfaces such as plane, cylinder, cone, sphere. - The algorithm removing false objects can against the increase in the number of candidate faces. In order to achieve this, we need to use an efficient strategy for browsing the combination of assumed values with using the rule for the propagation of attributes (true and false) of the relative object with respect to satisfying the projection and topology conditions, avoiding the combination of all.
- From the original database of two given views in AutoCAD, that follows the DXF code, create the database as follows:
Node1[], Node2[] are two matrices of the type ADS-POINT (ARX programming in Visual C 6++)
From database Node1[] and Node2[] above, find out any pair i, j satisfying the condition as follows:
| (1) |
ع is the small value depending on the user’s input
The pair i, j specifies a candidate vertex k.
It is not difficult to specify X, Y, Z coordinates of the 3D vertex k from its two views (, which belong to the descriptive geometry,) as follows:
- set Yo = min{Node1[][Y]}, that means we choose the lowest point on the given front view as front view of the origin O of coordinate system, then create the database Ver3D[] that is a matrix of ADS_3DPOINT:
| (2) |
| (3) |
| (4) |
From original database of front view, create the database as follows:
- Matrix lineseg1[][2]: lineseg1[k][1] and lineseg1[k][2] show two endpoints of line segment k- Matrix line1[][]: line1[m][] contains endpoints of line segments that belongs to a unique line m.
It is similar to create lineseg2[][]; line2[][] from top view.
From database above, find out any pair vertices k, m satisfying the conditions as follows :
- There is a member of line1[][] that includes
| (5) |
- There is a member of line2[][] that includes
| (6) |
The pair k, m specifies two endpoints (vertex) of a candidate edge. The set of edges should be stored in the matrix Ed[][]: Ed[][1] and Ed[][2] show two vertices k, m.
Ed[][3] and Ed[][4] show the members of line1[][] and line2[][] (i.e. Ed[][3] and Ed[][4] show front view and top view of the edge)
The Eqs. (5) and (6) are used for recognition of any popular edge.
If ver[k][1] = ver[m][1] and they satisfy Eq. (6) then the pair k, m specifies two vertices of a frontal projecting edge (the edge is perpendicular to the frontal plane of projection)
If ver[k][2] = ver[m][2] and they satisfy Eq. (5) then the pair k, m specifies two vertices of a horizontal projecting edge (the edge is perpendicular to the horizontal plane of projection).
Note: for each edge, check for the possible existence of intermediate vertices. If an intermediate vertex is found, the vertex causes the creation of two new edges (unless one of them already exists).
- Projecting face (the face is perpendicular to the plane of projection): For each member j of the matrix line1[][], find out all of the edges i as follows:
fronted = ed[i][3]; begin = ed[i][1]; end = ed[i][2];frontbegin = ver[begin][1]; frontend = ver[end][1];
If frontbegin is equal to frontend and they belong to line1[j][] then the edge i is a frontal projecting edge that belongs to the surface j (that has the front view as the line corresponding to line1[j][]).
If frontbegin is not equal to frontend but fronted equal to j then the edge i belong to the surface j
From the set of edges on the frontal projecting surface j, find out all of the minimal closed loops of edges, they specify a new candidate face. It is similar to recognize the horizontal projecting face. The candidate faces should be stored in the database faceed[][]
- Cylinder: The cylinders mentioned here are projecting cylinders so that in any view, projection of the cylinder becomes a circle. The circle should be divided into two arcs. The cylinder is divided into two half projecting cylinders, the algorithm for recognition of these half cylinders is the same as the algorithm above.
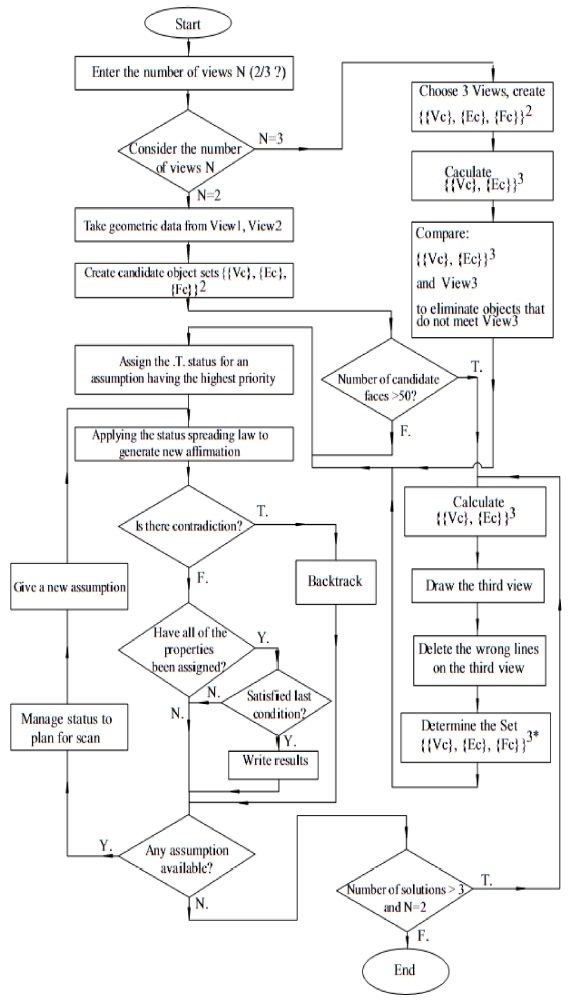
The proposed flexible reconstruction system algorithm is shown (in Fig. 3) as follows:
Interpretation of the algorithm as follows:
From the 2D database created from a DXF drawing file, find out a pseudo model consisting of sets of candidate vertexes {Vc}, edges {Ec}, faces{Fc}, these objects satisfy only the projection condition and may be true or false. In international scientific articles, the false objects in the pseudo model are called “ghost” objects, when the input of the reconstruction process is just two views, the number of “ghost” objects becomes more.
{{Vc},{Ec},{Fc}}2 is a candidate set created from the front and top views. {{Vc},{Ec}}3 is the side view of the candidate set created from the front and top views.
{{Vc},{Ec},{Fc}}3* is a candidate set created from the front and top views and the corrected side view. The loop located in the lower left corner of Fig. 3 is a binary traversal of the right or wrong assumptions of the candidate faces associated with the inference spreading the candidate states to combat “exhaustion” of the combinations. The purpose of this traversal process is to eliminate false assumptions due to dissatisfaction with topological conditions and projection conditions. The condition of the number of candidate faces > 50 when running reconstruction for 2 views to counteract the increase in traversal time of the assumption binary tree (the duration of this process is exponentially increased: 2n with n is the number of assumed faces). The status management and traversal planning block aim at selecting the face for further traversal with the highest priority (the priority is assessed by its amount of information, for example, the face contains many edges, the face will see a high level of priority). Conflicts are examined during the traversal process primarily using the object’s topological conditions and the line type of the highest or most distant faces. The last condition is to check all conditions: projection, topology, and line type before giving the solution. Calculating the third view is based on the relations between 3D coordinates X, Y, Z of one point with its 2D coordinate X, Y on the views as follows:
| (7) |
| (8) |
| (9) |
| (10) |
| (11) |
Where: Node1, Node2 are respectively sets of points on the front and top views, Zo = min{Node1[][Y]}, Yo = max{Node2[][Y]}, Xmin = min{Node3[][X]}; t, u, j are the numbers of nodes in the front, top, and side views of a 3D vertex respectively (see ADS_Point data type of ADSRX language similar to multidimensional array).
3. Verification Results and Discussion
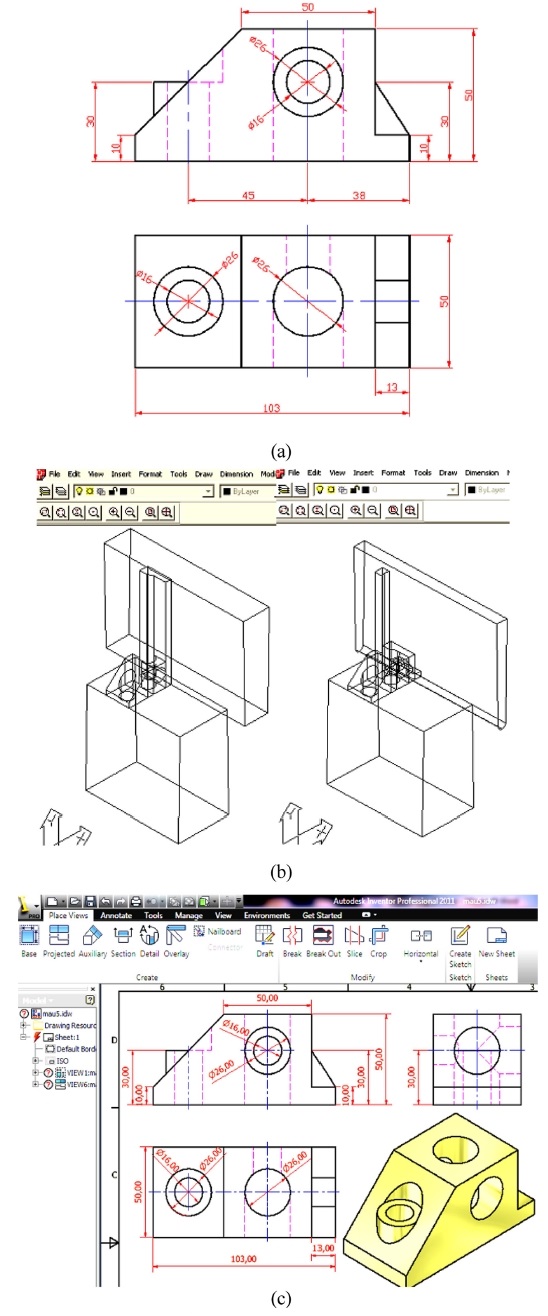
The proposed reconstruction method used to create a reconstruction experimental tool is a program of more than 5000 lines of code written in Visual C ++ 6.0 that incorporates the AutoCAD-R14 ADSRX library. Translating this source program into the target code is the ARX file type, after loading this file into the AutoCAD-R14 environment, AutoCAD has an extended function that automatically reconstructs a solid 3D model from the standard views. A computer with a medium configuration (2.1 GHz, Core i3, 2GB memory) is used to automatically reconstruct two representative samples and produce test results of the proposed method as shown in Figs. 4 and 5.
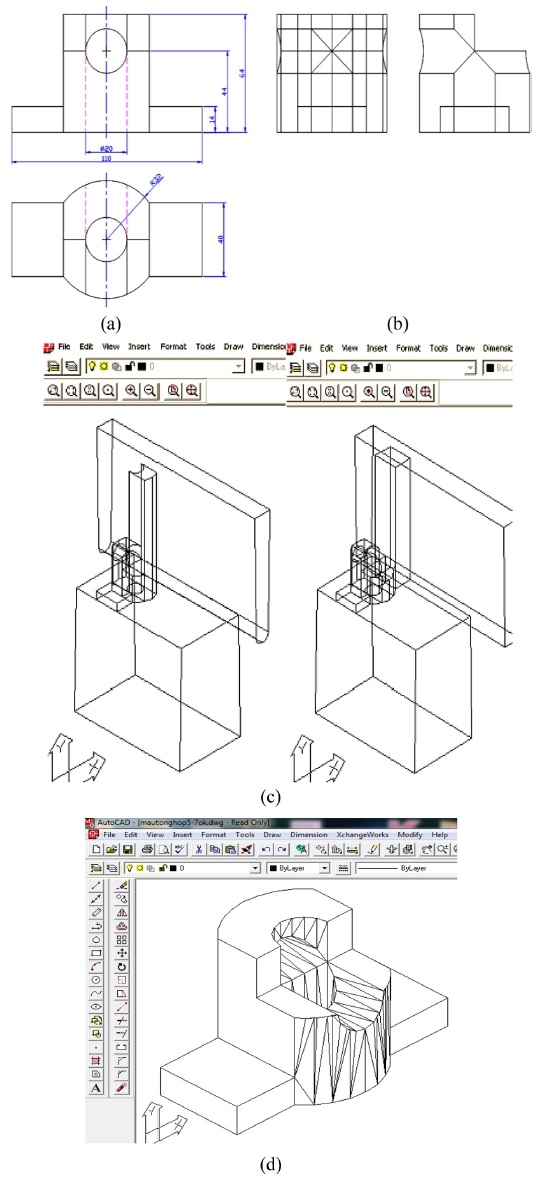
Sample 1 is given by only 2 views as shown in Fig. 4(a). The reconstruction program notifies the generation of 54 vertices, 99 edges, and 47 faces. The number of solutions that satisfies the topological condition is 6400, the number of line type contradictions is 5504, the number of real solutions is one, the reconstruction time is 0.7 seconds. Resulting solid is converted to SAT format and embedded in INVENTOR to recreate 3 views as shown in Fig. 4(c), the results indicate absolute accuracy. In this case, since the number of faces <50, the system did not automatically draw a pseudo side view to require correction to an additional view but was working correctly and quickly.
Sample 2 is given by only 2 views as shown in Fig. 5(a). The reconstruction program notifies the generation of 50 vertices, 108 edges, and 56 faces, then automatically draws the pseudo side view to remove the excess edge as shown in Fig. 5(b), then works well and fast, the reconstruction time is 0.9 seconds, giving the resulting solid as shown in Fig. 5(c). If using only two views for this sample, the reconstruction time is 11 seconds and produces 3 solutions,14 and if planning to use 3 views like other works, must actively draw the side view (when it is unknown whether or not to draw that view because most of the mechanical parts need only two views), it is more time-consuming than being assisted by the pseudo side view and just deleting the false lines.
The proposed method is limited to perfect input drawings containing straight lines, circles, and arcs. However, an engineering drawing is a mixture of geometry and annotation representations, and sometimes it is difficult to ensure that the drawing is accurate and consistent. Therefore, techniques for reconstructing 3D objects from real drawings are necessary to take imperfections into account.6
Like some works, the 3D solids reconstructed in this work are limited to two-manifold objects bounded by planar and cylindrical surfaces but unlike that work, the number of given view is minimum so the method is more complex. If there are more than one 3D solid reconstructed from two-views drawing, it is necessary to add the third existing view or modify the pseudo-view created automatically by the flexible reconstruction system.
4. Conclusions
The proposed flexible reconstruction method has overcome the existence of previous reconstruction methods which base only on a fixed number of views, and met 3 types of drawings: 2 views; 3 views and “2.5 views”. New features of the work include 1) New idea of a flexible reconstruction system; 2) Flexible reconstruction system algorithm; 3) Testing results with samples representing design situations confirmed the correctness of the algorithm, the effectiveness of using flexible reconstruction system as well as the absolute accuracy of the reconstructed solid.
Although the flexible reconstruction system above has been more effective for two-view drawing with the number of faces greater than 50 by not having to draw a third view, deleting the redundant strokes on the third view (“2.5 view drawing”) can continue to be further shortened with the concept of “2 + 1/4 view” drawing. That is the connected research direction of this work.
Acknowledgments
This paper was presented at PRESM 2019
This study was supported by Hanoi University of Science and Technology in the project T2016-PC-059
REFERENCES
-
Idesawa, M., “A System to Generate a Solid Figure from Three View,” Bulletin of Japan Society of Mechanical Engineers, Vol. 16, No. 92, pp. 216-225, 1973.
[https://doi.org/10.1299/jsme1958.16.216]

-
Wesley, M. A. and Markowsky, G., “Fleshing out Projections,” IBM Journal of Research and Development, Vol. 25, No. 6, pp. 934-954, 1981.
[https://doi.org/10.1147/rd.256.0934]

-
Sakurai, H. and Gossard, D. C., “Solid Model Input through Orthographic Views,” ACM, 1983.
[https://doi.org/10.1145/800059.801155]

-
Dutta, D. and Srinivas, Y. L., “Reconstructing Curved Solids from Two Polygonal Orthographic Views,” Computer-Aided Design, Vol. 24, No. 3, pp. 149-159, 1992.
[https://doi.org/10.1016/0010-4485(92)90034-8]

-
You, C. F. and Yang, S. S., “Automatic Feature Recognition from Engineering Drawings,” The International Journal of Advanced Manufacturing Technology, Vol. 14, No. 7, pp. 495-507, 1998.
[https://doi.org/10.1007/BF01351395]

- Watanabe, T., “Revision of Inconsistent Orthographic Views,” Journal for Geometry and Graphics, Vol. 2, No. 1, pp. 45-53, 1998.
-
Shin, B.-S. and Shin, Y. G., “Fast 3D Solid Model Reconstruction from Orthographic Views,” Computer-Aided Design, Vol. 30, No. 1, pp. 63-76, 1998.
[https://doi.org/10.1016/S0010-4485(97)00054-7]

-
Liu, S.-X., Hu, S.-M., Chen, Y.-J., and Sun, J.-G., “Reconstruction of Curved Solids from Engineering Drawings,” Computer-Aided Design, Vol. 33, No. 14, pp. 1059-1072, 2001.
[https://doi.org/10.1016/S0010-4485(00)00143-3]

- Furferi, R., Governi, L., Palai, M., and Volpe, Y., “3D Model Retrieval from Mechanical Drawings Analysis,” International Journal of Mechanics, Vol. 5, No. 2, pp. 91-99, 2011.
- Long, H. and Long, B. T., “Automatic Creating 3D Pseudo-Wireframe from 2D Orthographic Views,” Journal of Science and Technology of Ha Noi University of Science and Technology, Vol. 106, pp. 46-49, 2015.
- Long, H., Long, B. T., and Phan, V. H., “Conical Solid Model Reconstruction of 3D Pseudo-Wireframe Model Found from 2D Orthographic Views,” Journal of Science and Technology of Ha Noi University of Science and Technology, Vol. 108, pp. 68-72, 2015.
- Long, B. T. and Long, H., “Automatic 3D Model Reconstruction from Multi-Views Engineering Drawing for CAD/CAM Systems,” Proceedings ISEPD ISBN 978-89-5708-236-2, pp. 374-377, 2014.
- Long, H. and Long, B. T., “Automatic 3D Model Reconstruction from a Multi-Views Engineering Drawing File Containing even Curves and Hidden Lines for CAD/CAM Systems,” Proceedings RCMME ISBN 978-604-911-942-2, pp. 20-23, 2014.
- Long, H., ”Expanding a 3D Solid Reconstruction System Using Two Views to the System Using Three Views,” Journal of Science and Technology of Ha Noi University of Science and Technology, Vol. 125, pp. 40-45, 2018.
-
Aldefeld, B., “On Automatic Recognition of 3D Structures from 2D Representations,” Computer-Aided Design, Vol. 15, No. 2, pp. 59-64, 1983.
[https://doi.org/10.1016/0010-4485(83)90169-0]

-
Geng, W., Wang, J., and Zhang, Y., “Embedding Visual Cognition in 3D Reconstruction from Multi-View Engineering Drawings,” Computer-Aided Design, Vol. 34, No. 4, pp. 321-336, 2002.
[https://doi.org/10.1016/S0010-4485(01)00092-6]

-
Lee, H. and Han, S., “Reconstruction of 3D Interacting Solids of Revolution from 2D Orthographic Views,” Computer-Aided Design, Vol. 37, No. 13, pp. 1388-1398, 2005.
[https://doi.org/10.1016/j.cad.2005.01.007]

- Wang, Z. and Latif, M., “Reconstruction of 3D Solid Models using Fuzzy Logic Recognition,” World Congress on Engineering, pp. 37-42, 2007.
PhD. in the School of Mechanical Engineering, Hanoi University of Science and Technology, Vietnam. His research interests are CAD/CAM/CAE, reverse engineering Computational Geometry, cutting tool profiling by enwrapping, gear machining.
E-mail: long.hoang@hust.edu.vn

Professor in the School of Mechanical Engineering, Hanoi University of Science and Technology, Vietnam. His research interests are Metal cutting, industrial instrument, CAD/CAM/CAE
E-mail: long.banhtien@hust.edu.vn

