Friction Stir Dissimilar Butt Welding of Mild Steel and Aluminum 5052-O Alloy

Copyright © The Korean Society for Precision Engineering
This is an Open-Access article distributed under the terms of the Creative Commons Attribution Non-Commercial License (http://creativecommons.org/licenses/by-nc/3.0) which permits unrestricted non-commercial use, distribution, and reproduction in any medium, provided the original work is properly cited.
Abstract
The solid state dissimilar joining of mild steel and aluminum 5052-O alloy is successfully achieved by friction stir welding (FSW). The 2 mm thick sheets are butt welded using a convex scrolled tool made of tungsten carbide. With a constant weld speed of 75 mm/min, two different tool at rotation speeds of, 800 and 1000 rpm, were employed to determine the feasibility of the joint formation. Macroscopic observation of the cross section confirmed the formation of a sound FSW joint. However, the formation of an intermetallic in the Stir Zone (SZ) is also observed for the both sets of process parameters. Comparatively, better material mixing is observed when the parameters are set at, 1000 rpm and 75 mm/min respectively. The hardness test revealed the presence of three distinct hardness zones in the SZ for the two parameter sets.
Keywords:
Solid state joining, Dissimilar joining, Friction stir welding키워드:
고상 접합, 이종 접합, 마찰 교반 접합1. Introduction
The environmental and energy efficiency concerns in transportation industries compel manufacture of multi-material and hybrid structures. These new structures frequently use lightweight alloys like aluminum or magnesium alloys in their parts with the aim of overall weight reduction for lowering fuel consumptions and toxic emission. Engineering relevance involves joining of aluminum alloy and steels as an important dissimilar fabrication requirement for the manufacture of multi-material structures.1,2 Due to the significantly different melting temperatures and other physical properties, joining of aluminum alloy and steels by conventional fusion joining process is extremely difficult.
A conventional fusion joining process like arc welding leads to formation of complex weld pool shapes, inhomogeneous solidification microstructures, and segregations. Also the extremely low solubility of Fe in Al leads to the formation of brittle and excessive Al-rich FexAly intermetallic compound (IMC) phases, which are detrimental to the mechanical properties of the joint.3 In this regard, Kreimeyer and Sepold4 suggested that if the IMC layer is less than 10 μm thick, the joint may be mechanically sound.
Various joining methods such as friction stir knead welding,5 friction welding,6,7 surface activated bonding,8 abrasion circle friction spot welding,9 cold metal transfer,10 laser penetration welding,11 and barrel nitriding process12 have been used to join aluminum alloys to steels. Among the mentioned joining methods, friction stir welding (FSW) does not require a high pressure or vacuum chamber. Therefore, FSW can be easily applied inside the assembly plant for both continuous and spot welding processes.13 The joining mechanism in butt FSW mainly involves intermixing of plastically deformed materials in stir zone (SZ). Inside the SZ, high temperature and strain rate generally lead to the formation of dynamically recrystallized fine grain structure, which consequently enhances the mechanical properties of the joint.14 Even though initial investigations on FSW of aluminum alloys to steels report the presence of IMCs such as Fe4Al13, Fe2Al5, and FeAl4, the formation of IMC layers at aluminum-steel interface weakens significantly due to relatively lower heat input in FSW.15
The FSW process parameters such as tool rotation speed and weld speed influence the microstructure and properties of the joint. Therefore, it is natural that the optimization of the process parameters has been the focus of the researchers. Butt FSW of thin sheets of aluminum 6061-T6 alloy and advanced high strength steel was conducted by Liu et al.16 They analyzed the effect of process parameters on the joint microstructure evolution based on the mechanical welding force and temperature, which were measured during the welding process. Also, Coelho et al.17 investigated the influence of a distinct high strength steel base material on the joint efficiency of FSW of aluminum alloy to the high strength steel. They concluded that the joint efficiency depended foremost on the mechanical properties of the heat affected zone (HAZ) and the thermo-mechanical affected zone (TMAZ) of the aluminum alloy.17
In this technical report, FSW of aluminum 5052-O alloy and mild steel sheets has been conducted by altering the process parameters in butt configuration with offset of the tool pin towards the steel sheet at the advancing side. The cross section of joint was briefly analyzed with the aid of optical microscopy and microhardness indentation test.
2. Experimental Set-Up
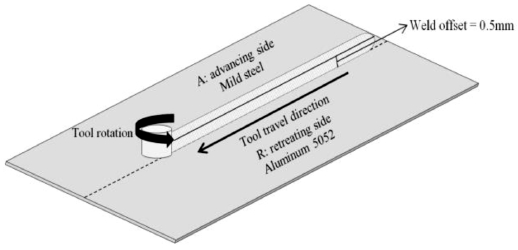
Mild steel (at the advancing side) and aluminum 5052-O alloy (at the retreating side) sheets of 2 mm thickness each were butt welded in displacement controlled mode using custom-made FSW machine (RM1A, MTI, USA), as schematically shown in Fig. 1 The process parameters for FSW are listed in Table 1 Note that the welding was carried out by offsetting the tool to the distance of 0.5 mm towards the steel sheet side at the advancing side. It has been reported that offsetting the tool to an aluminum alloy side serves as a better method to protect the tool from wearing during FSW of steels and aluminum alloys. However, in that case, researchers also reported no trace of material intermixing inside the SZ.18,19 Material intermixing being a crucial factor for determining joint strength was found to be better in this present study when the tool was inserted into the steel side.
The axial force and torque histories recorded in the data acquisition system attached to the FSW machine were first analyzed to evaluate the heat input during the process. At next, to observe the material flow in the SZ, the cross section perpendicular to the welding direction was prepared by polishing and etching with Keller’s (for aluminum) and Nital (for mild steel) etchant. Optical microscopy (OM; A1m Axio Imager, Carl Zeiss, Germany) was then carried on the cross section. For the evaluation of mechanical properties of the joint, Vickers hardness was measured along the cross section using a fully calibrated Vickers Microhardness tester (A-1170, Leica, Germany) with a load of 0.49 N for 10 sec.
3. Results and Discussion
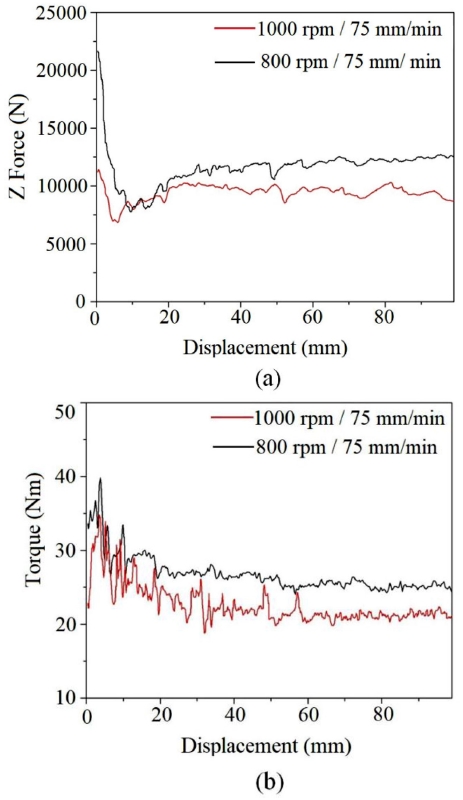
The mechanical interactions between the FSW tool and the workpiece materials can be easily examined from the process responses, the axial force and torque histories in Figs. 2(a) and 2(b). These process responses are meaningful since they are related with the heat input during joining by the stirring action of the pin and shoulder of the tool. The force and torques histories recorded during the FSW exhibit that by increasing the tool rotation speed from 800 to 1000 rpm at the constant weld speed of 75 mm/min, both the axial force and spindle torque decreases significantly. This clearly reveals that the frictional heat increased immensely with the increase in tool rotation speed at the constant weld speed, which directly influences plasticization of the materials. From the process responses in Fig. 2, the heat input during FSW can be approximated using the relation below.20
| Heat input=∫t0Cz(t)xNp×2π60dt | (1) |
Here, Cz and Np represent the torque and the tool rotation speed (in rpm), respectively. The heat (or energy) input values calculated using Eq. (1) are listed in Table 1.
The material flow in the FSW joint was examined for the both FSW parameter combinations, 800 rpm - 75mm/min and 1000 rpm - 75 mm/min, using a differential etching contrast technique and OM, as shown in Figs. 3 and 4. In the figures, the bright and dark regions represent the aluminum alloy and the mild steel, respectively.
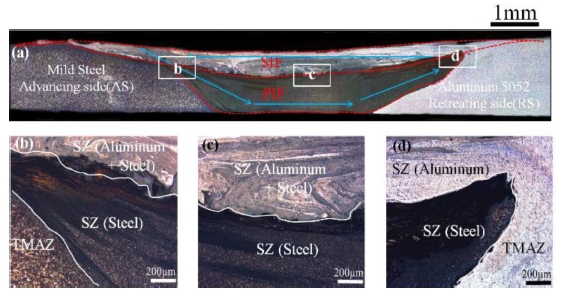
(a) Material flow path and weld cross section for 800/75 combination of parameters (b), (c), and (d) are magnified zones in advancing, central and retreating side as marked in the weld cross section
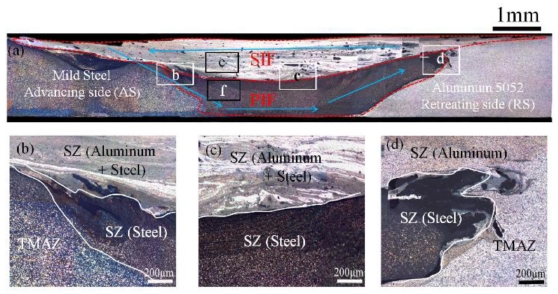
(a) Material flow path and weld cross section for 1000/75 combination of parameters (b), (c), and (d) are magnified zones in advancing, central and retreating side as marked in the weld cross section
For the both FSW parameter combinations, the results of the OM of the cross sections reveal that that the shoulder influenced area (SIF) is limited to top part of the SZ, whereas the bottom part of the SZ was influenced by the pin (the pin influenced area: PIF). In the SZ, the material flow took place along the horizontal and vertical paths, as indicated by the blue arrows. Material flow in the SIF indicates the transfer of aluminum alloy from the retreating side to the advancing side along the horizontal path. In the PIF, the material flow is nearly opposite. The steel from the advancing side was extruded and penetrated into the aluminum alloy in the retreating side, exhibiting an elongated band structure in the bottom part of the SZ. Intermixing of the steel and the aluminum alloy with formation of lamellar structures inside the SIF is clearly observed, as shown in the magnified views in Figs. 3(b)-3(d) and Figs. 4(b)-4(d). The results of EDS elemental scan for the SIF and PIF with 1000 rpm / 75 mm/min (Fig. 5) confirm the observation. This suggests that a certain quantity of the steel extruded to the retreating side was again re-transported to the advancing side. While the material flow paths for the both FSW parameter combinations are generally similar, the higher heat input by the parameter combination with 1000 rpm naturally plasticize the materials to a higher extent. As a result, a larger amount of aluminum alloy was transferred from the retreating side and a thicker SIF was formed in the SZ for the parameter combination with 1000 rpm.
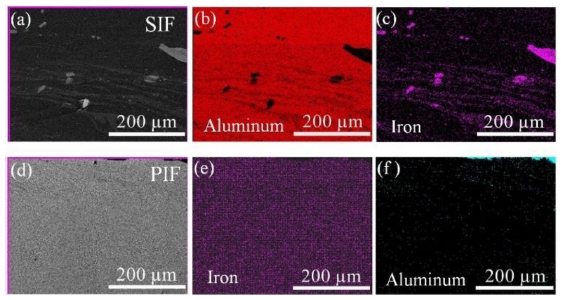
(a) SEM image of the center of SIF with 1000 rpm / 75 mm/min and the results of EDS elemental scan of the region shown in (a): (b) aluminum and (c) iron; (d) SEM image of the center of PIF with 1000 rpm /75 mm/min and the results of EDS elemental scan of the region shown in (d): (e) aluminum and (f) iron
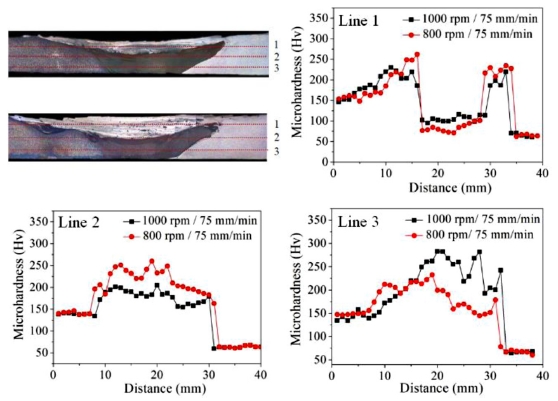
The Vickers hardness distributions were measured along the three different lines on the cross sections of FSW joint, as depicted in Figs. 6(a)-6(d). For the both parameter combinations, the hardness distribution along the line 1 passing the SIF shows that the hardness of the SIF is close to that of the base aluminum alloy, which is reasonable since the SIF is mostly composed of the aluminum alloy. The slight higher hardness is probably due to the intermixing of the steel from the advancing side in the SIF. It is interesting to see the hardness distributions in the PIF (lines 2 and 3) are significantly higher even than that of the base steel. Actually, it is very likely that intermetallic particles, which affect the mechanical properties significantly,18 were formed in the SZ. Also the occurrence of dynamic recrystallization in the SZ is quite likely during FSW. Therefore, further understanding of the mechanical properties of the FSW joint of the steel and the aluminum alloy should be accompanied by thorough microstructural analysis. Additional microstructural analysis is beyond the scope of this technical report and will be conducted as a future work.
4. Conclusion
Butt joining of the mild steel and the aluminum 5052-O alloy was successfully conducted by FSW with offset of the tool pin towards the steel sheet at the advancing side. The result of OM shows that the SZ is composed of two distinctively recognized regions, the SIF and the PIF. Due to the structure of the SZ, the hardness distributions on the cross section became quite different from each other, depending of the relative position of the measurement line. It is very likely that intermetallic particle formation and dynamic recrystallization occurred in the SZ during joining. A detailed microstructural analysis will be conducted as a future work. It also needs to be noted that the effect of other FSW parameters including tool travel speed and tool geometry could affect the joint property.
Acknowledgments
This research was supported by the 2016 research fund of the University of Ulsan.
REFERENCES
-
Tang, J. and Shen, Y., “Effects of Preheating Treatment on Temperature Distribution and Material Flow of Aluminum Alloy and Steel Friction Stir Welds,” Journal of Manufacturing Processes, Vol. 29, pp. 29-40, 2017.
[https://doi.org/10.1016/j.jmapro.2017.07.005]

-
Hussein, S. A., Tahir, A. S. M., and Hadzley, A. B., “Characteristics of Aluminum-to-Steel Joint Made by Friction Stir Welding: A Review,” Materials Today Communication, Vol. 5, pp. 32-49, 2015.
[https://doi.org/10.1016/j.mtcomm.2015.09.004]

-
Das, H., Jana, S. S., Pal, T. K., and De, A., “Numerical and Experimental Investigation on Friction Stir Lap Welding of Aluminum to Steel,” Science and Technology of Welding and Joining, Vol. 19, No. 1, pp. 69-75, 2014.
[https://doi.org/10.1179/1362171813Y.0000000166]

- Kreimeyer, M. and Sepold, G., “Laser Steel Joined Aluminium-Hybrid Structures,” Proc. of ICALEO, 2002.
-
Geiger, M., Micari, F., Merklein, M., Fratini, L., Contorno, D., et al., “Friction Stir Knead Welding of Steel Aluminium Butt Joint,” International Journal of Machine Tools and Manufacture, Vol. 48, No. 5, pp. 515-521, 2008.
[https://doi.org/10.1016/j.ijmachtools.2007.08.002]

-
Sahin, M., “Joining of Stainless-Steel and Aluminium Materials by Friction Welding,” International Journal of Advanced Manufacturing Technology, Vol. 41, Nos. 5-6, pp. 487-497, 2009.
[https://doi.org/10.1007/s00170-008-1492-7]

-
Taban, E., Gould, J. E., and Lippold, J. C., “Dissimilar Friction Welding of 6061-T6 Aluminum and AISI 1018 Steel: Properties and Microstructural Characterization,” Journal of the Materials and Design, Vol. 31, No. 5, pp. 2305-2311, 2010.
[https://doi.org/10.1016/j.matdes.2009.12.010]

-
Howlader, M. M. R., Kaga, T., and Suga, T., “Investigation of Bonding Strength and Sealing Behavior of Aluminum/Stainless Steel Bonded at Room Temperature,” Journal of the Vacuum, Vol. 84, No. 11, pp. 1334-1340, 2010.
[https://doi.org/10.1016/j.vacuum.2010.02.014]

-
Chen, Y. C., Gholinia, A., and Prangnell, P. B., “Interface Structure and Bonding in Abrasion Circle Friction Stir Spot Welding: A Novel Approach for Rapid Welding Aluminium Alloy to Steel Automotive Sheet,” Journal of Materials Chemistry and Physics, Vol. 134, No. 1, pp. 459-463, 2012.
[https://doi.org/10.1016/j.matchemphys.2012.03.017]

-
Cao, R., Yu, G., Chen, J. H., and Wang, P. C., “Cold Metal Transfer Joining Aluminum Alloys-to-Galvanized Mild Steel,” Journal of Materials Processing Technology, Vol. 213, No. 10, pp. 1753-1763, 2013.
[https://doi.org/10.1016/j.jmatprotec.2013.04.004]

-
Chen, S., Huang, J., Ma, K., Zhao, X., and Vivek, A., “Microstructures and Mechanical Properties of Laser Penetration Welding Joint with/without Ni-Foil in an Overlap Steel-on-Aluminum Configuration,” Journal of Metallurgical and Materials Transactions A, Vol. 45, No. 7, pp. 3064-3073, 2014.
[https://doi.org/10.1007/s11661-014-2241-1]

-
Kong, J. H., Okumiya, M., Tsunekawa, Y., Yun, K. Y., Kim, S. G., et al., “A Novel Bonding Method of Pure Aluminum and SUS304 Stainless Steel Using Barrel Nitriding,” Journal of Metallurgical and Materials Transactions A, Vol. 45, No. 10, pp. 4443-4453, 2014.
[https://doi.org/10.1007/s11661-014-2380-4]

-
Hou, X., Yang, X., Cui, L., and Zhou, G., “Influences of Joint Geometry on Defects and Mechanical Properties of Friction Stir Welded AA6061-T4 T-Joints,” Journal of the Materials and Design, Vol. 53, pp. 106-117, 2014.
[https://doi.org/10.1016/j.matdes.2013.06.061]

-
Mishra, R. S. and Ma, Z. Y., “Friction Stirs Welding and Processing,” Journal of Materials Science and Engineering: R: Reports, Vol. 50, Nos. 1-2, pp. 1-78, 2005.
[https://doi.org/10.1016/j.mser.2005.07.001]

-
Das, H., Ghosh, R. N., and Pal, T. K., “Study on the Formation and Characterization of the Intermetallics in Friction Stir Welding of Aluminum Alloy to Coated Steel Sheet Lap Joint,” Journal of Metallurgical and Materials Transactions A, Vol. 45, No. 11, pp. 5098-5106, 2014.
[https://doi.org/10.1007/s11661-014-2424-9]

-
Liu, X., Lan, S., and Ni, J., “Analysis of Process Parameters Effects on Friction Stir Welding of Dissimilar Aluminum Alloy to Advanced High Strength Steel,” Journal of the Materials and Design, Vol. 59, pp. 50-62, 2014.
[https://doi.org/10.1016/j.matdes.2014.02.003]

-
Coelho, R. S., Kostka, A., Dos Santos, J. F., and Kaysser-Pyzalla, A., “Friction-Stir Dissimilar Welding of Aluminium Alloy to High Strength Steels: Mechanical Properties and Their Relation to Microstructure,” Journal of Metallurgical and Materials Transactions A, Vol. 556, pp. 175-183, 2012.
[https://doi.org/10.1016/j.msea.2012.06.076]

-
Lee, W. B., Schmuecker, M., Mercardo, U. A., Biallas, G., and Jung, S. B., “Interfacial Reaction in Steel-Aluminum Joints Made by Friction Stir Welding,” Journal of the Scripta Materialia, Vol. 55, No. 4, pp. 355-358, 2006.
[https://doi.org/10.1016/j.scriptamat.2006.04.028]

-
Tanaka, T., Morishige, T., and Hirata, T., “Comprehensive Analysis of Joint Strength for Dissimilar Friction Stir Welds of Mild Steel to Aluminum Alloys,” Journal of the Scripta Materialia, Vol 61, No. 7, pp. 756-759, 2009.
[https://doi.org/10.1016/j.scriptamat.2009.06.022]

-
Mondal, M., Das, H., Ahn, E. Y., Hong, S. T., Kim, M. J., et al., “Characterization of Friction Stir Welded Joint of Low Nickel Austenitic Stainless Steel and Modified Ferritic Stainless Steel,” Journal of Metals and Materials International, Vol. 23, No. 5, pp. 948-957, 2017.
[https://doi.org/10.1007/s12540-017-6845-z]


Ph.D. candidate in the School of Mechanical Engineering, University of Ulsan. His research interest is friction stir welding.
E-mail: mondal.mounarik3@gmail.com

Post-doctorate researcher in the School of Mechanical Engineering, University of Ulsan. His research interest is friction stir welding.
E-mail: hrishichem@gmail.com

Ph.D. candidate in the School of Mechanical Engineering, University of Ulsan. His research interest is electrically assisted pressure joining(EAPJ).
E-mail: zsw19900619@gmail.com

Ph.D. candidate in the School of Mechanical Engineering, University of Ulsan. His research interest is friction stir welding.
E-mail: 18217603739@163.com

Professor in the School of Mechanical Engineering, University of Ulsan. His research interest is solid state joining and advanced metal forming.
E-mail: sthong@ulsan.ac.kr

Professor in the School of Mechanical Engineering, University of Ulsan. His research interest is precision machining.
E-mail: kypark@ulsan.ac.kr
