Light-Weight Design of Automotive Shock Tower Mounting Bracket by Using Computer Aided Engineering
Copyright © The Korean Society for Precision Engineering
This is an Open-Access article distributed under the terms of the Creative Commons Attribution Non-Commercial License (http://creativecommons.org/licenses/by-nc/3.0) which permits unrestricted non-commercial use, distribution, and reproduction in any medium, provided the original work is properly cited.
Abstract
Since the fuel consumption of automobiles increases in proportion to the weight of automobiles, and the emission of exhaust increases in proportion to the amount of fuel consumed, to improve fuel efficiency and reduce exhaust emissions, it is necessary either to develop a highly efficient engine or reduce the weight of the vehicle. In this study, we studied weight reduction using lightweight materials such as aluminum alloys to increase fuel economy. For this purpose, we propose a lightweight design process of the shock tower mounting bracket, which is the largest loaded part among the vehicle parts. The change in strength and dynamic strength was investigated by replacing the existing cast iron material with 320 MPa of aluminum A356 casting material. For strength and dynamic stiffness analysis of the shock tower mounting bracket, the load on the peripheral members was calculated. As a result of the dynamic stiffness analysis, we identified the weak part and calculated that the lifetime of the shock tower mounting bracket is safe for the calculated load conditions. Through this study, we provide a guide for lightweight design and suggest optimal design conditions for development of a vehicle shock tower mounting bracket.
Keywords:
Light-Weight, Design, Shock tower mounting bracket, CAE, Safety키워드:
경량, 설계, 쇼크 타워 마운팅브라켓, 컴퓨터 원용 엔지니어링, 안전1. Introduction
Vehicle development technologies that improve safety and fuel efficiency as well as reduce emissions through light-weight technology, modularization of relevant parts, and high-efficiency system technology are being studied.1-8 Automotive companies are working with companies that produce lightweight materials to reduce weight and fuel consumption and emissions by applying lightweight materials to their automobiles. In addition, the combination of lightweight materials with superior impact energy absorbing performance and vehicle body structure characteristics are contributing to vehicle weight reduction, which improves the safety of vehicles.9,10
According to the results of research on vehicle lightweight, it is known that if the total weight of the vehicle is reduced by 10%, the fuel efficiency is improved 6-8%.1,2 Vehicle weight reduction not only results in reduction of fuel consumption and emission of exhaust gas, but also reduces running resistance, reduces vibration and noise, reduces inertia of the vehicle body, and improves braking performance, steering stability, and power performance. In order to lighten the vehicle in order to reduce fuel consumption and exhaust emission, it is necessary to optimize the body structure and replace the material with lightweight material or high strength steel.
This study deals with the fabrication process of shock tower mounting brackets using A356 aluminum casting material with tensile strength of 320 MPa and high strength among aluminum alloys. For this purpose, squeeze casting and heat treatment of the shock tower mounting bracket were made. We also analyzed the design features using CAE (Computer Aided Engineering). In particular, we propose a method of lightweight design by changing the material of the shock tower mounting bracket to aluminum alloy instead of the existing steel material by comparing the von Mises stress variation due to the change of load conditions applied to the chassis part.2,3,7,8,11,12
2. Experimental Method and Design Conditions
2.1 Shock Tower Mounting Bracket
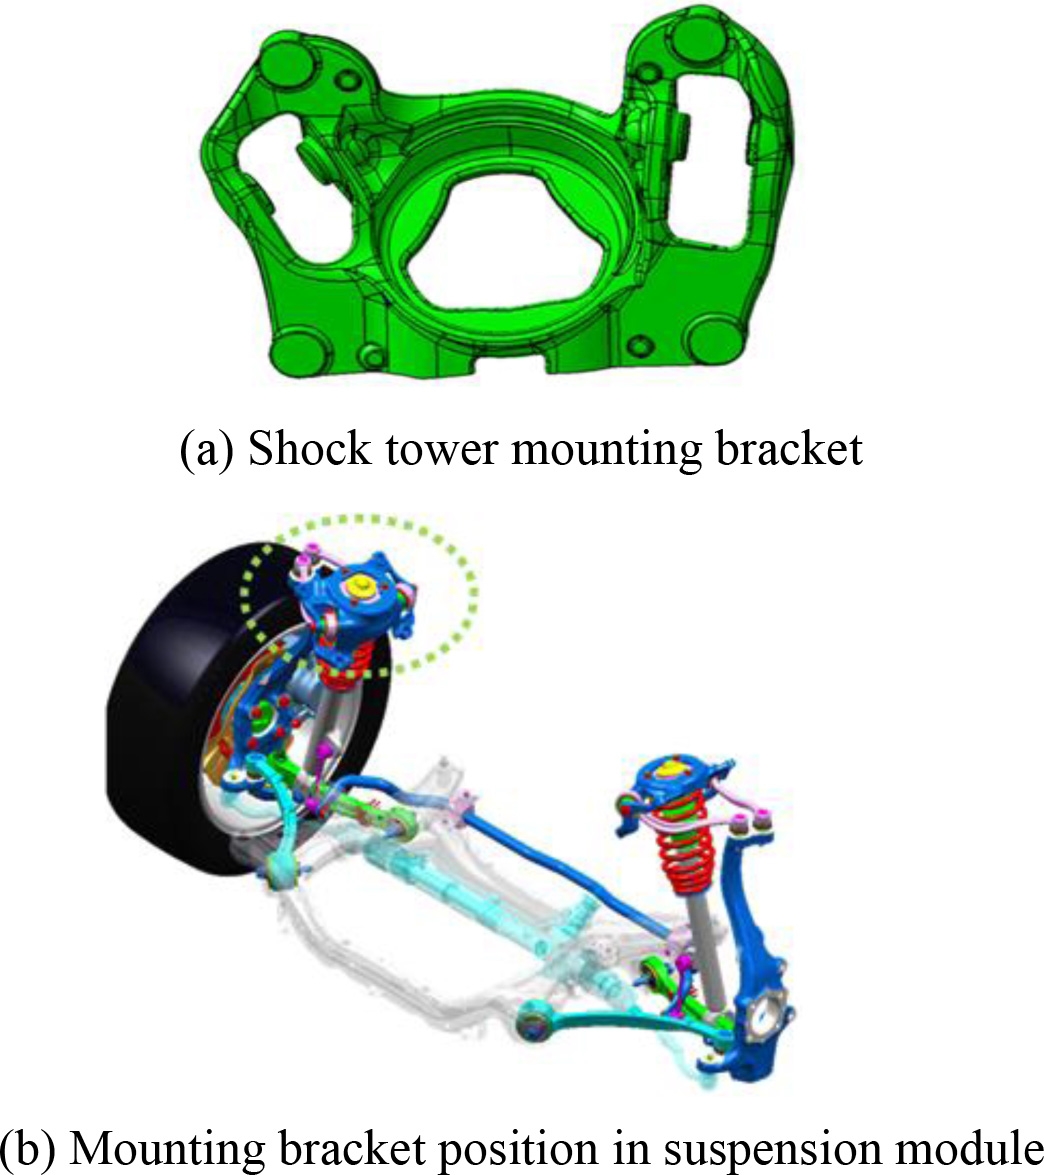
The shock tower mounting bracket is the suspension part of the vehicle. The center part of the suspension supports the shock absorber, and the left and right sides support the upper arm, which absorbs impact and vibration of the vehicle. Therefore, we would like to develop a shape design method of the product by simulating shape and structure in the development of the shock tower mounting bracket product. Fig. 1(a) shows a simple modeling of the shape of the shock tower mounting bracket to be studied and Fig. 1(a) shows the shock tower mounting bracket which is placed in the position in suspension module.
2.2 Vertical/Horizontal Hybrid Type Die Design and Casting
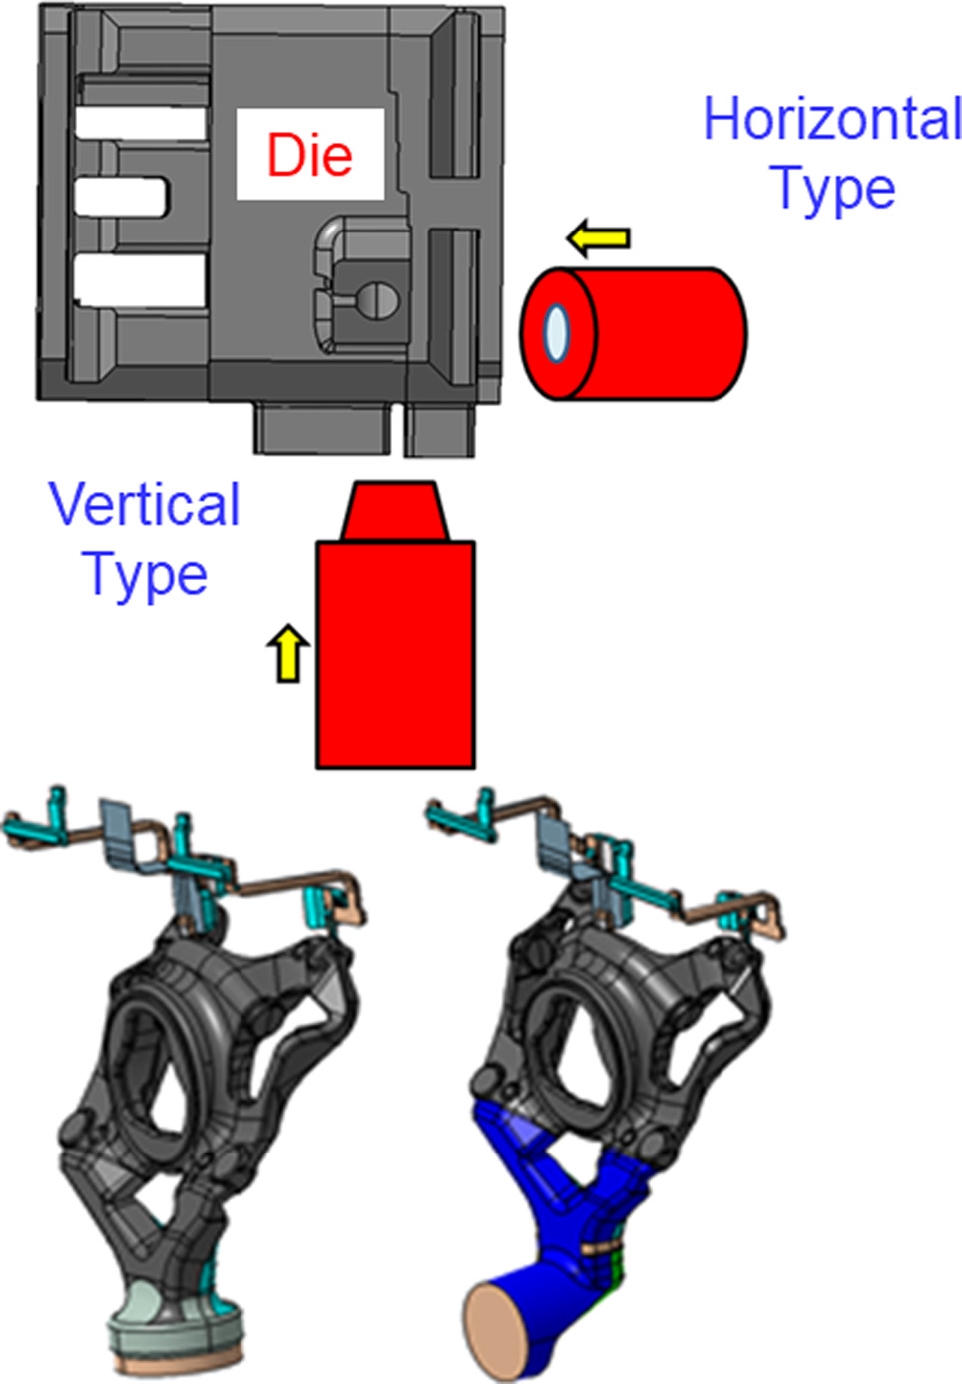
The hybrid mold to be developed in this study is a mold that can be applied to two types of vertical / horizontal type with one mold. It is a great feature that vertical and horizontal casting process can be applied simultaneously. The biggest difference between the vertical and horizontal molds is the joining position of the mold sleeves. In this study, it is featured to design the sleeves to be able to inject castings in both directions. That is, a part of the mold is designed to be inserted so that the two types of sleeves can be used in the design and manufacture of the hybrid mold as shown in Fig. 2.
In order to establish the casting method, a cast flow analysis of the aluminum shock tower mounting bracket through the process simulation was carried out. Through this, the mold was designed by correcting the expected defect occurrence area. Due to the nature of the horizontal / vertical hybrid caliper mold, the position of the injection port is different, so the filling aspect and the swirling part of the melt are different. Therefore, the casting condition according to each process was changed, and the optimum casting condition was established by controlling the process parameter. The parameters for establishing the optimum casting conditions are hydraulic speed, molten metal temperature, mold temperature, cooling rate, and optimum casting conditions were established through computer simulation. This study was carried out to investigate the microstructure of T6 after casting and to develop a product with excellent strength by establishing optimum casting conditions.
2.3 Determination of Vehicle Load Conditions and Strength Analysis
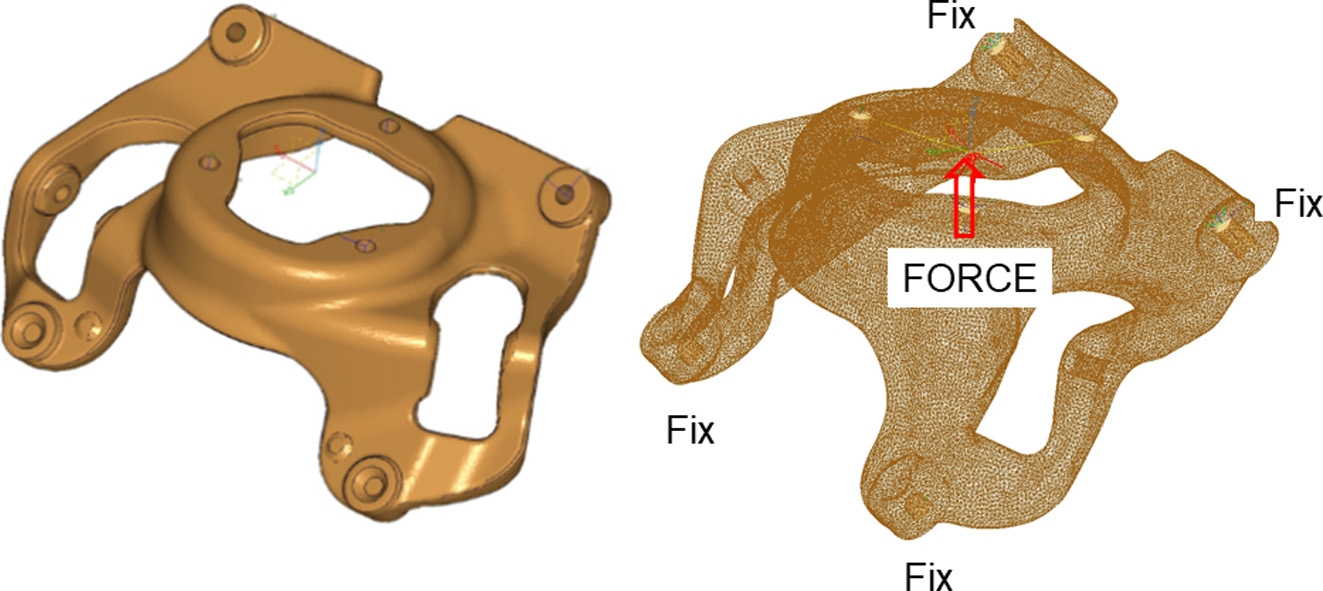
Shock tower mounting bracket parts were analyzed by using the MSC Nastran program. Through the investigation of the analysis results, we have searched for the weak area and proposed the durability examination and the reliability assurance method. Fig. 3 shows the material analysis conditions and the model used for the strength analysis. The four holes on the part were fixed and the load was applied to the center of the part. The number of elements was modeled as about 350,000, and the weight of the model was 1.7 kg.
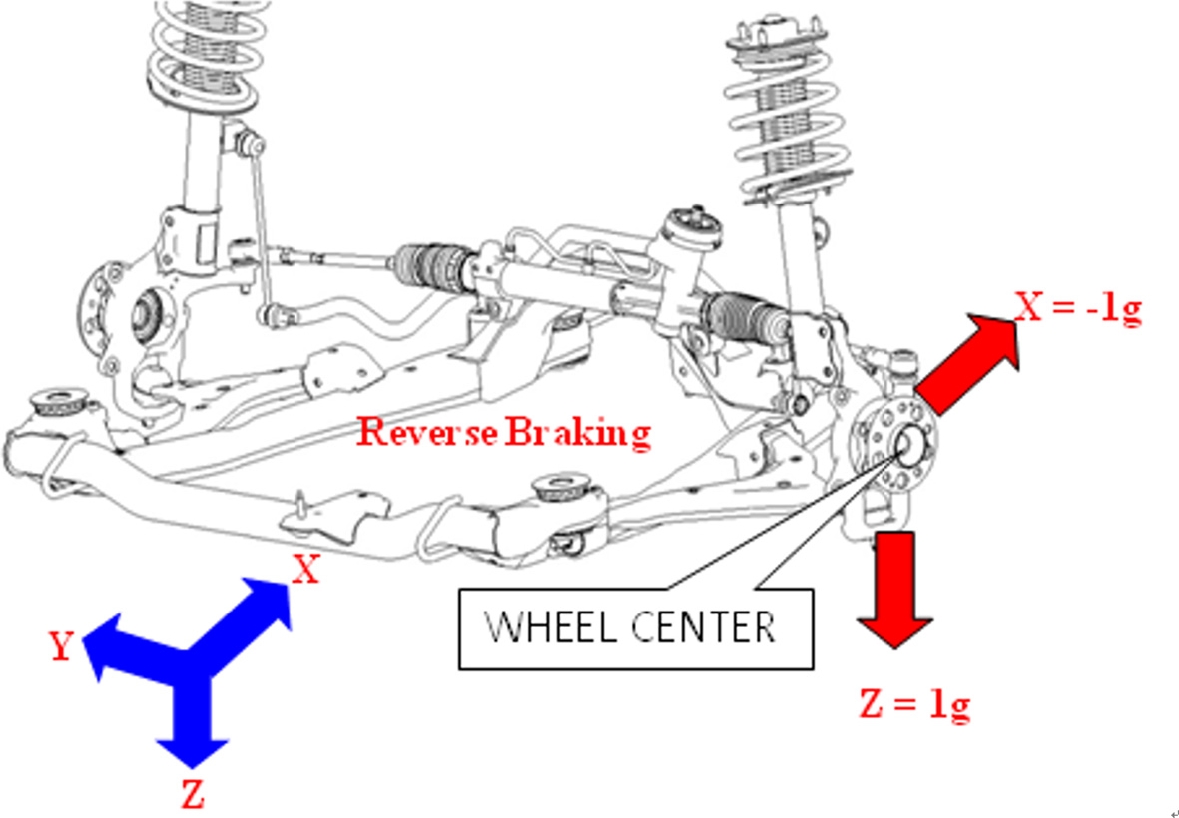
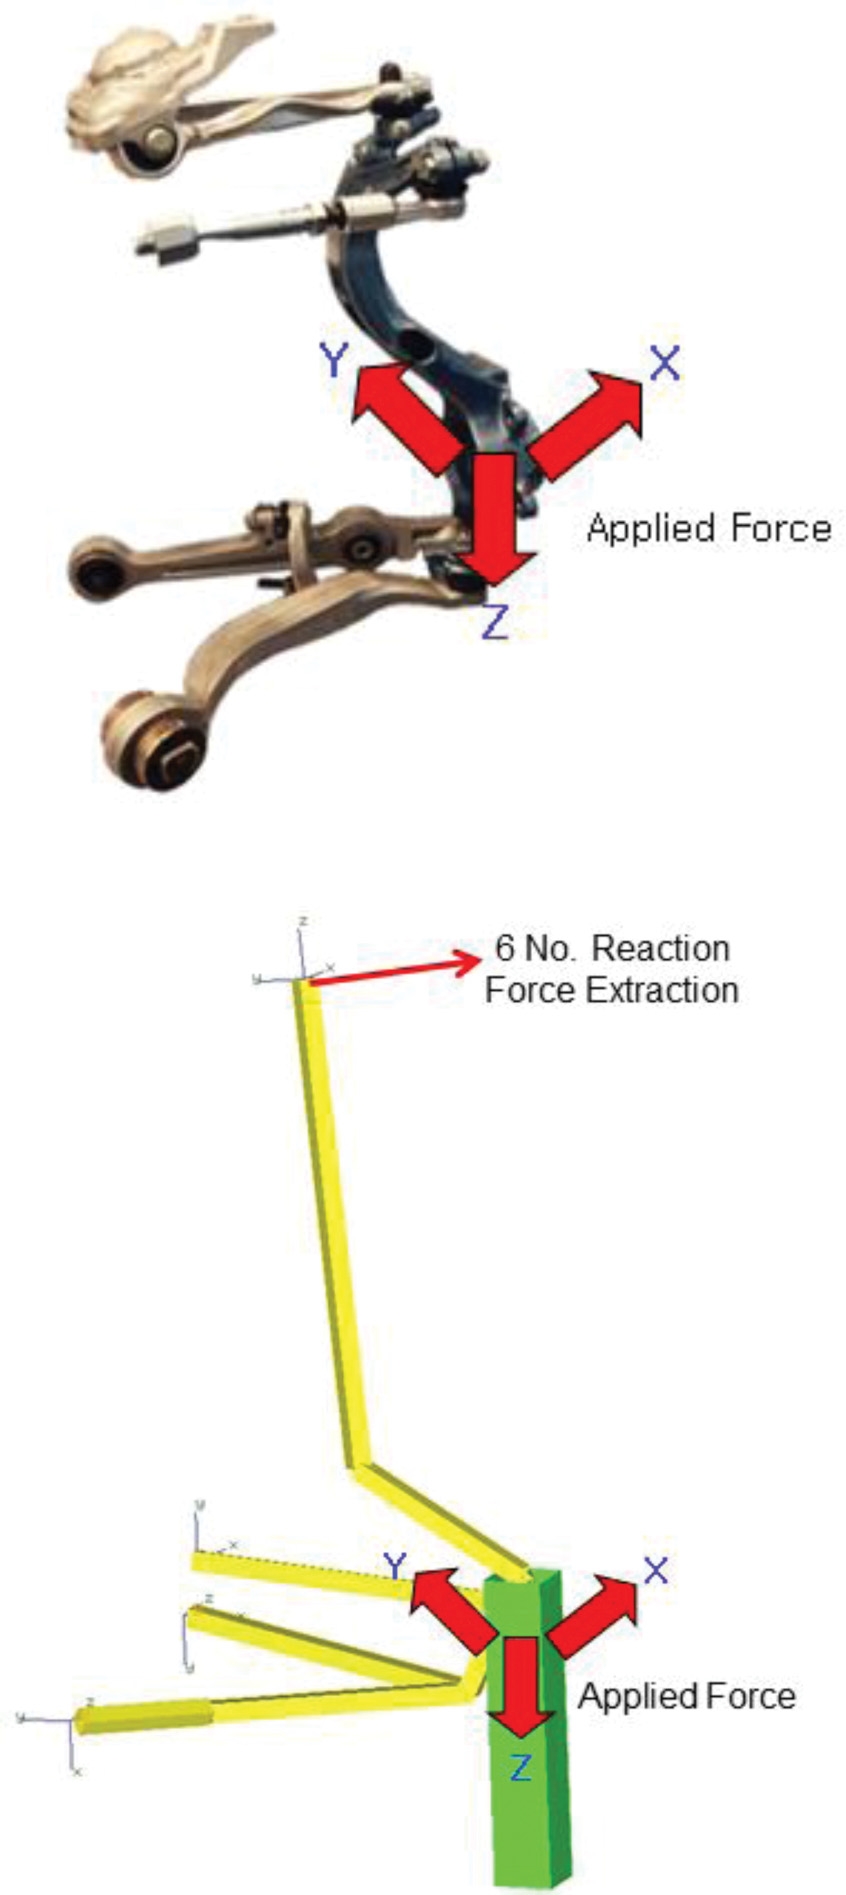
Fig. 4 shows the load direction of the reverse braking (RB) load condition as an example. In the case of RB load condition, it shows the load condition applied to the vehicle when the vehicle is backward and performs the braking operation. The reason why the load is not given only to the distribution load of 1 g of the vehicle is because it gives the design load condition considering the safety factor of the vehicle. The load conditions used in the analysis refer to the design conditions of ETA and LOTUS which are commercial analysis companies.3 As shown in Fig. 4, each load case is given a load in different directions for each load case according to Table 1, and the load is applied to the wheel center and the tire ground plane is fixed.
3. Experimental Results and Discussion
3.1 Results of Casting
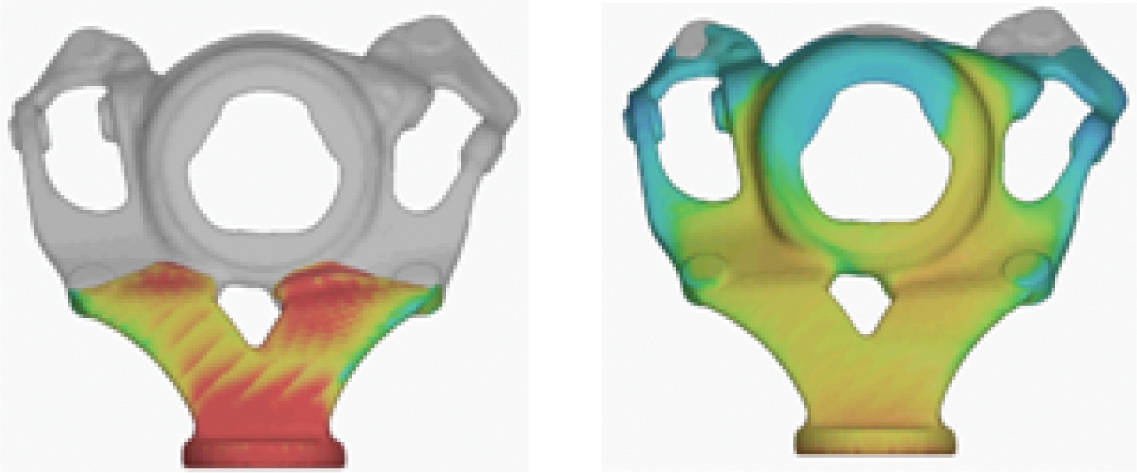
Fig. 5 shows the analysis process of the shock tower mounting bracket through casting analysis. Generally, by computer simulation, we can predict casting conditions for each process by predicting vortex generation and defects generated during charging.
In this analysis, casting analysis was performed by simple computer simulation using Anycasting program. Through the analysis, the optimum conditions of casting speed and casting pressure were extracted by trial and error method. The optimization method was extracted by trial and error method to minimize bubbles or pores generated during casting. Through this, the optimum casting condition was determined.
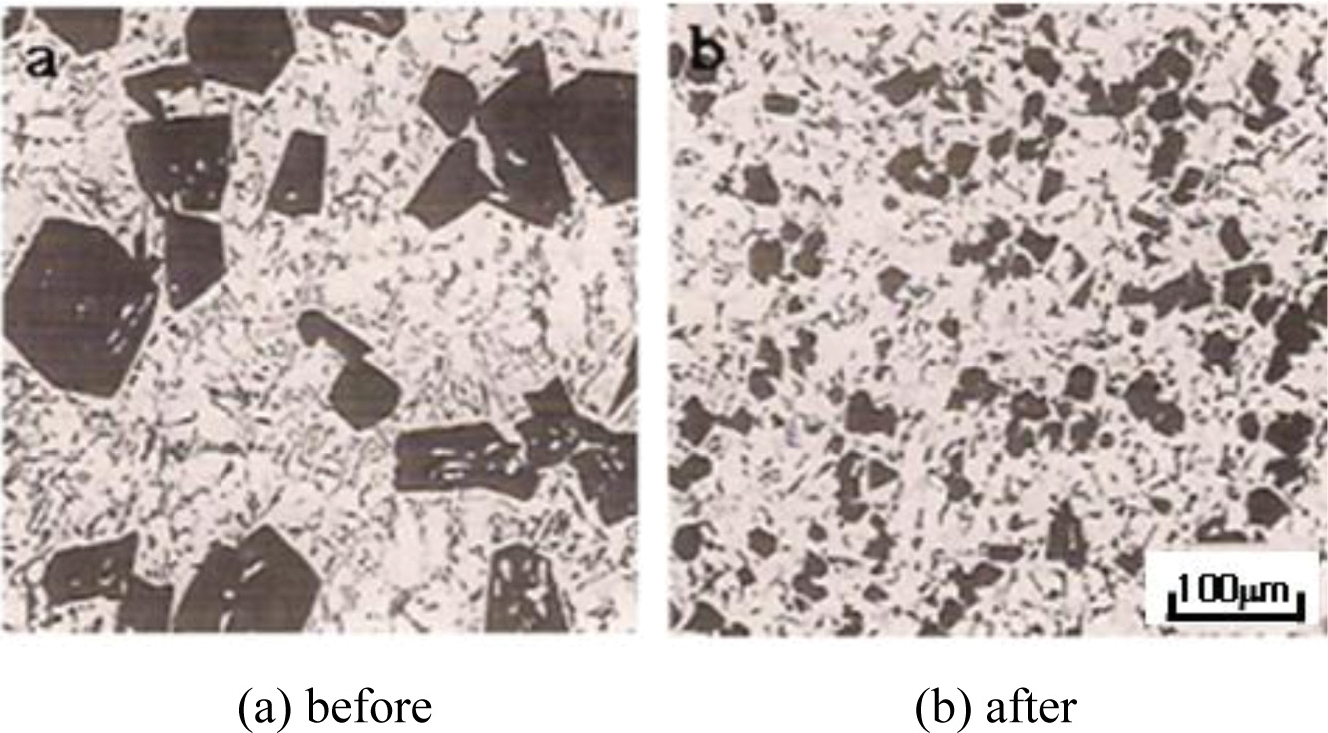
Castings made from A356 alloy can be T6 heat treated by composite casting process. After the heat treatment, microstructural changes due to heat treatment were observed. Fig. 6 shows the microstructure before and after T6 heat treatment. It can be confirmed that the crystal grains became finer after the heat treatment.
3.2 Results of Dynamic Stiffness and Strength Analysis
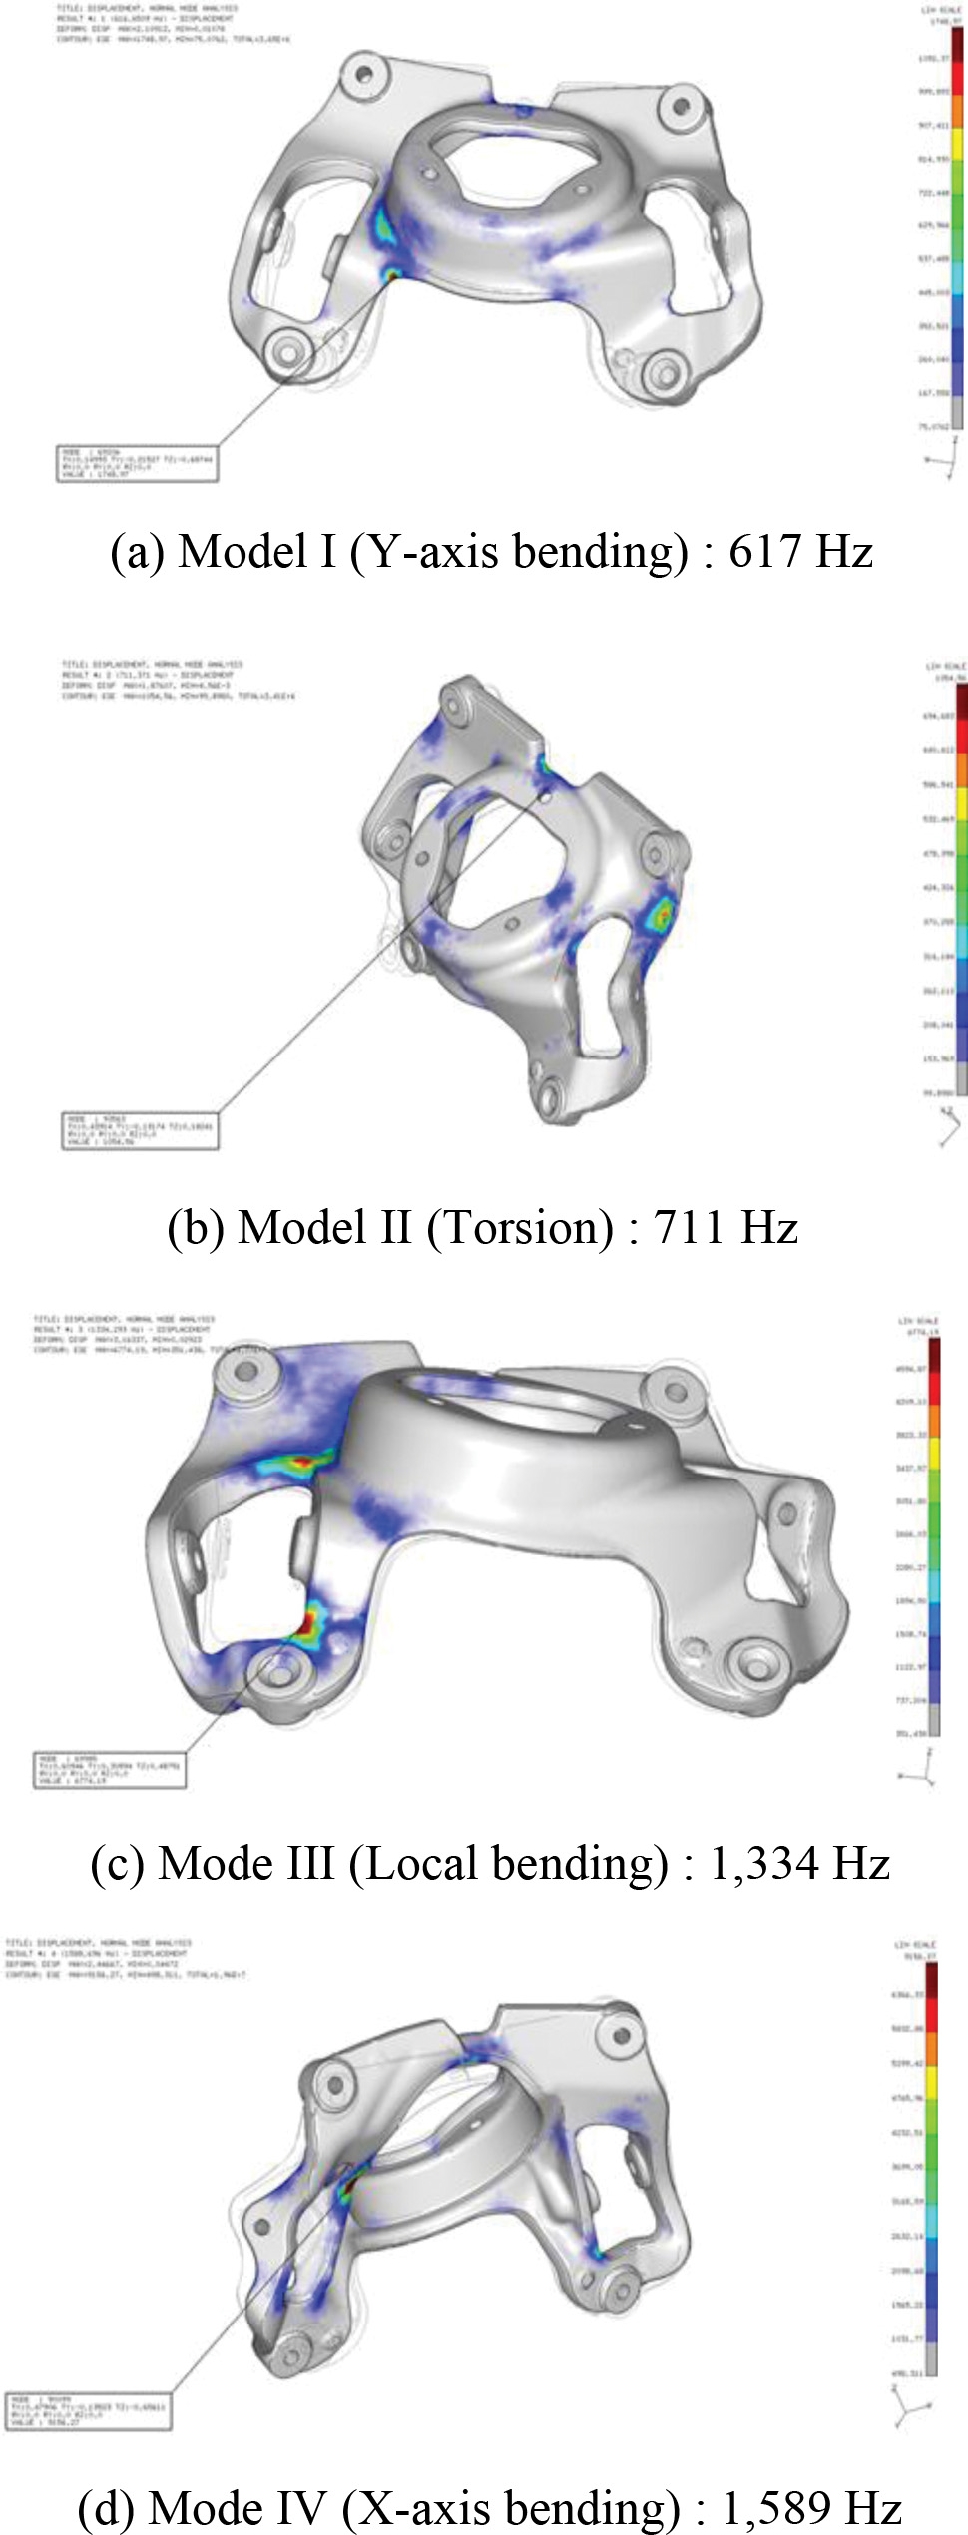
Fig. 7 shows the results of the dynamic stiffness analysis. When the load is applied to the shock tower, the weak area is the area shown in the Fig. 7. This vulnerability seems to require close attention when designing the die mold.
After the dynamic stiffness analysis, the design of the weak section was improved and the strength analysis was carried out. The weight of the design improvement model was 1.43 kg. The reaction force according to the load conditions in Table 1 was obtained when the component parts were installed in the vehicle as shown in Fig. 8. Table 2 summarizes the reaction forces extracted according to the load conditions when the vehicle weight is 2,310 kg (Equivalent Weight of Equus, Geenesys, K9). It can be seen that various loads are applied in the X, Y and Z directions.
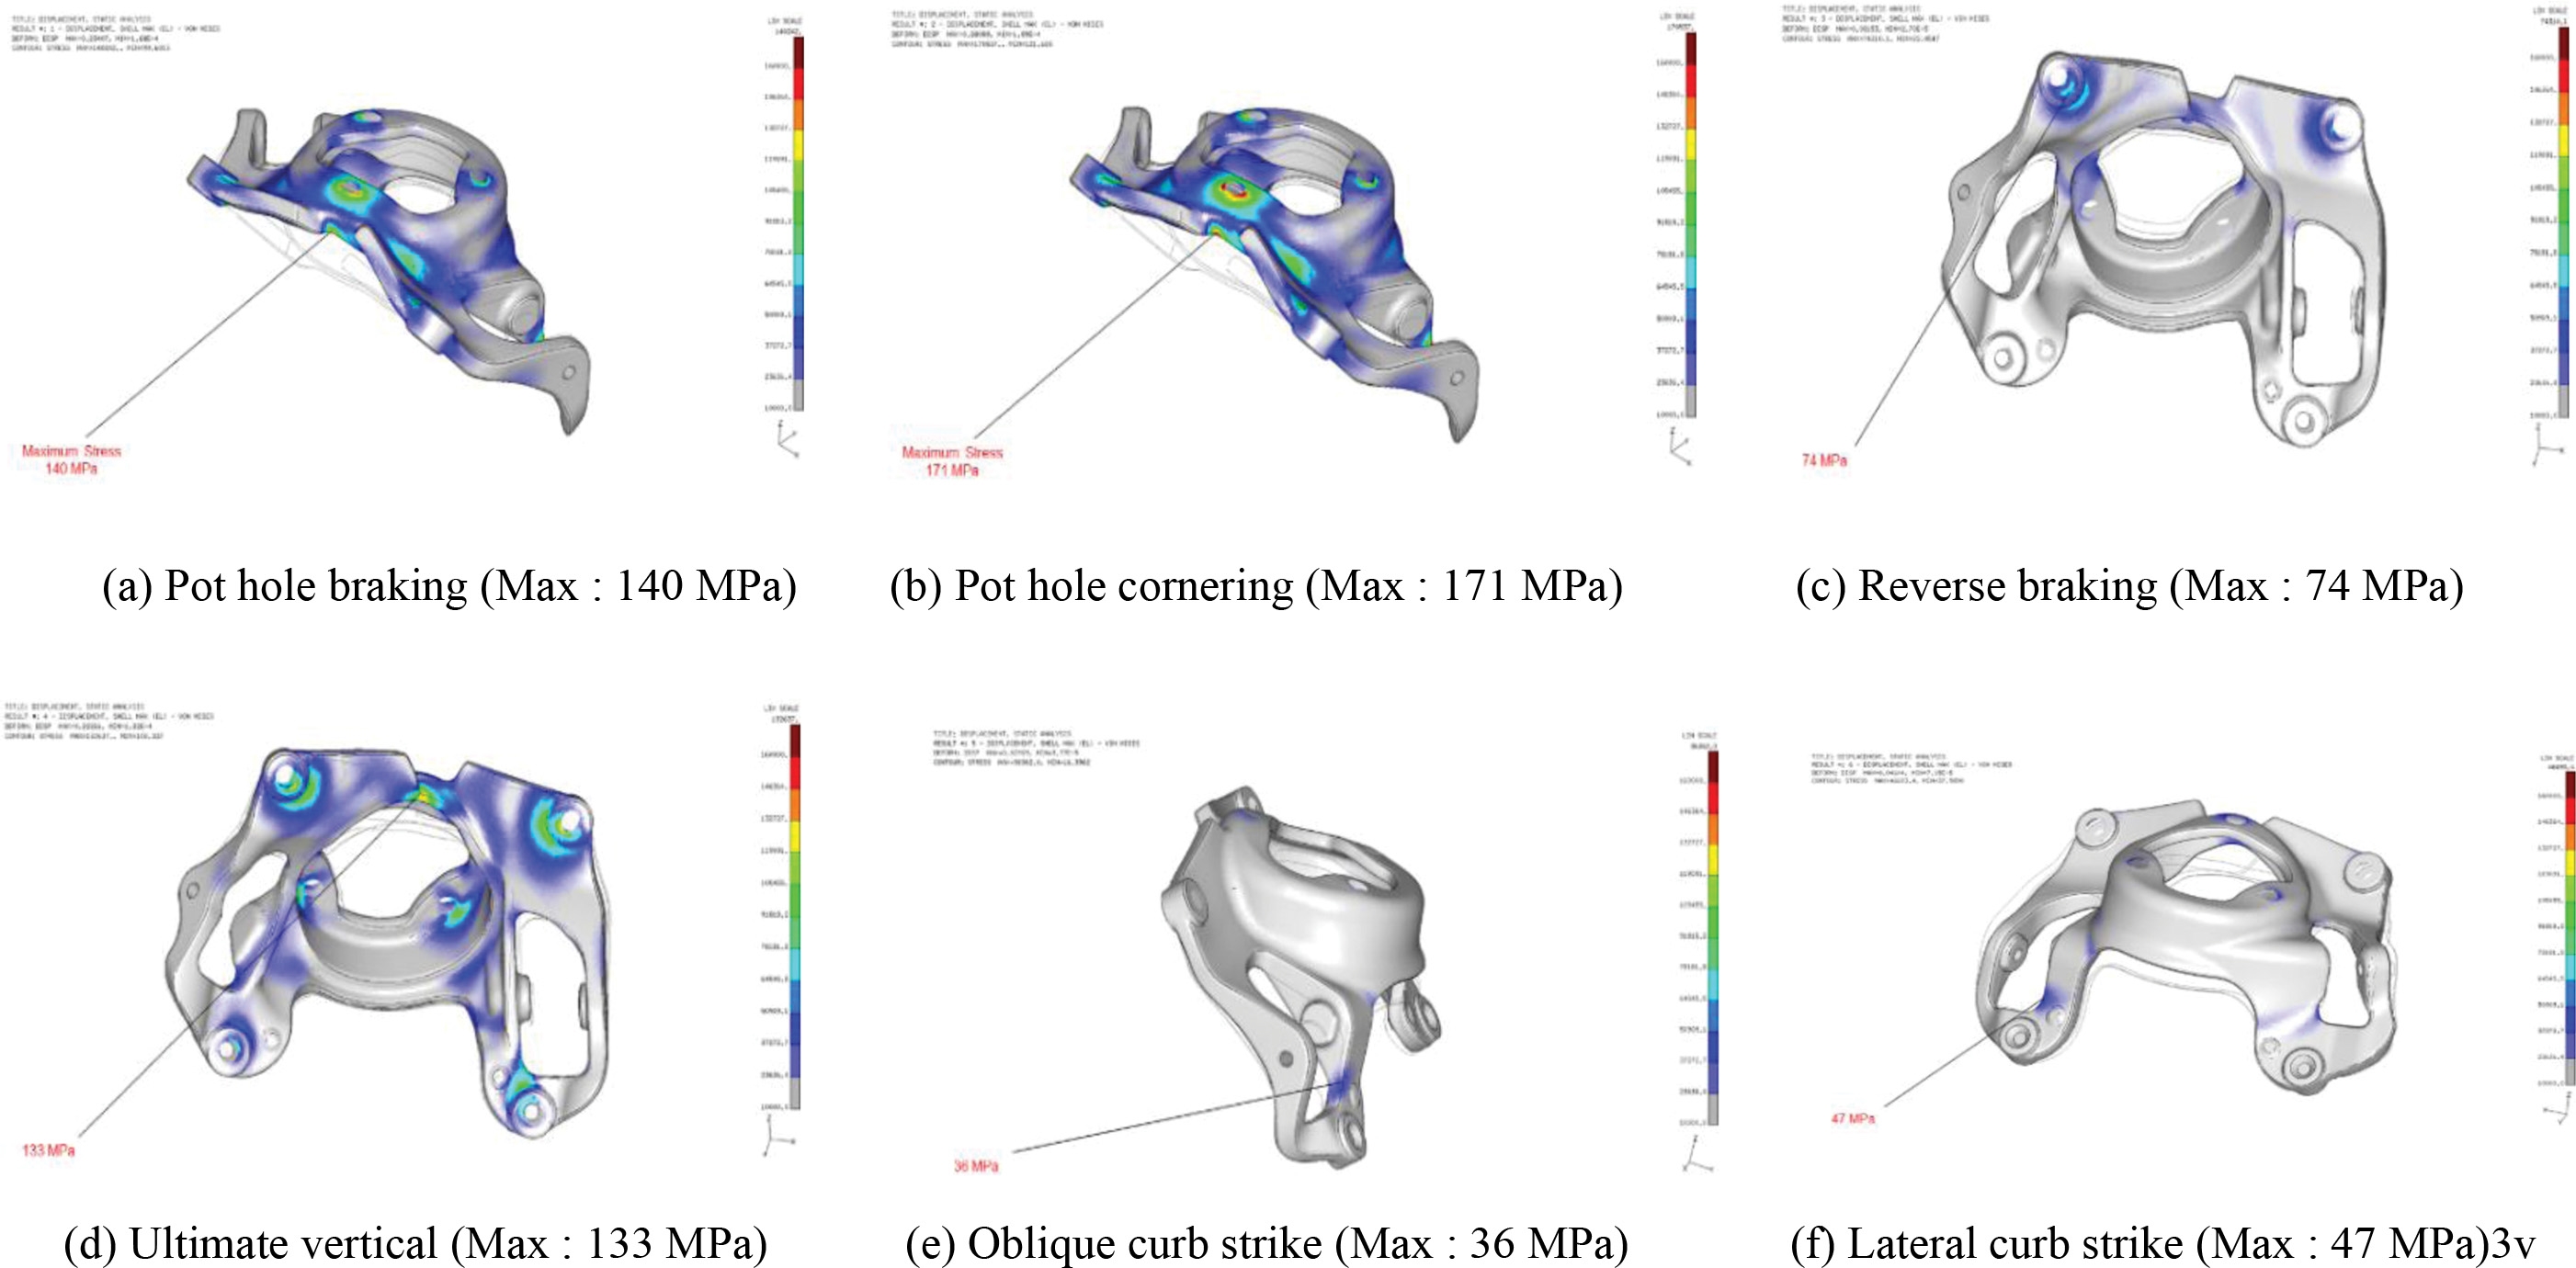
Fig. 9 shows the strength analysis results. As shown in the results of the strength analysis, when the load is applied under 6 different loading conditions, the maximum stress value is below the tensile strength and the design model is confirmed to be safe.
4. Conclusions
We propose a lightweight design process of the shock tower mounting bracket. For this, the change of strength and dynamic strength was investigated by replacing the existing material of cast iron with aluminum A356 casting material. Through this, the following conclusions were obtained.
(1) The casting condition was established through the analysis of the casting of the shock tower mounting bracket using 320 MPa class A356 aluminum alloy material. Castings with fine grain boundaries were obtained through casting and T6 heat treatment.
(2) The dynamic stiffness analysis was carried out by using CAE with reference to the part made of the conventional steel model. From these results, the weak areas of the design products were predicted and the design was changed for safety.
(3) The stress comparison analysis result of the product after the design change, the maximum stress value appeared within the material tensile strength range under all given load conditions and it was found that the design was safe.
(4) When the shock tower mounting bracket made of steel was used, the weight was 3.0 kg, but when the A356 aluminum alloy material was applied after the design modification to improve the main vulnerable parts, the weight was reduced by 50% to 1.43 kg. In the future, it can be expected that the lightweight design will be possible even if the safety margin is increased and the rigidity is reinforced through the test of the actual vehicle.
REFERENCES
-
Kim, K. J., Lim, J. H., Park, J. H., Choi, B. I., Lee, J. W., et al., “Light-Weight Design of Automotive AA6061 Rear Sub-Frame based on Cae Simulation,” Transactions of the Korean Society of Automotive Engineers, Vol. 20, No. 3, pp. 77-82, 2012.
[https://doi.org/10.7467/KSAE.2012.20.3.077]

-
Park, J. H., Kim, K. J., and Yoon, J. G., “Light-Weight Design of Automotive Spring Link based on Computer Aided Engineering,” Transactions of the Korean Society of Automotive Engineers, Vol. 21, No. 5, pp. 157-161, 2013.
[https://doi.org/10.7467/KSAE.2013.21.5.157]

- Suspension Analysis Load Input Formulas, “ETA Analysis Input Report,” pp. 1-14, 1990.
- Kim, K. J., “Automotive Application of Tailor Welded Blank Using Computer Aided Design Technique,” Journal of the Korean Society of Mechanical Technology, Vol. 7, No. 4, pp. 1-6, 2005.
-
Kim, K. J., Won, S. T., Kim, K. S., Choi, B. I., Park, J. H., et al., “Design of Driveline Test Bench for Noise and Vibration Harshness Improvement of Automotive Chassis Components System,” Design and Analysis of Materials and Engineering Structures, Vol. 32, pp. 1-14, 2013.
[https://doi.org/10.1007/978-3-642-32295-2_1]

-
Park, J., Kim, K., Lee, J., and Yoon, J., “Light-Weight Design of Automotive Suspension Link based on Design of Experiment,” International Journal of Automotive Technology, Vol. 16, pp. 67-71, 2015.
[https://doi.org/10.1007/s12239-015-0007-4]

- Lee, Y., Kim, C. W., and Kim, J., “A Study on Design Factors for Shock Tower Loads,” Proc. of the Spring Conference of Korea Society of Automotive Engineers, pp. 791-794, 2011.
- Deshmukh, M. and Sontakke, K., “Analysis and Optimization of Engine Mounting Bracket,” International Journal of Scientific Engineering and Research, Vol. 3, No. 5, pp. 131-136, 2015.
- Han, M. S. and Cho, J. U., “Structural and Fatigue Analysis on Shock Absorber Mount of Automobile,” Journal of the Korean Society of Manufacturing Process Engineers, Vol. 11, No. 1, pp. 125-133, 2012.
- Park, H., Ha, D., and Kim, S., “Development of Plastic Rod Guide for Lightweight Automotive in Shock Absorber,” Proc. of the Autumn Conference on Korea Society of Automotive Engineers, pp. 2129-2135, 2012.
-
Han, M. S. and Cho, J. U., “Structural Analysis of Engine Mounting Bracket,” Journal of the Korean Society of Manufacturing Technology Engineers, Vol. 21, No. 4, pp. 525-531, 2012.
[https://doi.org/10.7735/ksmte.2012.21.4.525]

- Prasad Babu, A., Vijaya Kumar, Y., and Udaya Kiran, C., “Topology Optimization in Design of Engine Mounting Bracket,” Proc. of the International Conference on Emerging Trends in Mechanical Engineering, Vol. 1, pp. 83-89, 2014.

Professor in the School of Mechatronics Engineering, Tongmyung University. He specialized in mechanical engineering in school years. He has experience to work in Ssangyong Motor Co. for about 16 years.
E-mail: kjkim@tu.ac.kr

Professor in the Department of Mechanical System Design Engineering, Seoul National University of Science and Technology. He worked at the Seoul National University of Science and Technology for 35years.
E-mail: stwon370@seoultech.ac.kr

