A Study on the Fracture Characteristics of Structural Adhesives according to the Shape of Double and Tapered Double Cantilever Beams Using the Finite Element Method
Copyright © The Korean Society for Precision Engineering
This is an Open-Access article distributed under the terms of the Creative Commons Attribution Non-Commercial License (http://creativecommons.org/licenses/by-nc/3.0) which permits unrestricted non-commercial use, distribution, and reproduction in any medium, provided the original work is properly cited.
Abstract
In this study, the fracture characteristics of structural adhesives were investigated according to the shape of a DCB and TDCB by using the FEM. First, to obtain the reliability of the finite element method, the experimental and FEM analyses were compared, and the reliability was secured. When the graph of reaction force to displacement on the TDCB test specimen was examined, it was found that the smaller the slope, the stronger the exhibited property sustaining the load to the end of the adhesive surface. Maximum reaction force occurred was just before the adhesive was removed. The shear stress of the specimen exhibited the same characteristics and an equivalent stress. Thus, the data of this study resulting in the fracture characteristics of the structural adhesives for each shape can be applied to the design with durability.
Keywords:
Double cantilever beam, Tapered double cantilever beam, Structural adhesive, Fracture characteristic, Reaction force키워드:
이중외팔보, 경사진 이중외팔보, 구조용 접착제, 파괴 특성, 반력1. Introduction
The industrial development in recent years has been fast and diverse. In case of the automobile industry, the face lift cycle of a particular model is being shortened compared to the past; within one year, or two years at most. As these trends in technology and design change rapidly, much research and development have been carried out to match them. Many new techniques have been introduced to meet these changes. In the field of research, the time required for research is minimized by using the finite element method, which is often referred to as “analysis”, because it requires a large amount of time for experimentation. This finite element method is a virtual simulation achieved through 3D modeling rather than using an actual experiment, but it can be the output data similar to that of an actual experiment when the physical material data for actual material is applied. There are many ways to carry out 3D printing faster than using injection and molds. In case of general injection, matching molds must be made, and in this case, 3D printers are being manufactured to reduce the amount of time and cost invested in mold making. Normally, a plate is joined with a bolt or a rivet at a position where the plate abuts against another plate. However, in such a case, a notch may be formed in the plate, which may cause breakage.
In this study, the structural adhesives used in recent automobile bodies, not bolts or rivets, were used. The shape of test specimen was manufactured and designed based on BS 7991. BS 7991 is an experimental method for evaluating adhesive failure characteristics by using a dual cantilever shape.1-7 For this reason, the above method was applied in this study. The difference between a DCB (Double Cantilever Beam) and TDCB (Tapered Double Cantilever Beam) is that the former has a simple rectangular shape. The reason for this is that a DCB is applied to a general plate or section of steel, while in case of a TDCB, one side is higher and inclined. These TDCBs were designed to investigate the shape under an offset load. In order to describe the production of DCB and TDCB test specimens by using 3D printers, the properties of ABS material used in real 3D printers were identified and applied to analysis. We designed the DCB and TDCB using Autodesk Inventor and applied the model to the finite element method in order to ascertain the fracture characteristics of adhesive. In order to establish the reliability of finite element method, a typical case was tested to confirm that it had a reaction force graph similar to that of the finite element method.8-12
2. Study Results
2.1 Comparison of Experiment and Analysis
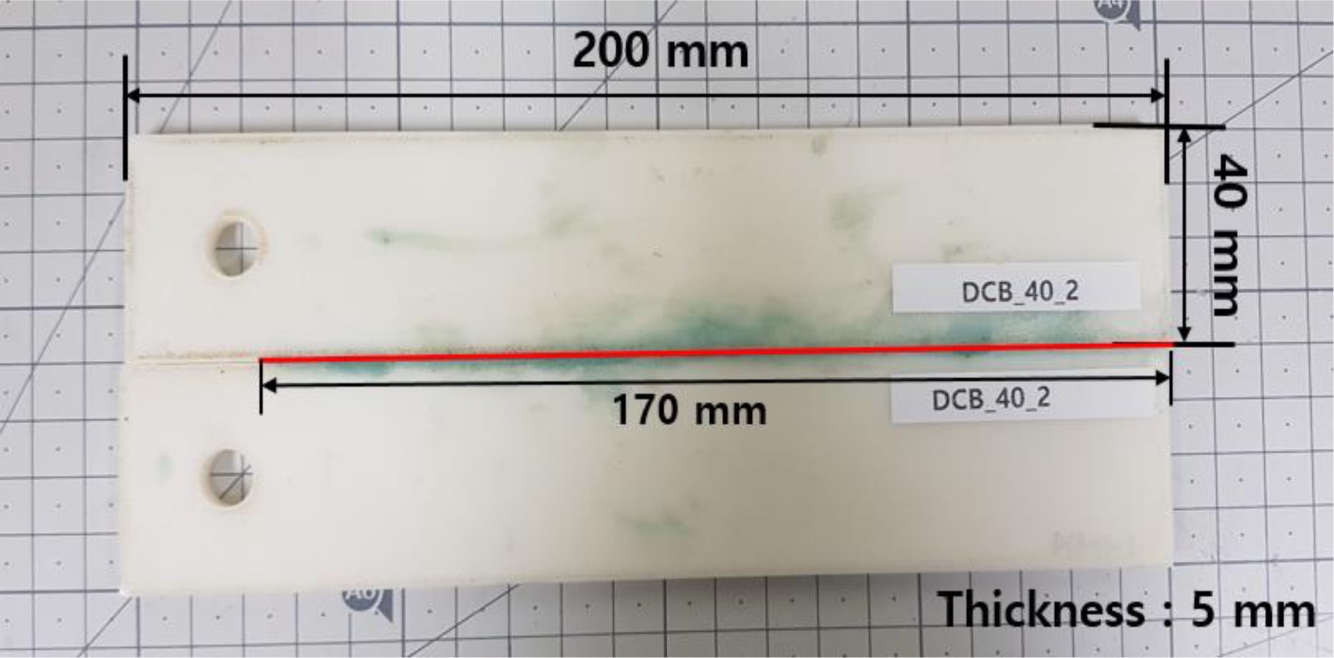
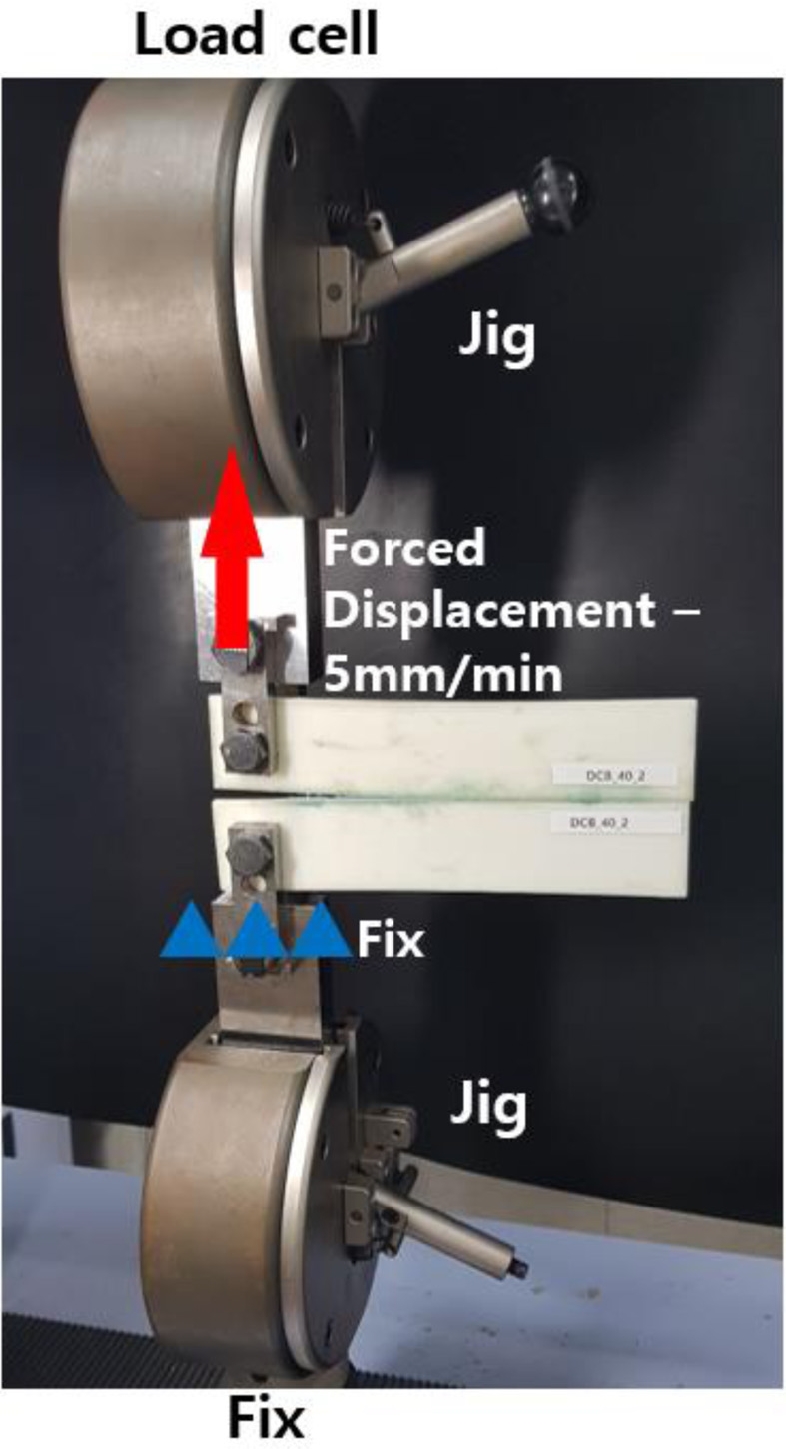
When the finite element method was used for analysis, we did not know its error rate compared to that of the actual experiment. Therefore, we selected one case and compared the actual experiment with the model by using the finite element method. In order to make this comparison, we compared the reaction force-displacement graphs. Fig. 1 shows the test specimen used in the actual experiment. It was made the same as DCB_40 in the finite element model. Fig. 2 shows the condition under which the actual test was performed. The lower end was fixed and the upper end was applied by the forced displacement of 5 mm/min, and the reaction force happening at that time was measured by the load cell.
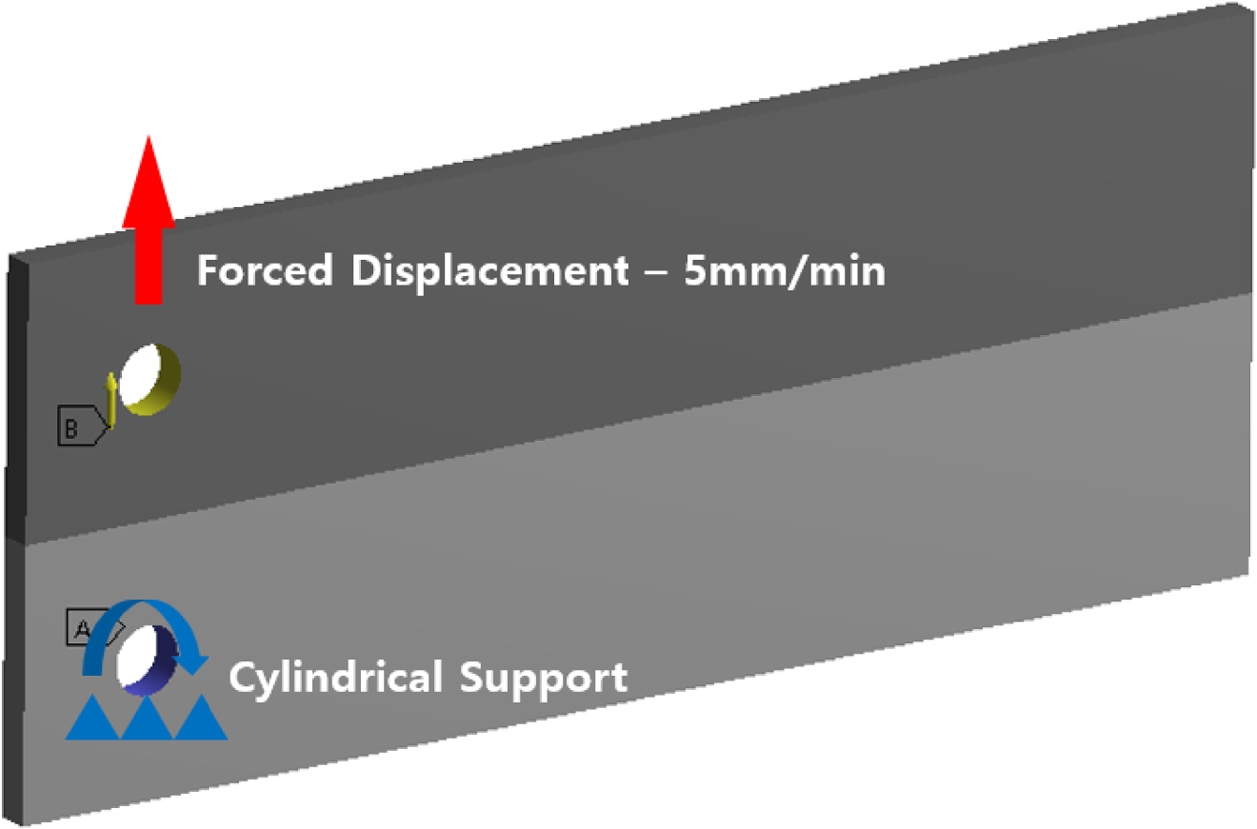
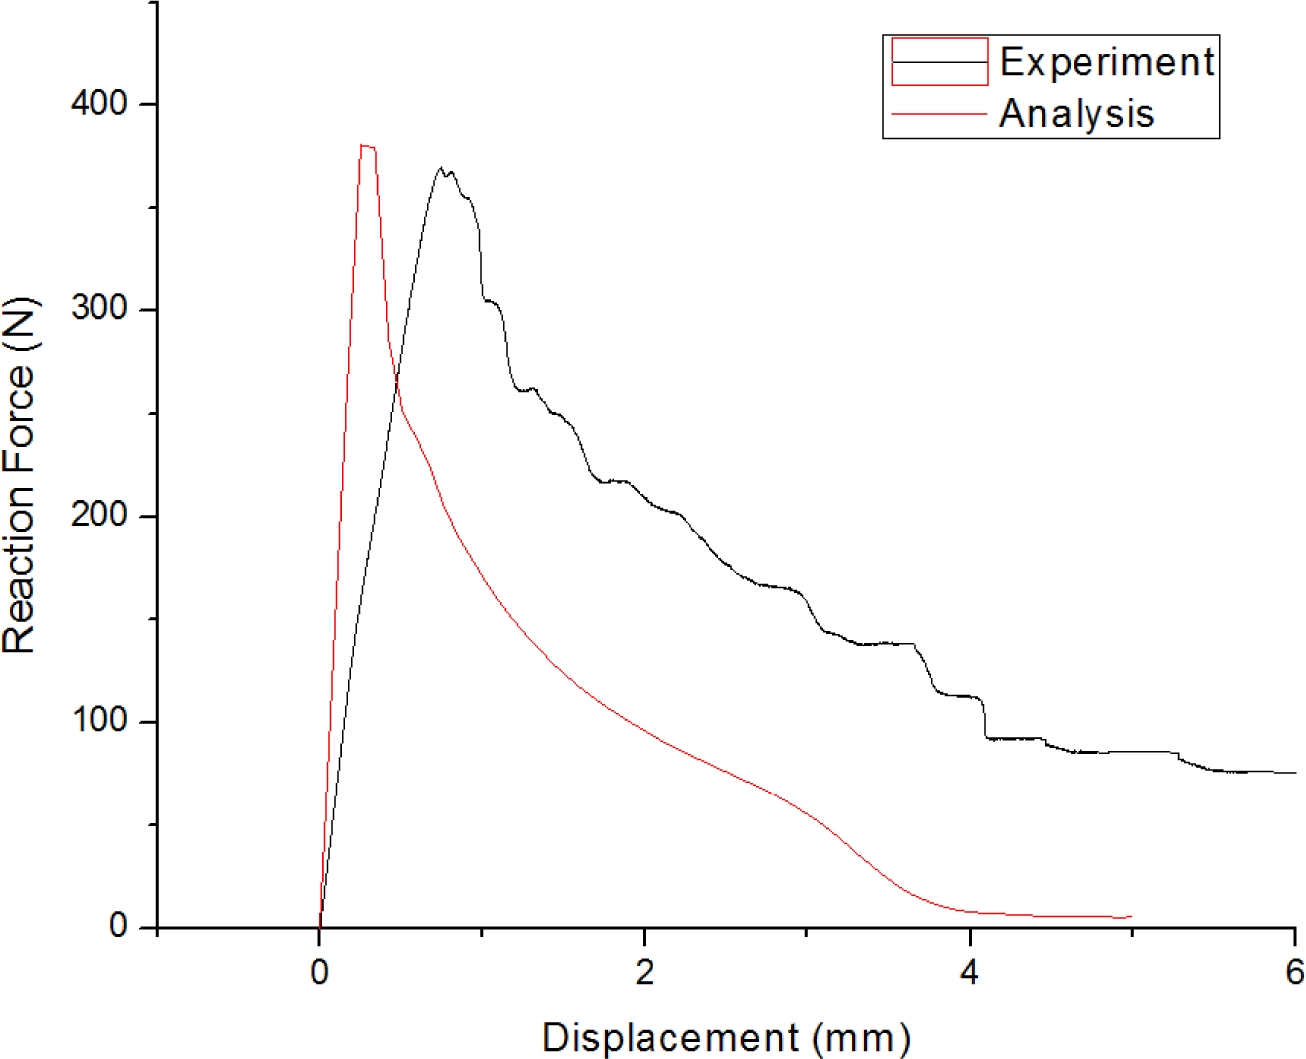
Using this method, a graph of reaction force-displacement was shown. Fig. 3 shows the analysis conditions applied when the finite element method was used. The lower part was fixed and the upper part was subjected to forced displacement of 5 mm/min, as in the actual experiment.13-15 Fig. 4 is the graph of reaction force-displacement for confirming reliability between the experiment and the analysis. The graph of reaction and displacement was as follows.
In case of the analysis, we found that the tendency appeared quickly in preparation for the actual experiment. However, it could be seen that the maximum reaction force and the tendency of experiment and analysis approached with each other. A slight error occurs because the material properties of ABS are made up of the only elastic areas. If the properties up to the plastic region are added, they may indicate the closer values between experiment and analysis each other. Based on this, it is believed that the analysis can be deemed reliable.
2.2 Fracture Characteristics of Structural Adhesives by the Finite Element Method
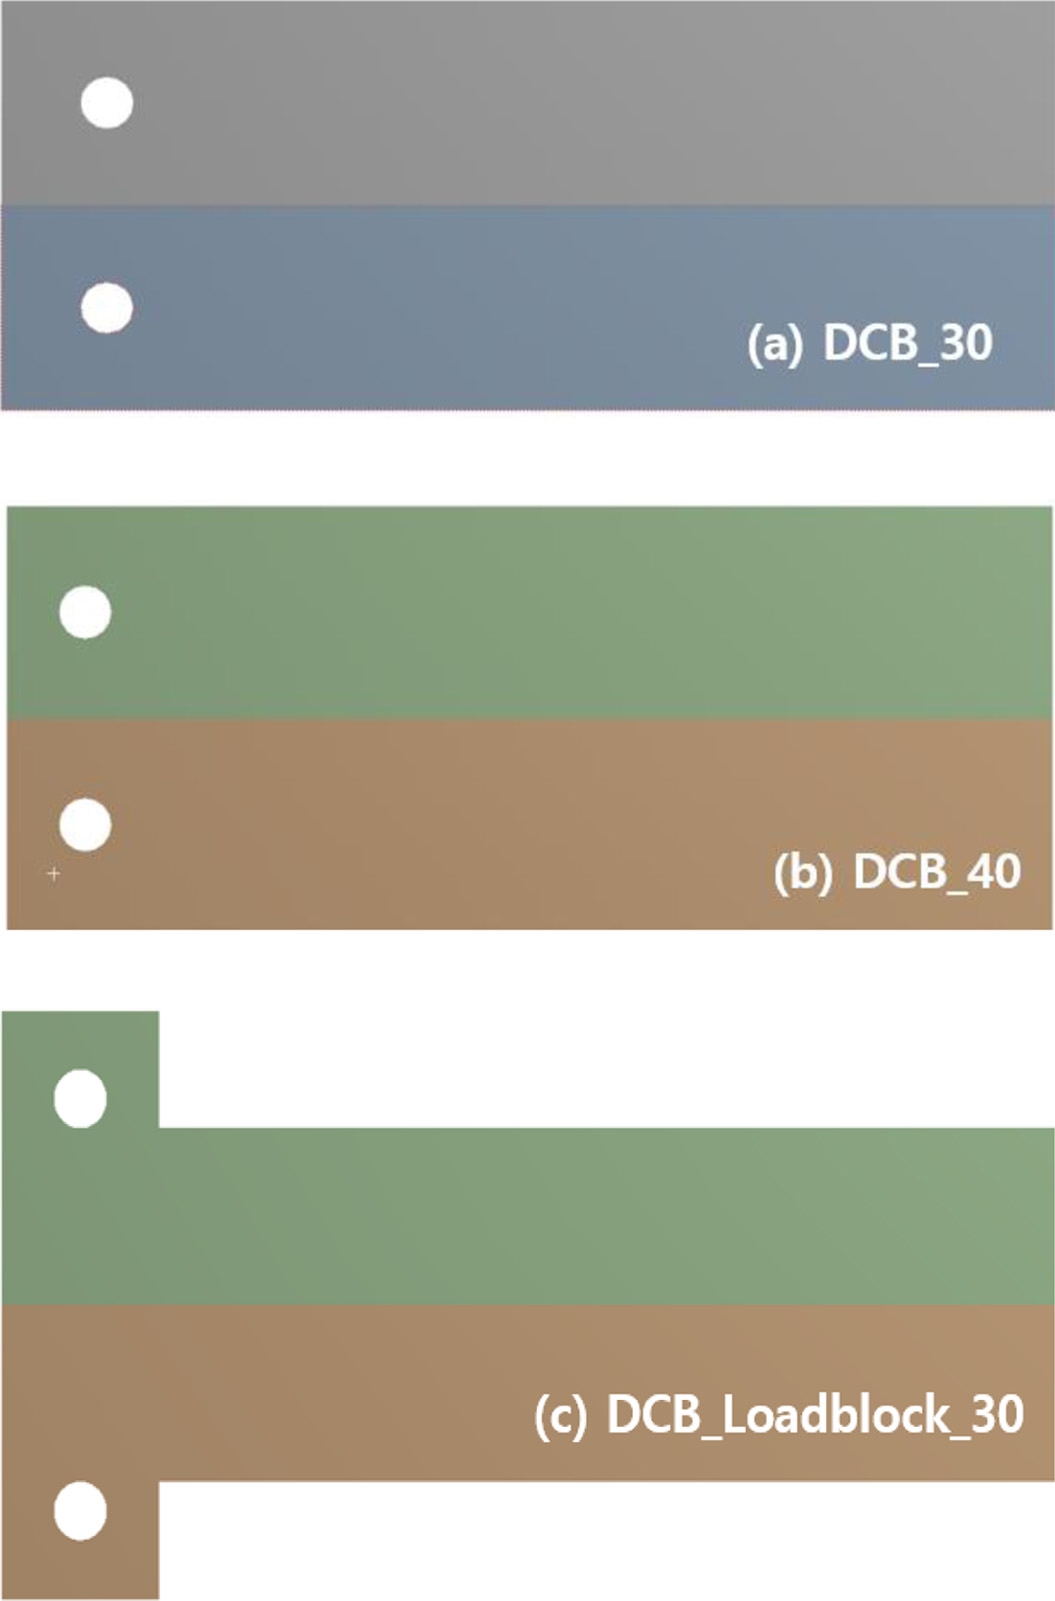
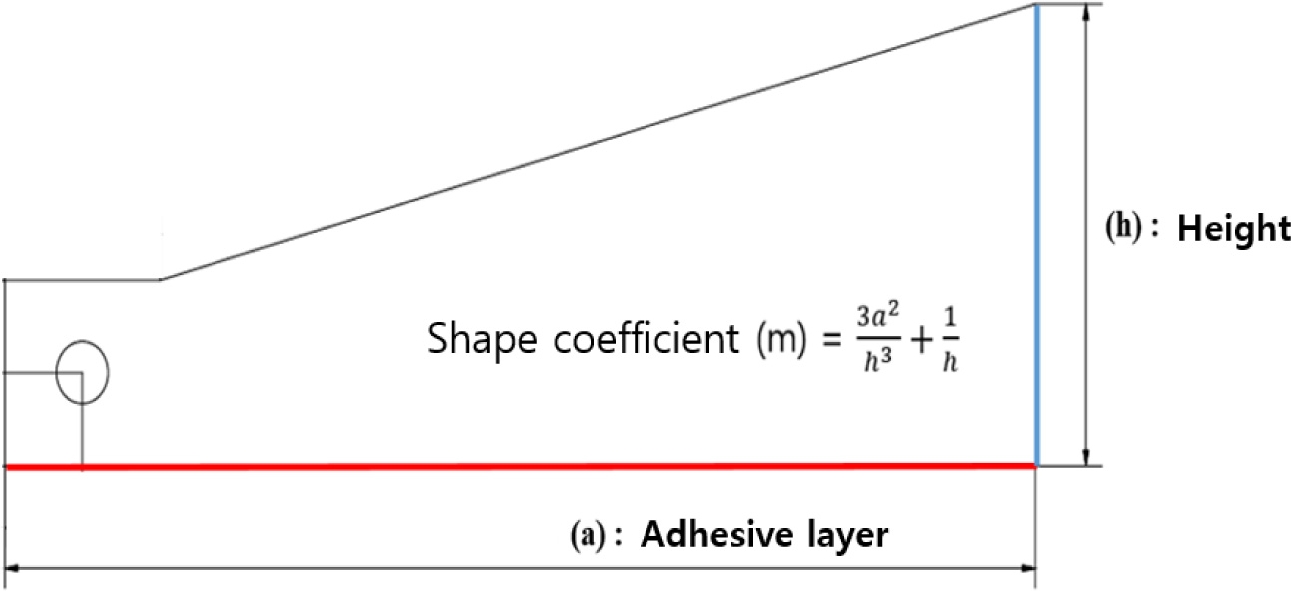
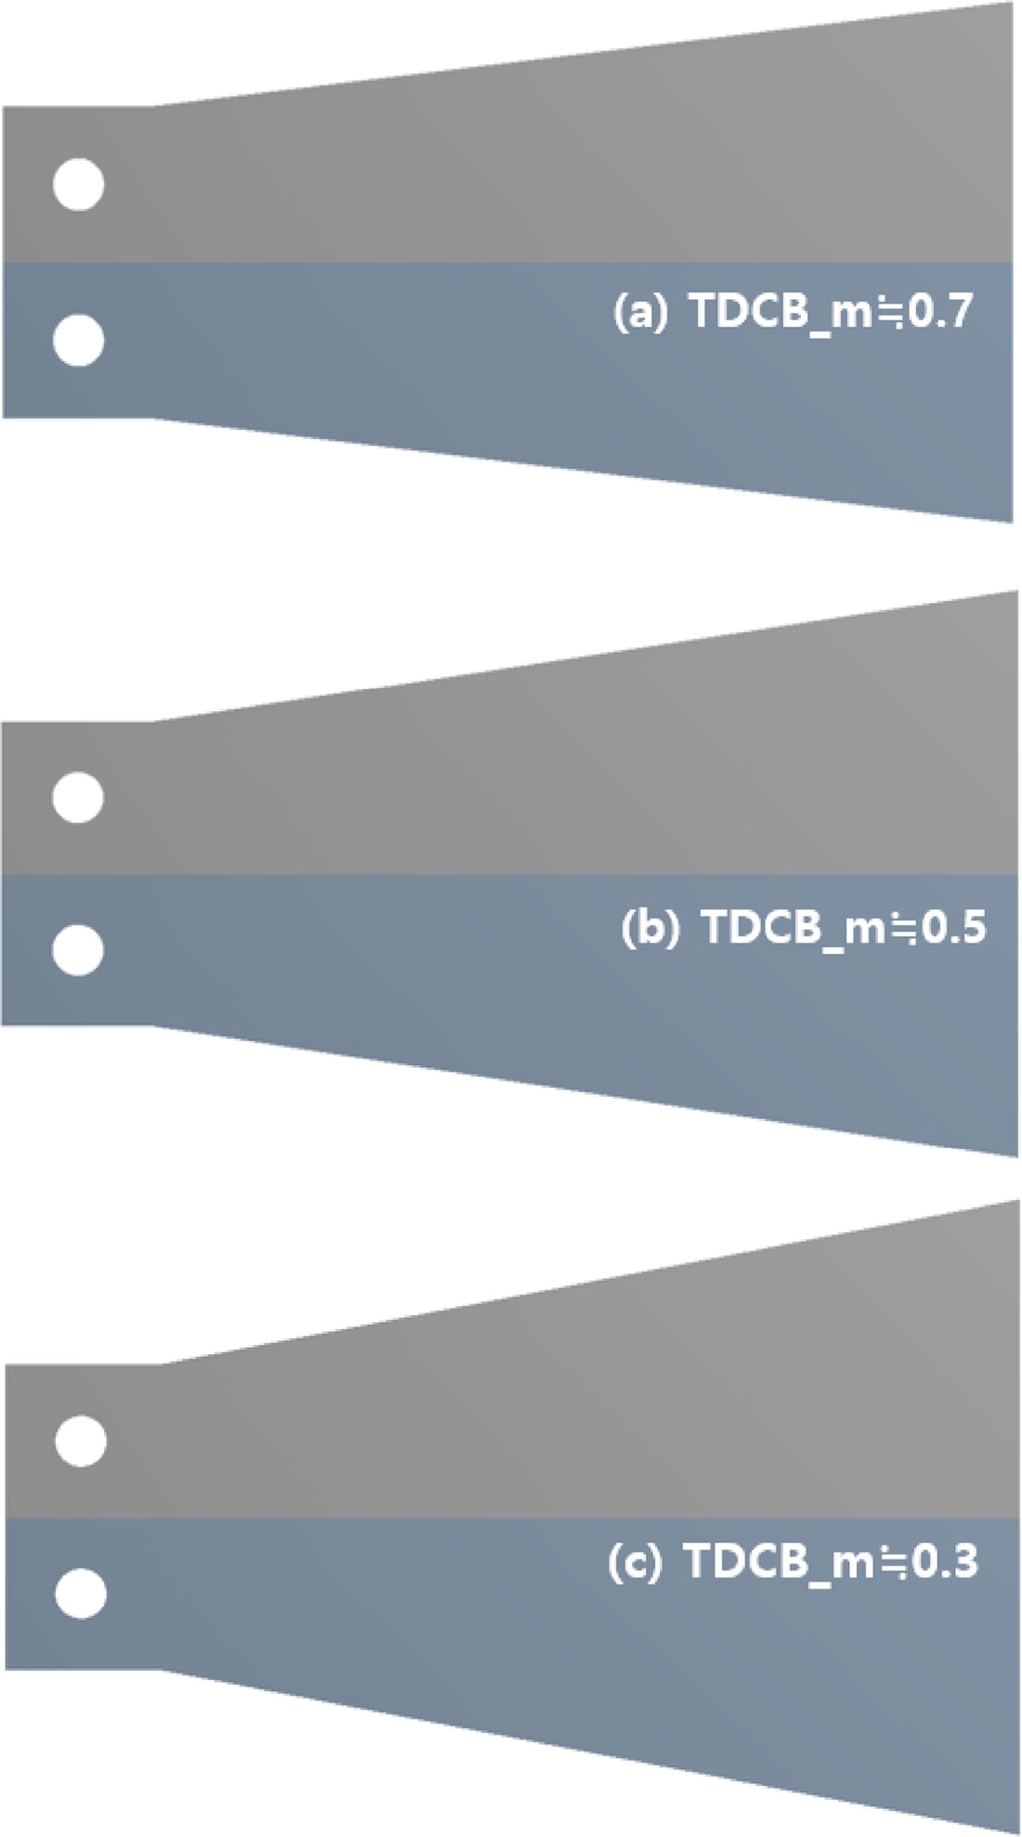
The reliability of analysis was established via comparison of the experiment and the analysis in Section 2.1 above. The reliability of the adhesive was evaluated by the shape of specimen. Fig. 5 shows a picture of DCB specimens used in this study; DCB_30 and DCB_40, are specimens with width of 30 mm and 40 mm, respectively, and for the DCB_loadblock_30, a load block was added to its end. Fig. 6 shows the calculation method for obtaining the shape factor determining the slope of TDCB test specimen. The shape factor of the TDCB is mainly a function of the adhesive interface and the height of the specimen tip. TDCB test specimens designed using these shape factors are shown in Fig. 7. The specimens with shape factors of 0.7, 0.5 and 0.3 were compared, and the characteristics of each adhesive failure were investigated.
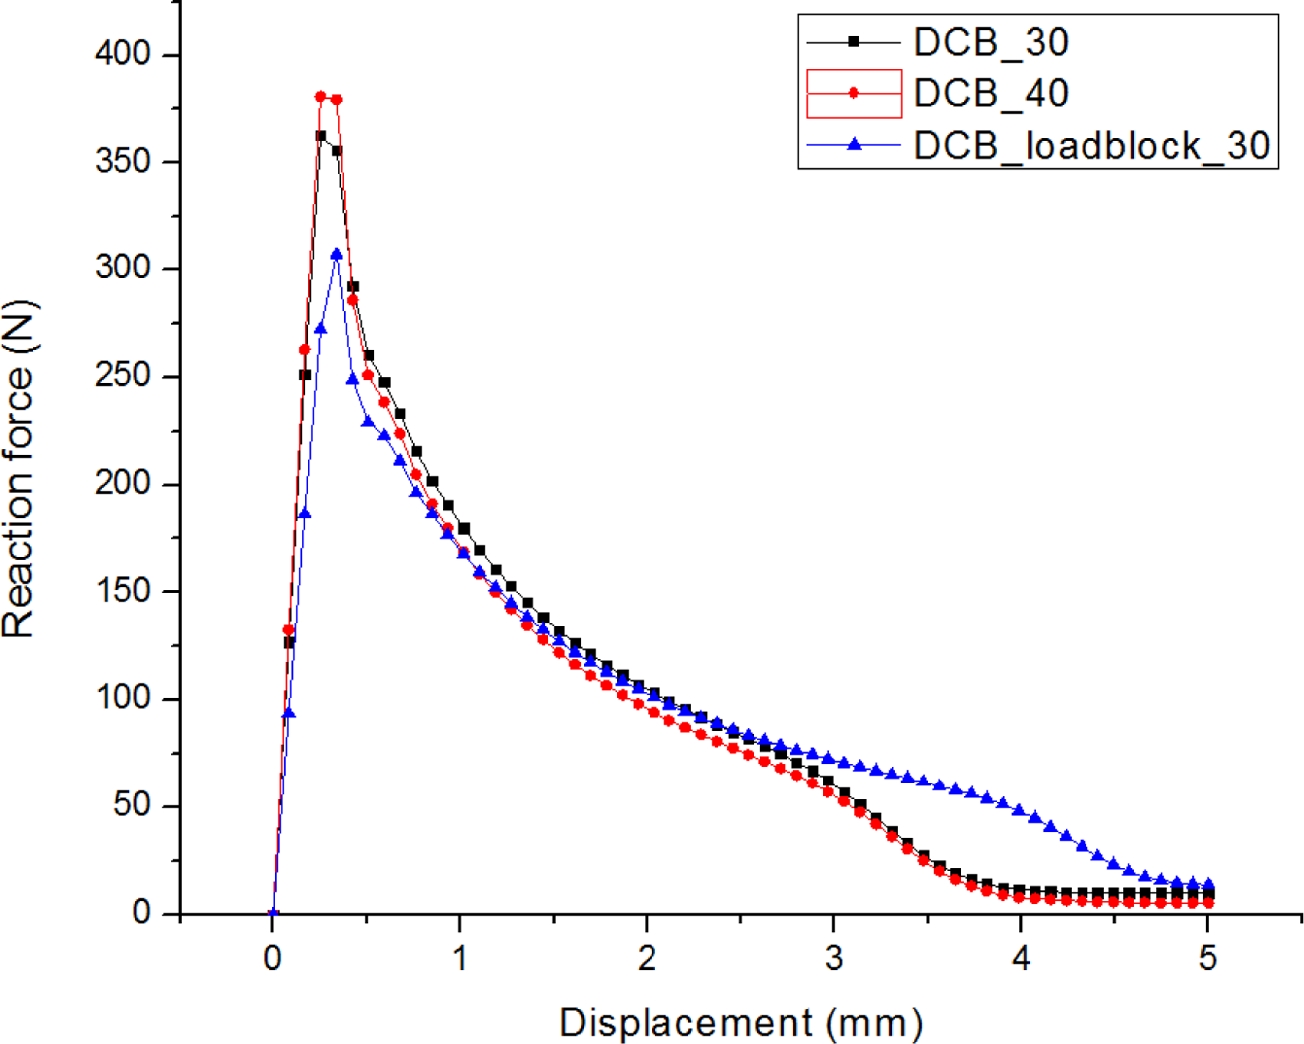
Fig. 8 is the graph of reaction force-displacement on DCB test specimens by configuration. DCB_40 showed the magnitude of maximum reaction force followed by DCB_30, DCB_loadblock_30, respectively; the maximum reaction force was 362.98 N for DCB_40, 362.98 N for DCB_30, and 307.52 N for DCB_loadblock_30, respectively. Based on these results, we inferred that the width of the specimen affected the maximum reaction force. In addition, when load block is added, the maximum reaction force is decreased, but the reaction force has a property which is sustained until the end of the displacement.
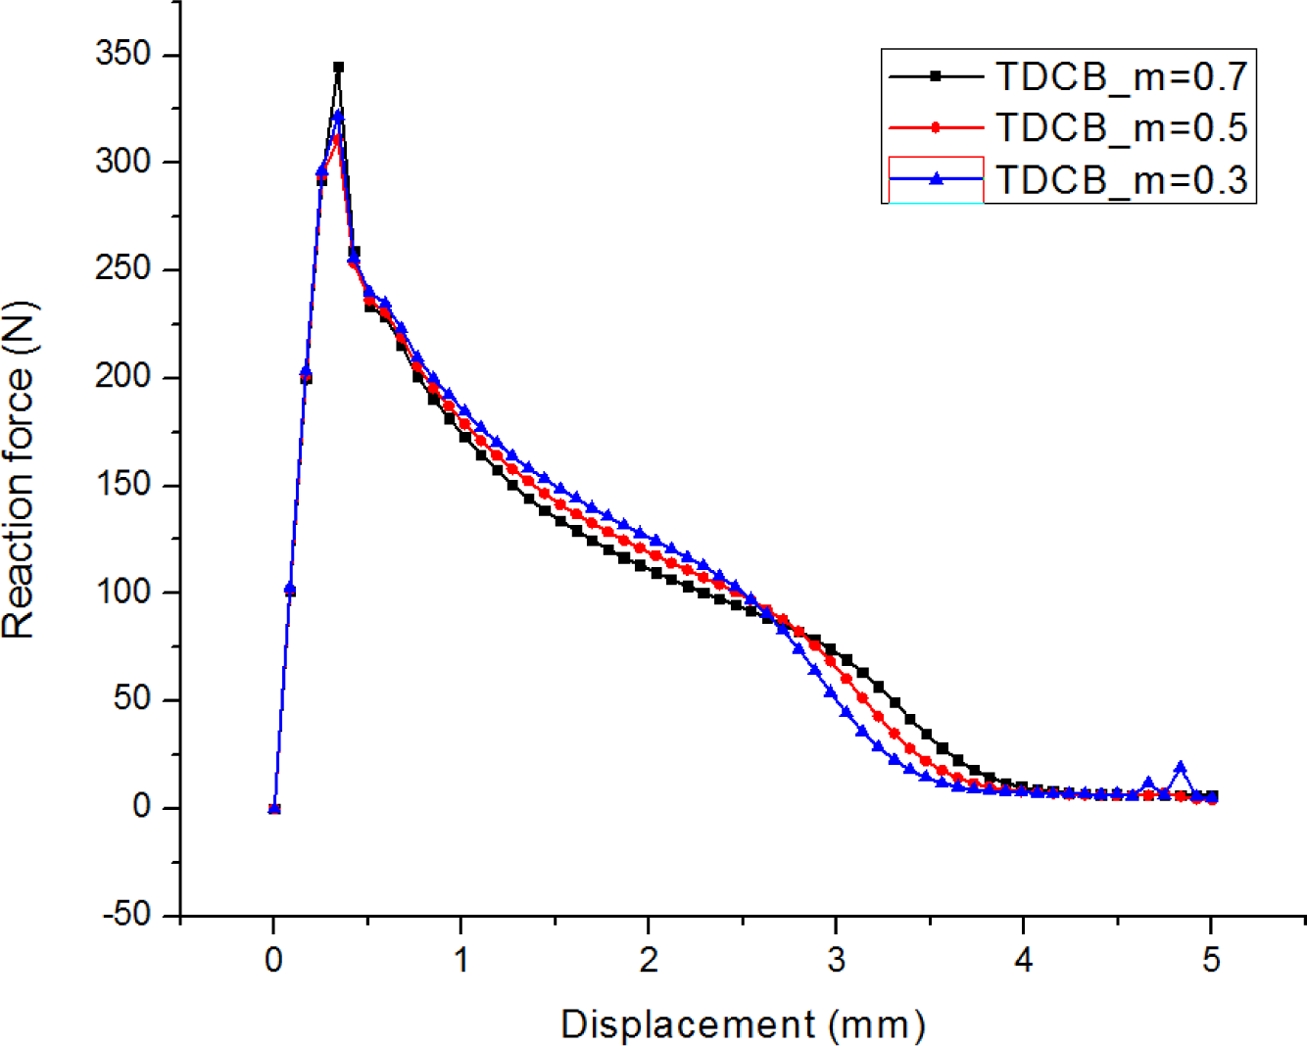
Fig. 9 shows the graph of reaction force-displacement on TDCB test specimen. The maximum reaction force was found to be the highest when the shape coefficient was TDCB_m = 0.7, followed by TDCB_m = 0.3 and TDCB_m = 0.5. As for maximum reaction force, TDCB_m = 0.7 was 344.73 N, TDCB_m = 0.3 was 322.01 N, and TDCB_m = 0.5 was 310.98 N. Based on these results, it was found that the reaction force happened differently from the DCB test specimen. The lesser the inclination, the more it tended to TDCB_m = 0.5 and TDCB_m = 0.3.
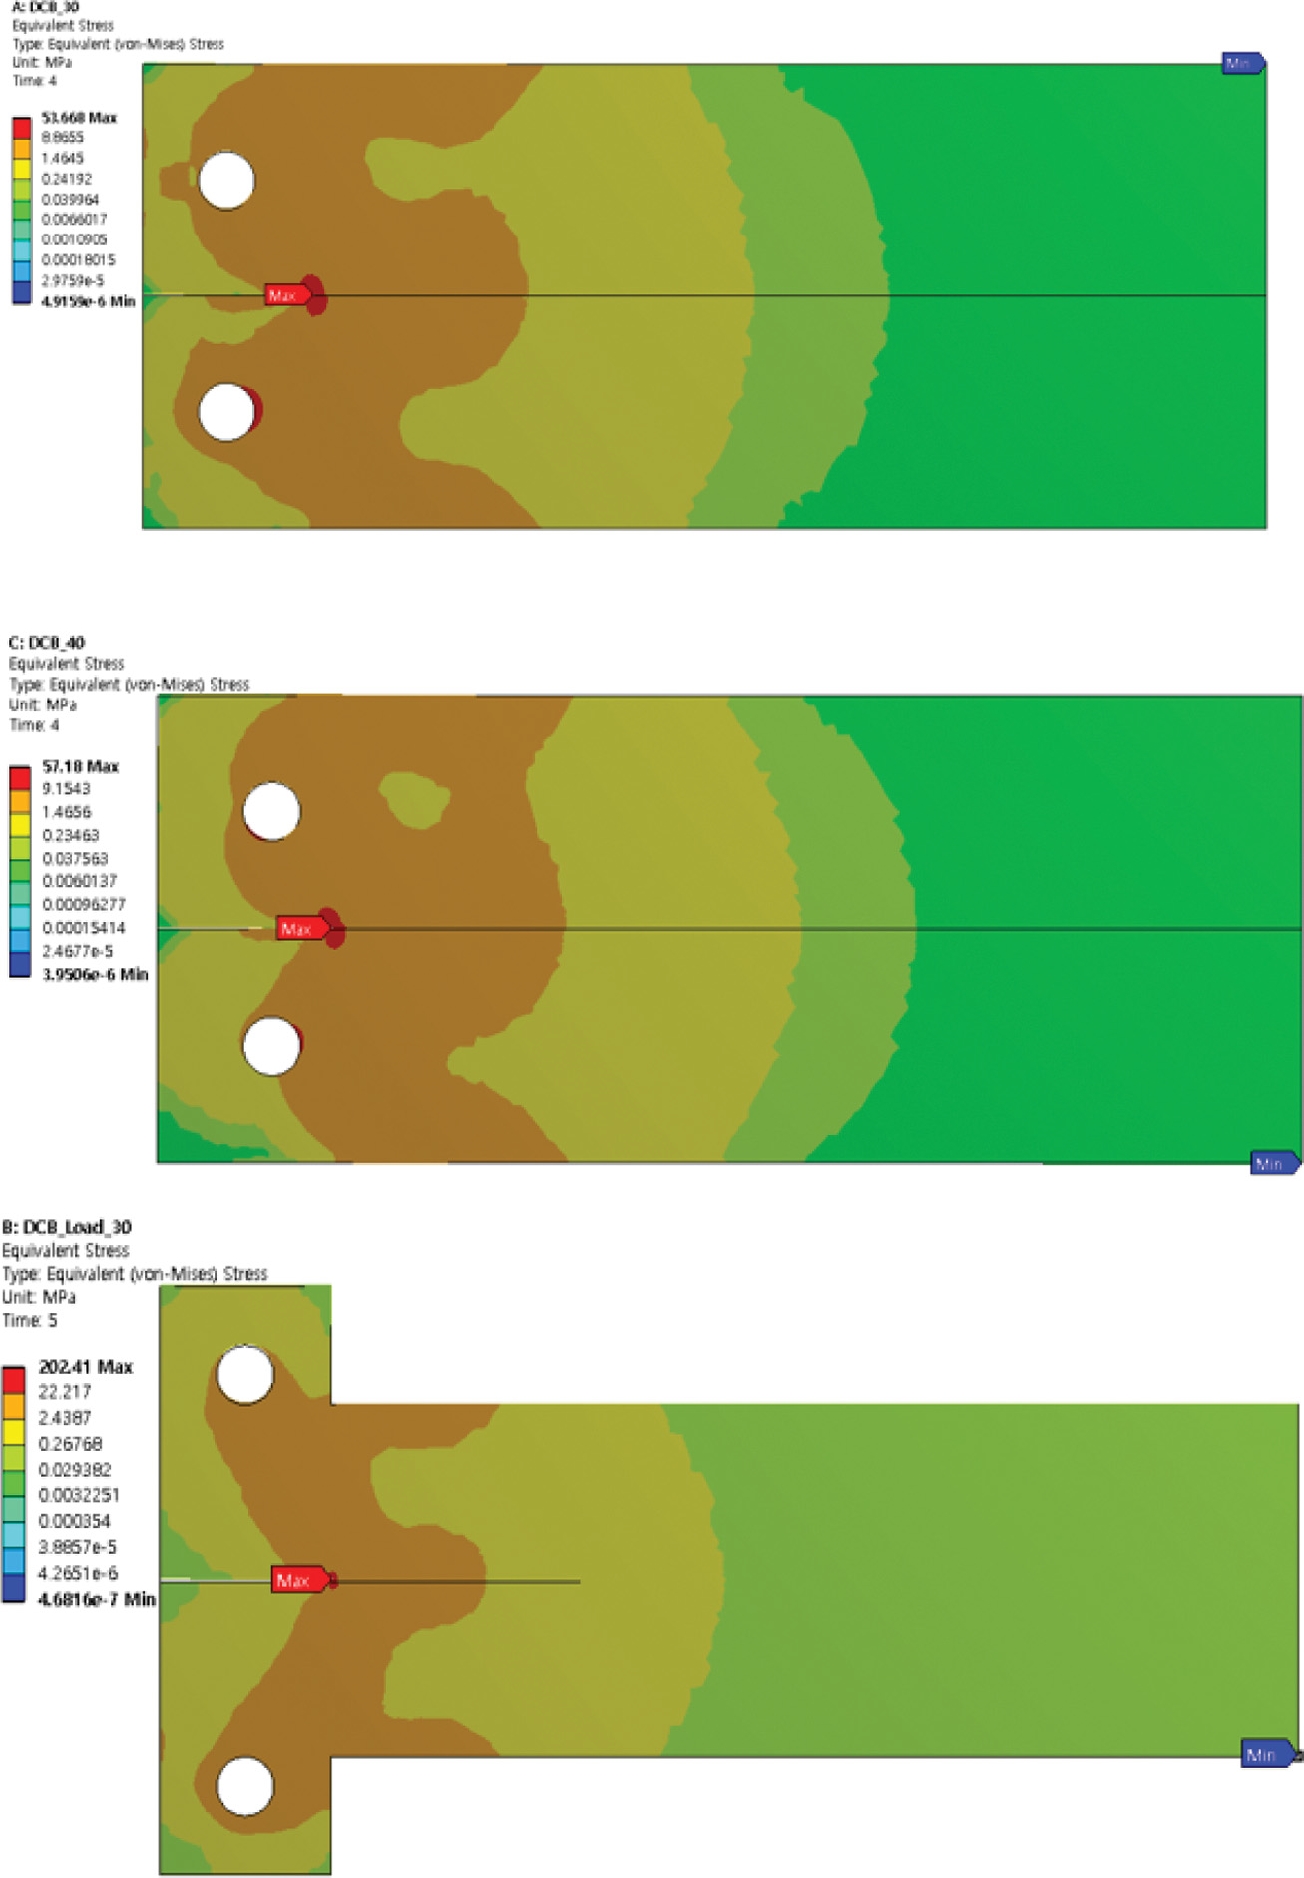
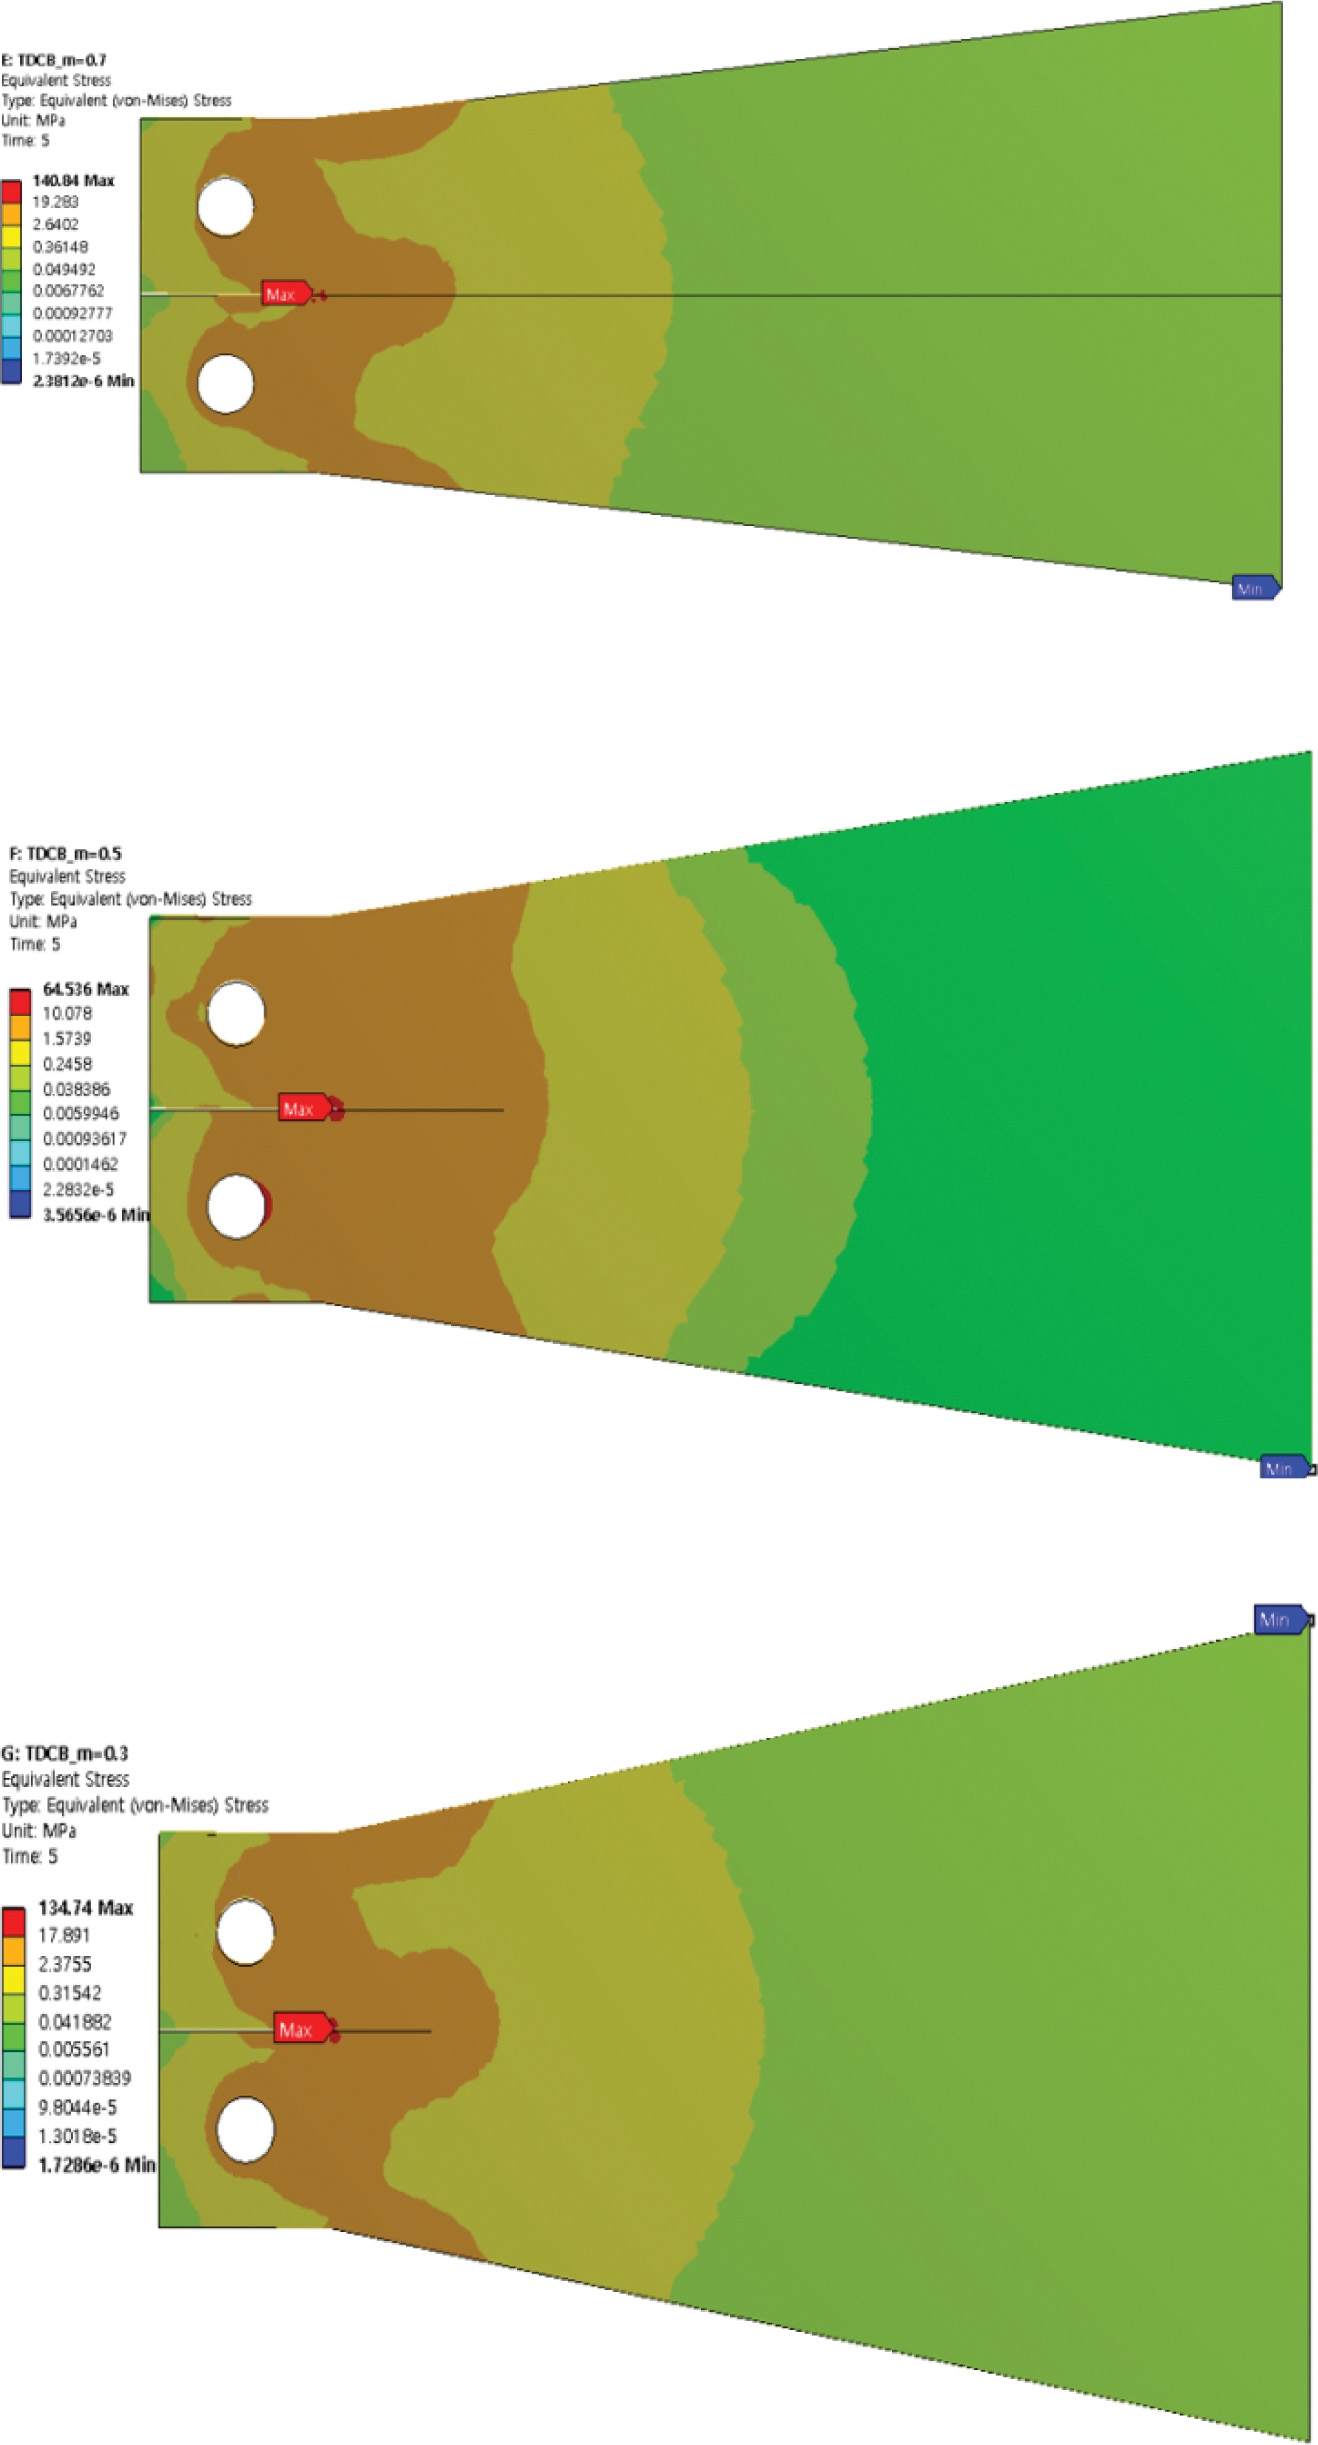
One of the advantages of the finite element method over the actual experiment is that it is easy to check the stresses inside the test specimen, which can be hard to visually recognize. Fig. 10 is the contour of the equivalent stress happening inside the DCB test specimen at the maximum reaction force. It was found that the greatest stress was exerted at the time when the adhesive was peeled off, and it could be inferred that the maximum reaction force occurred just before the adhesive was peeled off. The maximum equivalent stress at this time was found to be 53.668 MPa in DCB_30. The maximum equivalent stresses of model DCB_40 and DCB_loadblock_30 were 57.18 MPa and 202.41 MPa, respectively. Additionally, Fig. 11 is the contour of equivalent stress happening inside the TDCB test specimen at the maximum reaction force. It was found that the greatest stress was exerted at the time of peeling of the adhesive, which was the same as DCB test specimen.
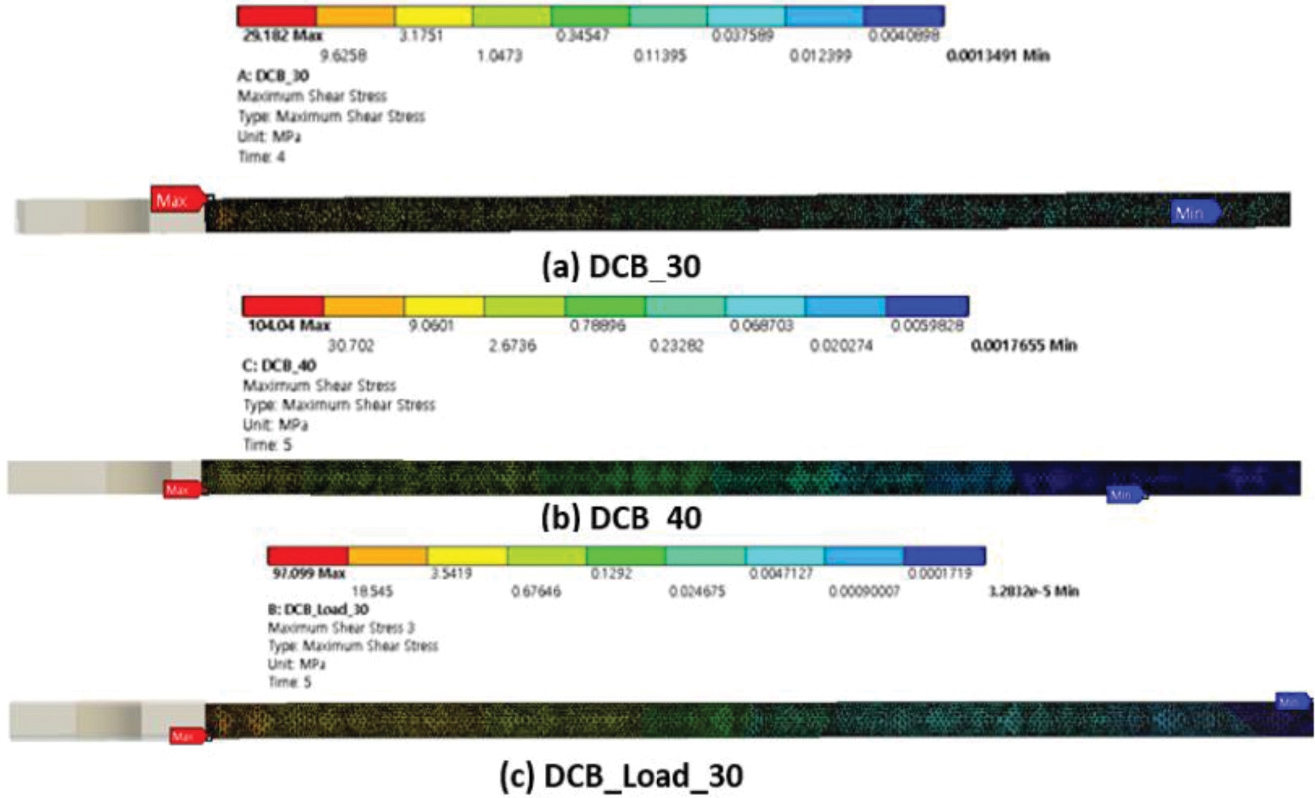
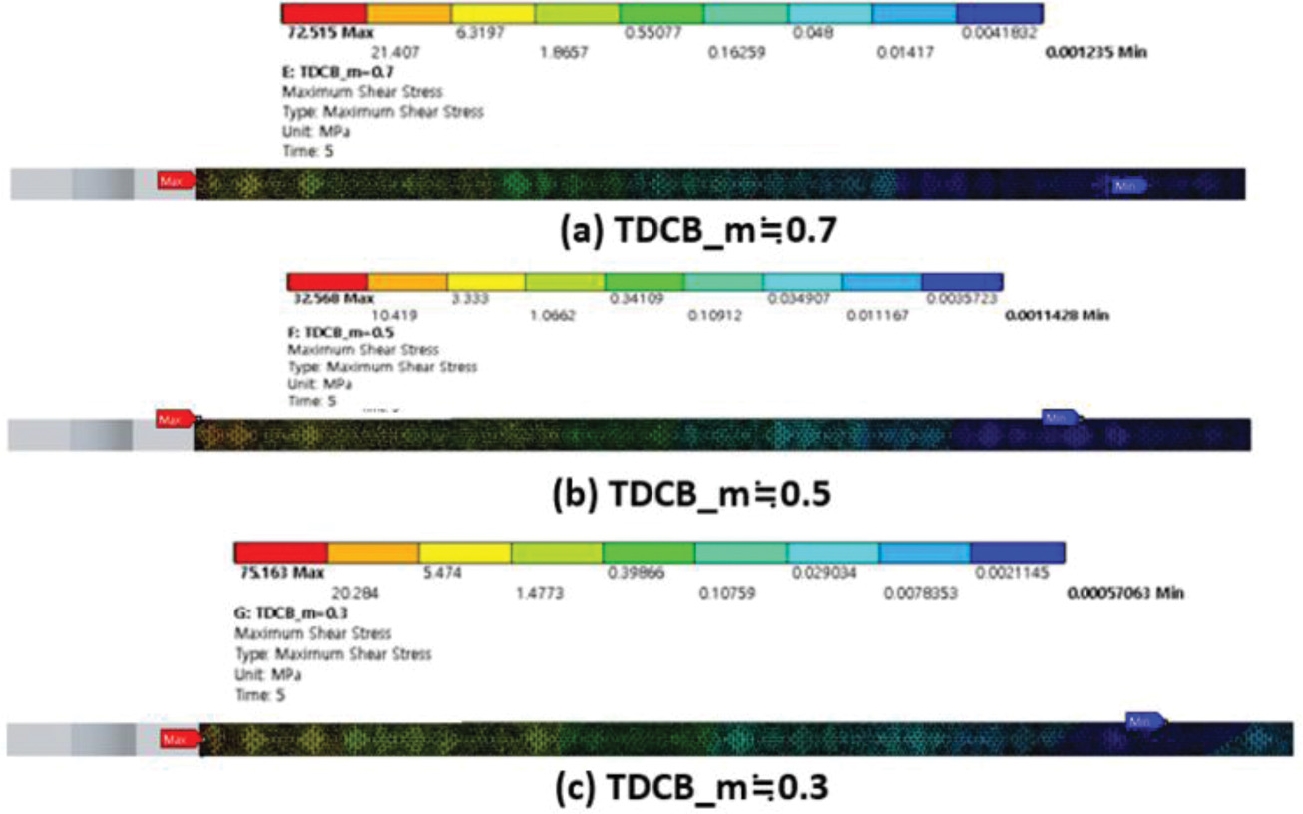
When the maximum equivalent stress at this time was checked, it was found that the equivalent stress of 140.84 MPa was the maximum at TDCB_m = 0.7. The maximum equivalent stresses of TDCB_m = 0.5 and TDCB_m = 0.3 were 64.536 MPa and 134.74 MPa, respectively. Fig. 12 shows the shear stress of DCB test specimen with respect to the inside of the bonding surface when the maximum reaction force is applied. It could be seen that the largest shear stress was exhibited at the portion where the adhesive was peeled off on all the shapes. It could be seen that this was an equivalent stress.
In DCB_30, the maximum shear stress of 29.182 MPa was examined. The maximum shear stresses of model DCB_40 and DCB_loadblock_30 were 104.04 MPa and 97.099 MPa, respectively. Therefore, the largest shear stress was found in DCB_40. By comparing the above two results, it could be observed that DCB_40 was safer than the other models. Finally, Fig. 13 shows the shear stress of the TDCB test specimen when the maximum reaction force is applied to the inside of the bonding surface. It could be seen that the largest shear stress was observed at the portion where the adhesive was peeled off equally in all the shapes. These shear stresses showed up to 72.515 MPa shear stress at TDCB_m = 0.7. The maximum shear stresses of TDCB_m = 0.5 and TDCB_m = 0.3 were found to be 32.568 MPa and 75.163 MPa, respectively. Therefore, TDCB_m ≒ 0.3 showed the largest shear force. Comparing the above two results, it was observed that TDCB_m ≒ 0.3 was safer than other models.
3. Conclusions
In this study, the fracture characteristics of structural adhesives according to the shape of a double cantilever beam and tapered double cantilever beam were investigated by using the finite element method. The conclusions are as follows.
(1) In order to obtain the analysis reliability, an actual experiment was conducted, and the conditions of the analysis and experiment were equal. When we investigated the graph of reaction force-displacement, the graph indicated faster results for the analysis than the experiment results. However, when we checked the tendency of graph, the maximum reaction force was almost the same, and the graph shape was similar. Based on these results, the reliability of the analysis could be obtained.
(2) When the graph of reaction force-displacement according to the shape of DCB specimen was examined, the maximum reaction force was the highest for DCB_40, followed by DCB_30 and DCB_loadblock_30. These results suggest that the width of specimen has a great impact on the maximum reaction force. In addition, when the load block was added, the maximum reaction force decreased, but the reaction force demonstrated a property that sustained until the end of displacement.
(3) When we investigated the graph of reaction force-displacement according to the shape of TDCB test specimen, the maximum reaction force was the highest when the shape coefficient was TDCB_m = 0.7, followed by TDCB_m = 0.3 and TDCB_m = 0.5. These results show that the reaction force happens differently from the DCB test specimen. The tendency to maintain the reaction force to the end of bonding surface was as follows: TDCB_m = 0.7, TDCB_m = 0.5 and TDCB_m =0.3. This means that the lesser the inclination, the more it tends to sustain the load to the end of the plane.
(4) When the equivalent stresses happening at DCB and TDCB test specimens were observed, it was found that the greatest stress was exerted at the point when the adhesive was peeled off. This suggests that the peak reaction force happens immediately before the peeling of the adhesive.
(5) When we examined the shear stress of the adhesive surface of DCB and TDCB specimens at the maximum reaction force, the maximum reaction force happened when the adhesive was peeled off equally in all shapes. This means that it shows a tendency that is an equivalent stress.
(6) Based on the results of this study, it is thought that the data for the fracture characteristics of structural adhesives for each shape using DCB and TDCB test specimens can be applied to the design with durability.
Acknowledgments
This research was supported by Basic Science Research Program through the National Research Foundation of Korea (NRF) funded by the Ministry of Education (NRF-2018R1D1A1B07041627).
REFERENCES
-
Terasaki, N., Fujio, Y., Horiuchi, S., and Akiyama, H., “Mechanoluminescent Studies of Failure Line on Double Cantilever Beam (DCB) and Tapered-DCB (TDCB) Test with Similar and Dissimilar Material Joints,” International Journal of Adhesion and Adhesives, Vol. 93, pp. 40-46, 2019.
[https://doi.org/10.1016/j.ijadhadh.2019.01.022]

-
Heidari-Rarani, M. and Sayedain, M., “Finite Element Modeling Strategies for 2D and 3D Delamination Propagation in Composite DCB Specimens using VCCT, CZM and XFEM Approaches,” Theoretical and Applied Fracture Mechanics, Vol. 103, Paper No. 102246, 2019.
[https://doi.org/10.1016/j.tafmec.2019.102246]

-
Aljabar, N., Zhao, X., Al-Mahaidi, R., Ghafoori, E., Motavalli, M., et al., “Effect of Crack Orientation on Fatigue Behavior of CFRP-Strengthened Steel Plates,” Composite Structures, Vol. 152, No. 1, pp. 295-305, 2016.
[https://doi.org/10.1016/j.compstruct.2016.05.033]

-
Hwang, G. and Cho, J., “A Study on Mechanical Behavior occurred at the Adhesive Interface Delamination of Jointed Structure,” International Journal of Precision Engineering and Manufacturing, Vol. 18, No. 3, pp. 381-387, 2017.
[https://doi.org/10.1007/s12541-017-0046-z]

-
Jung, Y. S., Lee, G. I., and Kim, J. Y., “Study on Optimal Design of F-Apron of Vehicles by Multi-Material Bonding,” Journal of the Korean Society of Manufacturing Process Engineers, Vol. 18, No. 2, pp. 102-107, 2019.
[https://doi.org/10.14775/ksmpe.2019.18.2.102]

-
Choi, J. W. and Kim, H. C., “3D Printing Technologies -A Review,” Journal of the Korean Society of Manufacturing Process Engineers, Vol. 14, No. 3, pp. 1-8, 2015.
[https://doi.org/10.14775/ksmpe.2015.14.3.001]

-
Jones, R., Kinloch, A. J., and Hu, W., “Cyclic-Fatigue Crack Growth in Composite and Adhesively-Bonded Structures : The Faa Slow Crack Growth Approach to Certification and the Problem of Similitude,” International Journal of Fatigue, Vol. 88, pp. 10-18, 2016.
[https://doi.org/10.1016/j.ijfatigue.2016.03.008]

-
Liu, Y., Zhang, C., and Xiang, Y., “A Critical Plane-Based Fracture Criterion for Mixed-Mode Delamination in Composite Materials,” Composites Part B: Engineering, Vol. 82, pp. 212-220, 2015.
[https://doi.org/10.1016/j.compositesb.2015.08.017]

- Lee, S. H., Choi, S. D., Kim, G. M., and Lee, J. H., “Study on the Bonding Property and Strength Evaluation in Bonding Interface Joints of Dissimilar Material Using Response Surface Analysis,” Journal of the Korean Society of Manufacturing Process Engineers, Vol. 8, No. 2, pp. 76-82, 2009.
-
Ishbir, C., Banks-Sills, L., Fourman, V., and Eliasi, R., “Delamination Propagation in a Multi-Directional Woven Composite DCB Specimen Subjected to Fatigue Loading,” Composites Part B: Engineering, Vol. 66, pp. 180-189, 2014.
[https://doi.org/10.1016/j.compositesb.2014.05.013]

-
Bang, H., Lee, S. K., Cho, C., and Cho, J. U., “Study on Crack Propagation of Adhesively Bonded DCB for Aluminum Foam Using Energy Release Rate,” Journal of Mechanical Science and Technology, Vol. 29, No. 1, pp. 45-50, 2015.
[https://doi.org/10.1007/s12206-014-1207-y]

- Cho, J. U. and Han, M. S., “Study on Fracture at Material under Dynamic Load,” Journal of the Korean Society of Manufacturing Process Engineers, Vol. 7, No. 2, pp. 16-22, 2008.
-
Cho, H., Cho, J., and Cho, C., “Experimental and Analytical Verification of the Characteristics of Shear Fatigue Failure in the Adhesive Interface of Porous Foam Materials,” Journal of Mechanical Science and Technology, Vol. 29, No. 6, pp. 2333-2339, 2015.
[https://doi.org/10.1007/s12206-015-0525-z]

-
Kim, S. Y. and Kim, K. S., “A Study on Radiation Noise of Vehicle Power Seat Recliner using Finite Element Analysis,” Journal of the Korean Society of Manufacturing Process Engineers, Vol. 17, No. 1, pp. 101-107, 2018.
[https://doi.org/10.14775/ksmpe.2018.17.1.101]

-
Gorman, J. and Thouless, M., “The Use of Digital-Image Correlation to Investigate the Cohesive Zone in a Double-Cantilever Beam, with Comparisons to Numerical and Analytical Models,” Journal of the Mechanics and Physics of Solids, Vol. 123, pp. 315-331, 2019.
[https://doi.org/10.1016/j.jmps.2018.08.013]


Jae-Won Kim is a graduate school student in the Division of Mechanical Engineering of Kongju National University, Cheonan. His field of specialization are Fracture Mechanics (Dynamic Impact), Impact Fracture of Composite Material), Fatigue & Strength Evaluation, and Durability & Optimum Design.
E-mail: kimjw_920@naver.com

Seong-Sik Cheon received his M.S. and Ph.D. in Mechanical Engineering at KAIST in 1995 and 1999, respectively. He is currently a professor in the division of Mechanical & Automotive Engineering at Kongju National University, Korea. His research interests include crashworthiness of joining parts, mechanical behaviour of foams and application of composite materials.
E-mail: sscheon@kongju.ac.kr

Sung-Ki Lyu is a professor in the School of Mechanical & Aerospace Engineering of Gyeongsang National University, Korea. His research interests are gear, gearbox, and mechanical system design.
E-mail: sklyu@gnu.ac.kr

Jae-Ung Cho received his M.S. and Doctor Degree in Mechanical Engineering from Inha University, Incheon, Korea, in 1982 and 1986, respectively. Now he is a professor in the Division of Mechanical & Automotive Engineering of Kongju National University, Korea. He is interested in the areas of fracture mechanics (Dynamic impact), composite material, fatigue and strength evaluation, and so on.
E-mail: jucho@kongju.ac.kr
