Investigation on Welded T-Joint Distortion Using Virtual Manufacturing Tools with Simplified Procedure
 ; Mohamad Shahar Sulaiman1 ; Mohd Shahriman Adenan1
Copyright © The Korean Society for Precision Engineering
This is an Open-Access article distributed under the terms of the Creative Commons Attribution Non-Commercial License (http://creativecommons.org/licenses/by-nc/3.0) which permits unrestricted non-commercial use, distribution, and reproduction in any medium, provided the original work is properly cited.
Abstract
This study presents a distortion analysis of a welded T-joint by using the virtual manufacturing (VM). Two different nonlinear 3D FEM-based VM systems, namely the general purpose MSC Marc/Mentat and the specialized Simufact.Welding software are compared and verified with the experiment. Both simulations are conducted based on an uncomplicated procedure without considering enormously on the weldment shape and resulting transient temperature distribution. Within this VM procedure, the heat source is modeled following Goldak’s double ellipsoid and the flow curve as one of the material properties of low carbon steel S235 is added with only one strain rate (0.001 s) based on non-linear isotropic plasticity model and von-Mises yield stress criterion. As the final outcome, the simplified procedures, weld geometry, and material properties will reduce the pre-processing without deteriorating the distortion results tremendously. Welding provides more structured and clearer simulation steps with more precise results of the angular distortion (Average of 7.25%) compared to the general purpose MSC Marc/Mentat (Average of 14.5%). This simplified simulation procedure without heat source and temperature calibration as well as complex material properties can be recommended for implementation if the time matter is constrained and the results are expected to be moderate.
Keywords:
FEM, Virtual manufacturing, Weld distortion, Simufact.Welding, MSC Marc/Mentat1. Introduction
The involvement of Virtual Manufacturing (VM) process in engineering environment nowadays is able to tackle the challenges faced in modern engineering society such as increasing demands in term of quality and quantity of manufactured products. FEM-based VM is one of the crucial components within Virtual Engineering which is a realization of real manufacturing process inside the computer world utilizing the numerical model. Principally, VM’s main function is to model the entire manufacturing process in order to enhance the decision-making and quality control within the manufacturing process.1,2 Many VM engineer uses three-dimensional model in order to simulate the realistic numerical model when compared to the real manufacturing process.3
The basic principle of fusion welding process is that two or more materials with similar or dissimilar composition heated until their melting point then connected among each other after the cooling phase commenced. One of the fusion welding processes is GMAW used commonly due to its flexibility and high range of productivity in engineering field with an extensive range of plate thickness.4,5 T-joint type of welding is one of the most popular joint types among welding process which is commonly applied on pipes and tubes that are welded in perpendicular orientation. The T-joint is often constructed with two or more weld passes which owes the relatively large wall thickness in tube or pipe system when its applied on those type of constructions.6
Nowadays, welding technology is commonly used in a lightweight structure which consists of thin plates, but the distortions that could possibly be occurred are not easy to correct. This may lead into an imperfection which will affect the final design of finished goods.7 Presence of distortion affects the dimensional accuracy causing misalignment of structural parts, which might lead to poor joint fit-up and decrease aesthetical value. Even though welding process has been used frequently in manufacturing environment, the distortion that occurs could lead to the imperfect final product design that would increase the production cost in overall, especially on maintenance cost.8
Distortion in the welding process resulted from the unbalanced thermally induced stress that exists in non-restrained weld joints. The three major distortion forms usually found in welding processes are longitudinal shrinkage that takes place in a direction parallel to the weld line, transverse shrinkage that develops in a direction perpendicular to the weld line and angular change due to rotation around the weld line. Configuration of weld joint, heat input during transfers and welding sequences are factors that could affect the extend of distortions.9 By conducting repair welding process, it will lead into a quite sums of schedule delay and additional costs. By predicting the degree of welding distortions beforehand, engineers also could reduce the number of reworks by means of reverse design and distortion margin.10
The prediction of distortion is of importance when the intent is to minimize its negative effects. The distortion prediction method is divided mainly into experimental, analytical and numerical method.11 Computer-aided numerical method or FEM is a powerful tool for analyzing the potential deformation in which a numerical model for analyzing the pattern of welding distortion is simulated based on actual manufacturing parameters.12 Since its inception, the numerical simulations have become a mandatory tool to predict the outcome of the real experiment prior to actual welding. The 3D model usage becomes a necessity for the highaccuracy prediction of post-weld deformation and stress distribution on the joint.
One of the main purposes of finite element method on welding process is to predict the percentage of distortions with a numerical method which occurs during the entire welding process. The usage FEM acts as a preventive maintenance before the actual welding process by preventing the unwanted distortions.13 In welding simulation, the principle of Finite Element Analysis consists of two parts, which are thermal and mechanical analysis.14 The temperature calculation is determined as the variable for each melting and cooling points in term of analysis.15 However, the limitation of computational ability is a minor constraint on predicting the outcome that exactly accurate compared to real model. With the help of modern simulation software and use of numerical techniques, complex phenomenon of welding can be understood, and both weld thermal cycles experienced by the weld and distortion resulting from this can be predicted with reasonable accuracy.16
The numerical simulations that specified for reducing the computational time and complexity of transient linear problem has been an interest in researcher in FEM area for years.17 Mato and Zdenko18 had performed an analysis based on T-joint weld aiming to analyze residual stresses and distortions induced by T-joint weld and found that the numerical model of 3D-solid had no significant influence towards the temperature distribution field. The prediction of angular distortion is crucial when the intent is to minimize its negative effects.
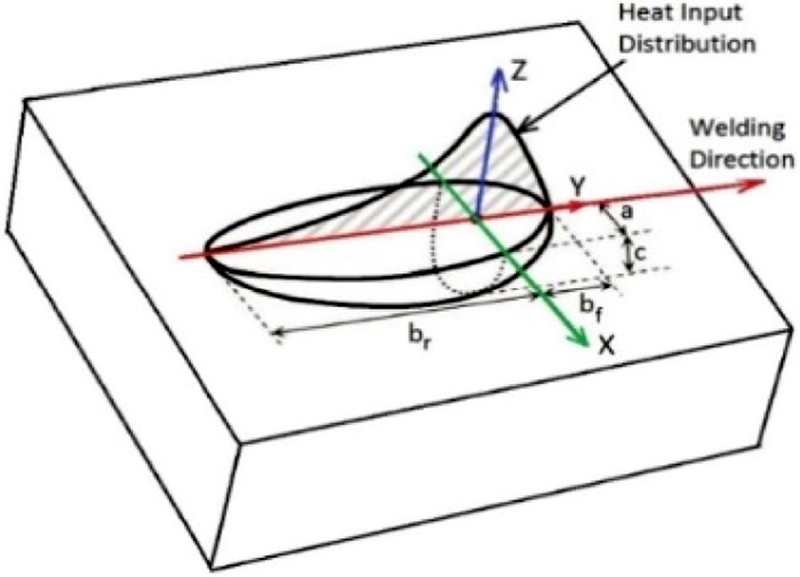
In recent decades, many researches have been done on heat source models to reveal various welding process, such as gauss or elliptical heat source model for TIG in low welding current, double ellipsoid heat source model for MIG and double-ellipsoidal + EHGC (Exponentially-Tapered Peak Value of Heat Flux in Gaussian Cylinder) heat source model for plasma arc welding.19 Pavalec in late 1960s recommended a heat source model of circular disc with Gaussian distribution on the surface of the workpiece. Then, Goldak’s double ellipsoidal heat source was developed for the use of FE in welding simulation process. Fig. 1 illustrates the Goldak’s Double Ellipsoid model.
Power density of the heat flux in front section (Qvf) of heat source can be determined by following formula, Eq. (1):
| (1) |
Power density of the heat flux in rear section (Qvr) can be determined by Eq. (2):
| (2) |
Where ff and fr are the heat deposited fractional factors in the front and rear quadrant respectively and its sum is equal to 2. The distribution of fluxes in the double ellipsoid model is determined by 4 directions: width (a), depth (c), rear length (br) and front length (bf). The values for each direction are shown in Table 1.
2. Virtual Manufacturing Using Nonlinear 3D-FEM Systems: Material Model, Process Parameters and Geometry
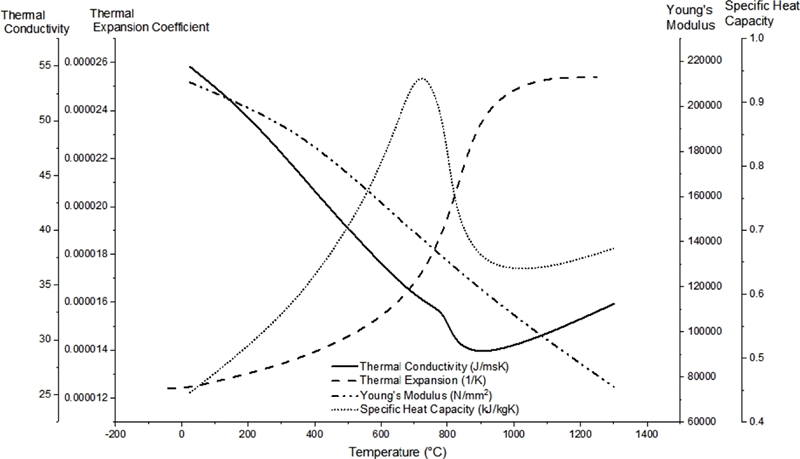
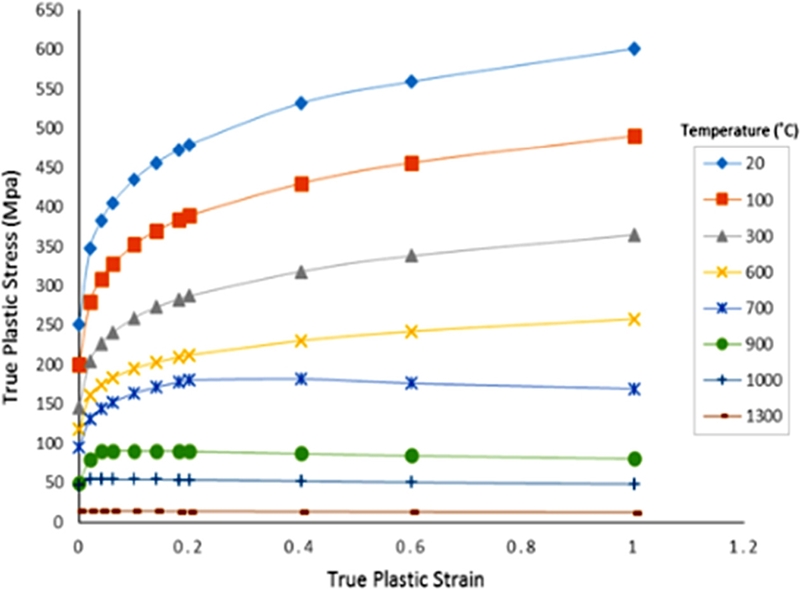
Low Carbon steel material S235 is assigned for both simulations which acts as both weld and filler materials. S235 is a version of low carbon steel which mirrors the real-life material assigned in welding process. Thermomechanical properties of S235 are exhibited on Fig. 2, while flow curve with isotropic nonlinear hardening model is demonstrated by means of Fig. 7. Table 1 displays the parameters that are implemented on the simulation process that would be later used on the experimental verification on both FEM software. The Current (I) and the Voltage (V) are considered under the equation of power. The assigned travel speed (v) was based on the ideal welding speed for this material using one-pass T-joint.
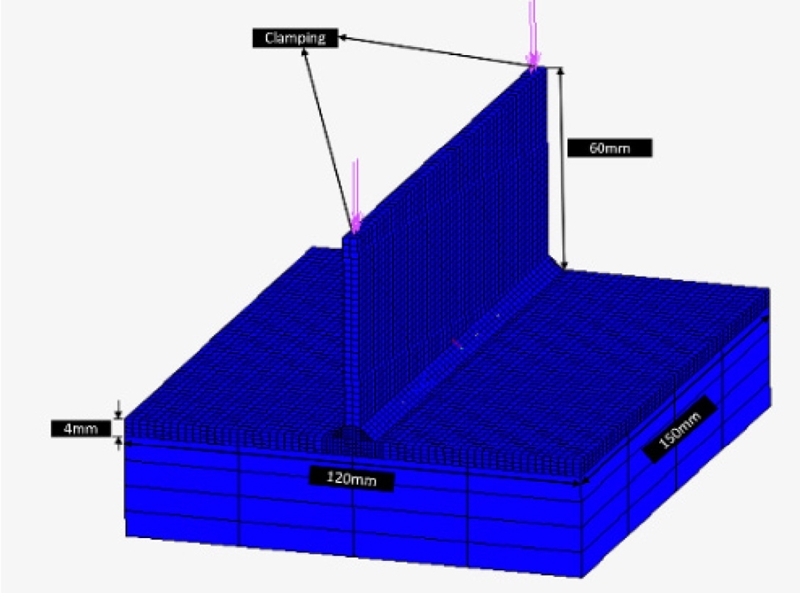
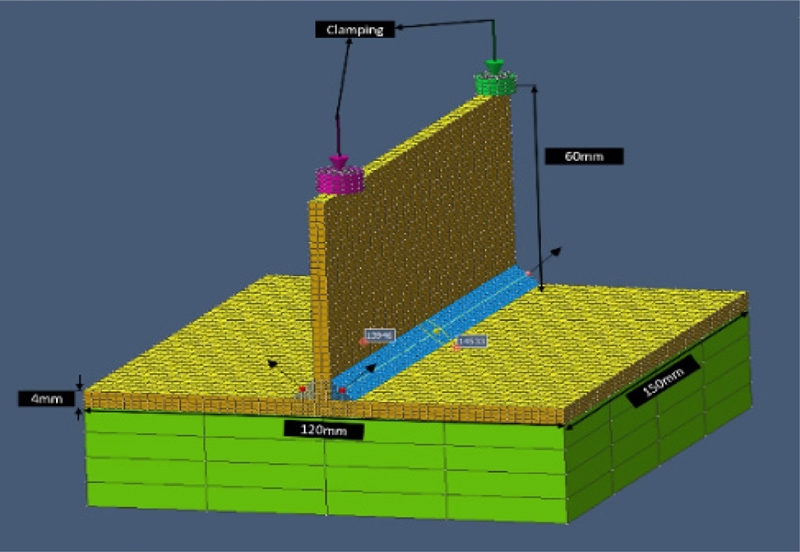
Fig. 4 shows the schematic illustration of the geometrical model, having the dimension of 120 × 150 mm as base plate and 60 × 150 mm as stiffener plate. The thickness of plates is 4 mm, which was assigned to produce double-sided weld. In this simulation, the geometry is meshed using single-passed welding bead.
The most modern simulation technique of the actual manufacturing process is considered as an advanced phase of modern engineering since it combines all the aspects of thermal, mechanical and metallurgical phenomena in one numerical model. The FEM simulation process of Simufact.Welding carries the same principal as MSC Marc/Mentat which some features differs than the other.
Compared to the whole process of MSC Marc/Mentat, however, Simufact.Welding provides more simplified process than MSC Marc/Mentat. This situation is occurred knowing that Simufact. Welding is a dedicated welding software which contents has been arranged to simulate real life welding rather than MSC Marc/Mentat which serves as general purposes FEM software. Fig. 5 displays the schematic illustration of FE model assigned to Simufact.Welding. The CAD model was created by using MSC Marc/Mentat. Weld beads for the T-joint were modelled on which the welding trajectory is located.
3. Experimental Setup and Procedures of Welded T-Joint
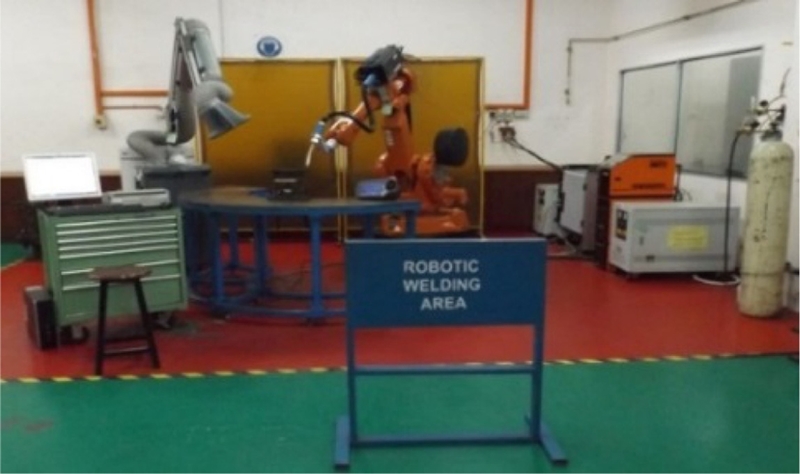
A series of comprehensive experimental welding processes were conducted in order to verify the simulation FEM result using T-joint weldment. Robotic Welding machine used for this experiment is ABB IRB 2400/16, with the GMAW power source KEMMPI Pro Evolution ProMIG 540MXE. The demonstration of robotic welding equipment can be seen in Fig. 6.
Table 3 shows the chemical composition of S235 based on material data sheet and the experimental results obtained using an Arc Spark Emission Spectrometer.
A macrograph is analyzed in order to generate the clearer image of heat affected zone from T-joint experiment. The result of the macrograph can be seen in Fig. 7 below.
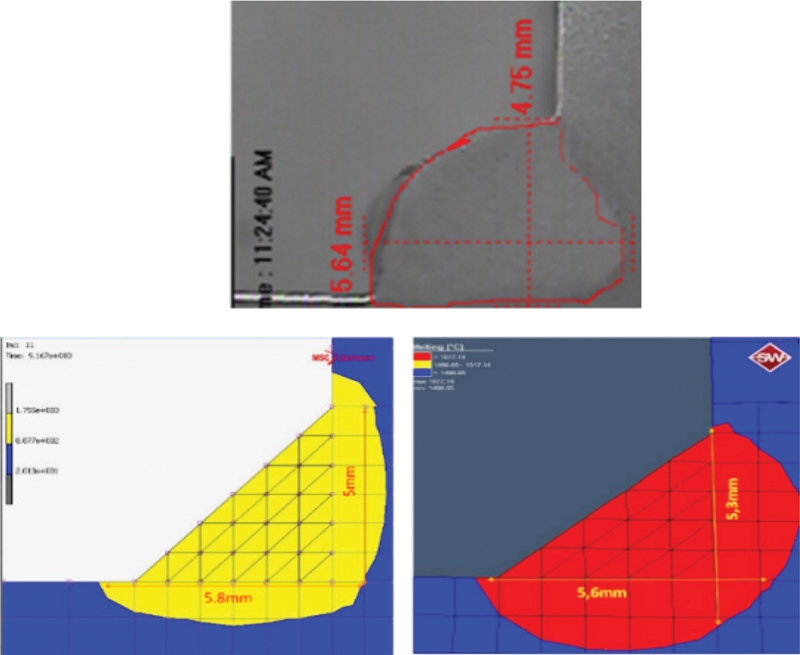
Macrograph of weld and model: experiment (Top), MSC Marc/Mentat (Bottom-Left) and Simufact.Welding (Bottom-Right)
A precised Coordinate Measuring Machine (CMM) of Mitutoyo model Beyond 70 with probe system model Renishaw PH9 is used as measurement for distortions of each point on the sides of plate. Before and after the welding process, the specimens were quantified using the same CMM to obtain the final readings of the identical points. Three measurement locations of the plate were defined in order calculate the angular distortion.
4. Result and Discussion
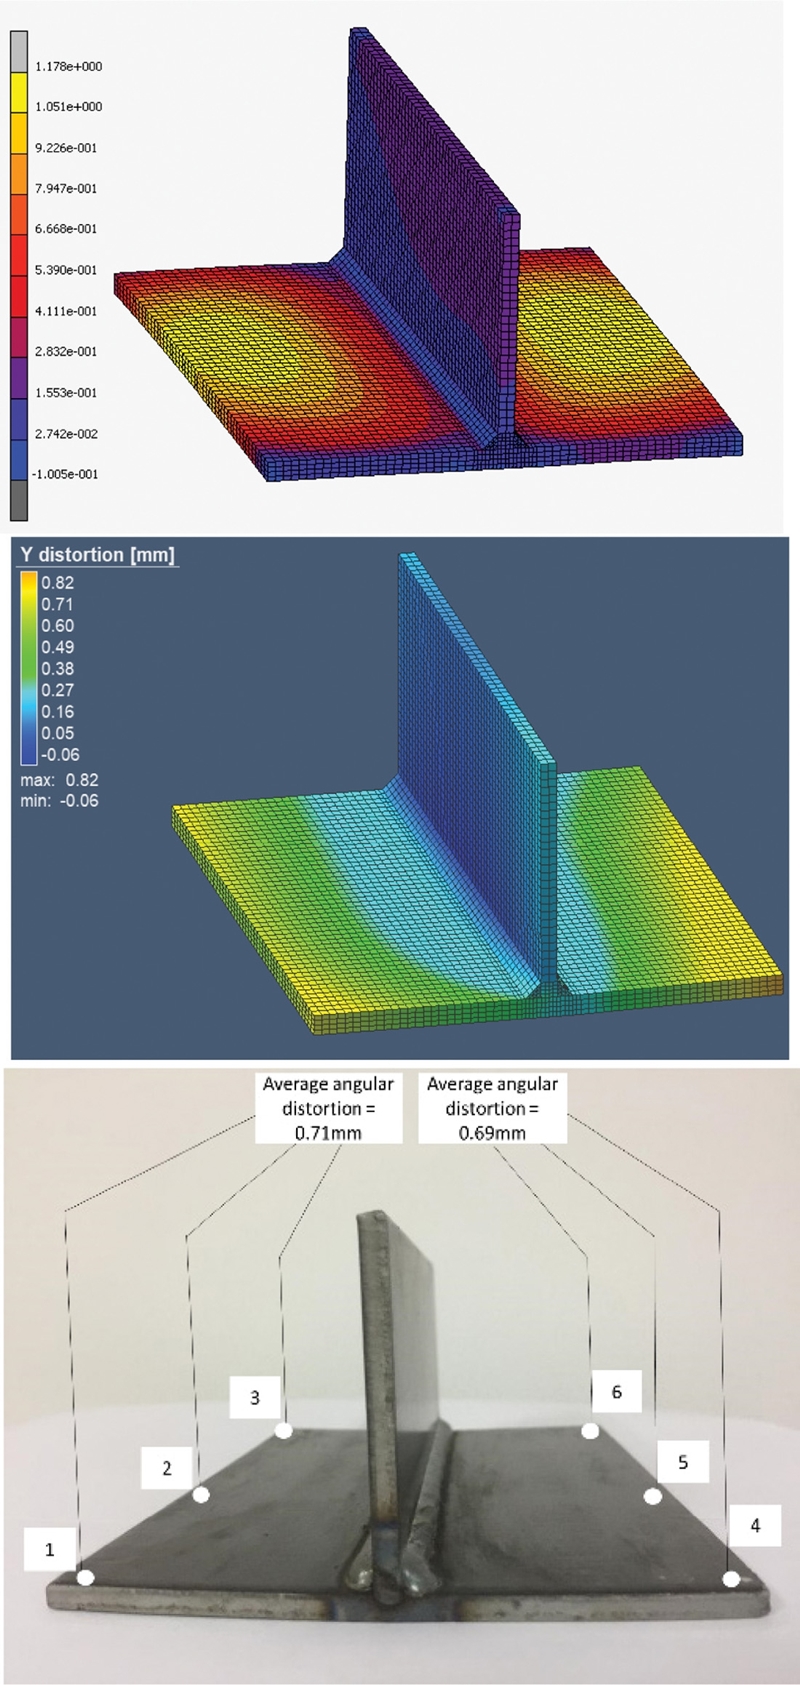
Fig. 8 demonstrates the angular distortion results towards the displacements from solid model FEM simulation and experimental process. Three different points were measured as tracking points which serve as measurement for distortion in both distortion and experimental process. The points which were selected on FEM simulation mirrors the points that was measured using CMM on experimental process in order to ensure the legitimate comparison between FEM and experiment.
Table 4 displays the approximate time for pre-processing starting from material model up to execution of the numerical simulation. The geometry is modelled by utilizing MSC Patran and would later be transferred to both MSC Marc/Mentat and Simufact.Welding. This part of pre-processing was conducted by expert-level user to ensure that both pre-processing was carried out at similar skill level.
Table 5 shows the computational time starting from job submission until the very last increment within simulation. MSC Marc/Mentat needs less computational time, since MSC Marc/Mentat calculates lesser variable in overall than Simufact.Welding, which is a dedicated welding simulation software under consideration of more prediction parameters.
From the computational time comparison above, it can be seen that Simufact.Welding has longer computational time compared to MSC Marc/Mentat but in exchange offers a faster pre-processing time, thus the overall time from start to finish are shorter when compared to MSC Marc/Mentat. Table 6 exhibits the comparative result of angular distortion between FEM-based Virtual Manufacturing using both software and experimental process.
The result displayed in both VM software shows a similar distortion patterns with the results induced by experimental T-joint process. For both software, the result shows that the error percentage between simulation and experiment is within the range of 7.25 to 15.3%. This proves that both VM software are able to produce an acceptable result compared to experimental distortion result.
5. Conclusion
By means of FEM-based Virtual Manufacturing, a study of distortions of welded T-joint using GMAW had been executed. The research covers both numerical and experimental analysis which was compared as final output. The software MSC Marc/Mentat and Simufact.Welding are used for numerical analysis using 3D solid element. To conclude this research, there are some critical points to be stated, namely:
(1) The FEM-based Virtual Manufacturing of T-joint model were executed successfully with clear and simplified simulation procedure.
(2) VM modelling and simulation using MSC Marc/Mentat and Simufact.Welding show good agreement on distortion tendency verified with experimental results.
(3) Simufact.Welding is able to provide a more stable result with less average error percentage (7.25%) compared to MSC Marc/Mentat (14.5%).
(4) Although user requires faster computational time in MSC Marc/Mentat by 48.6%, faster pre-processing time is recorded using Simufact.Welding by 267.2%.
(5) Due to simplified procedure as proposed, the complicated heat source and thermal calibration can be neglected.
(6) Simufact.Welding has more clarified procedure and easier to use when compared to general purpose VM tool.
(7) The non-homogenous material, geometry, pre-condition of welding process and the fluctuating parameters during experimental analysis might cause the difference between simulation and experiment results.
From the knowledge point of view, important information through simulation is obtained which can be used as a planning tool within the design phase or prior to actual welding process. This investigation could bring a contribution towards the further development of research in FEM-based VM application such as for other joint geometry and materials.
NOMENCLATURE
| a : | Width |
| bf : | Front length |
| br : | Rear length |
| c : | Depth |
| CAD : | Computer aided design |
| FEM : | Finite element method |
| WAAM : | Wire-Arc additive manufacturing |
| VM : | Virtual manufacturing |
Acknowledgments
The authors would like to express their gratitude to staff member of Smart Manufacturing Research Institute (SMRI) as well as staff of Welding Laboratory, Advanced Manufacturing Laboratory, Advanced Manufacturing Technology Excellence Centre (AMTEx) and Research Interest Group: Advanced Manufacturing Technology (RIG:AMT) at Faculty of Mechanical Engineering, Universiti Teknologi MARA (UiTM) as well as Professorship of Virtual Production Engineering at Chemnitz University of Technology (CUT) in Germany for encouraging this research. The simulation was partially carried out at our partner university CUT. This research is financially supported by Geran Inisiatif Penyeliaan (GIP) with the project code: 600-IRMI 5/3/GIP (073/2019).
REFERENCES
-
Wang, Q., “Virtual Manufacturing and Systems,” WIT Transactions on State-of-the-Art in Science and Engineering, Vol. 16, 2005.
[https://doi.org/10.2495/978-1-85312-998-8/09]

- Bharath, V. and Rajashekar, P., “Virtual Manufacturing: A Review,” International Journal of Engineering Research & Technology, Vol. 3, No. 17, pp. 355-364, 2015.
-
Shukla, C., Vazquez, M., and Chen, F. F., “Virtual Manufacturing: an Overview,” Computers & Industrial Engineering, Vol. 31, Nos. 1-2, pp. 79-82, 1996.
[https://doi.org/10.1016/0360-8352(96)00083-6]

-
Teng, T. L., Fung, C. P., Chang, P. H., and Yang, W. C., “Analysis of Residual Stresses and Distortions in T-Joint Fillet Welds,” International Journal of Pressure Vessels and Piping, Vol. 78, No. 8, pp. 523-538, 2001.
[https://doi.org/10.1016/S0308-0161(01)00074-6]

-
Long, H., Gery, D., Carlier, A., and Maropoulos, P., “Prediction of Welding Distortion in Butt Joint of Thin Plates,” Materials & Design, Vol. 30, No. 10, pp. 4126-4135, 2009.
[https://doi.org/10.1016/j.matdes.2009.05.004]

-
Lu, Y. H., Wu, P. B., Zeng, J., and Wu, X. W., “Numerical Simulation of Welding Distortion Using Shrinkage Force Approach and Application,” Advanced Materials Research, Vols. 129-134, pp. 867-871, 2010.
[https://doi.org/10.4028/www.scientific.net/AMR.129-131.867]

-
Vetriselvan, R., Devakumaran, K., Sathiya, P., and Ravichandran, G., “Transient Out-of-Plane Distortion of Multi-Pass Fillet Welded Tube to Pipe T-Joints,” Defence Technology, Vol. 13, No. 2, pp. 77-85, 2017.
[https://doi.org/10.1016/j.dt.2016.06.002]

-
Okano, S. and Mochizuki, M., “Transient Distortion Behavior during Tig Welding of Thin Steel Plate,” Journal of Materials Processing Technology, Vol. 241, pp. 103-111, 2017.
[https://doi.org/10.1016/j.jmatprotec.2016.11.006]

-
Bajpei, T., Chelladurai, H., and Ansari, M. Z., “Experimental Investigation and Numerical Analyses of Residual Stresses and Distortions in GMA Welding of Thin Dissimilar AA5052-AA6061 Plates,” Journal of Manufacturing Processes, Vol. 25, pp. 340-350, 2017.
[https://doi.org/10.1016/j.jmapro.2016.12.017]

- Robert, W. and Messler, J., “Principle of Welding: Processes, Physics, Chemistry, and Metallurgy,” John Wiley & Sons, 2008.
-
Kim, M., Kang, M., and Chung, H., “Simplified Welding Distortion Analysis for Fillet Welding Using Composite Shell Elements,” International Journal of Naval Architecture and Ocean Engineering, Vol. 7, No. 3, pp. 452-465, 2015.
[https://doi.org/10.1515/ijnaoe-2015-0032]

-
Sun, J., Liu, X., Tong, Y., and Deng, D., “A Comparative Study on Welding Temperature Fields, Residual Stress Distributions and Deformations Induced by Laser Beam Welding and CO2 Gas Arc Welding,” Materials & Design, Vol. 63, pp. 519-530, 2014.
[https://doi.org/10.1016/j.matdes.2014.06.057]

-
Wang, C., Kim, Y. R., and Kim, J. W., “Numerical Modelling of Welding Distortion Redistribution due to the Change of Self-Constraint in a T-Joint Welded Structure,” Journal of Mechanical Science and Technology, Vol. 30, No. 6, pp. 2683-2690, 2016.
[https://doi.org/10.1007/s12206-016-0529-3]

-
Wang, J., Yuan, H., Ma, N., and Murakawa, H., “Recent Research on Welding Distortion Prediction in Thin Plate Fabrication by Means of Elastic FE Computation,” Marine Structures, Vol. 47, pp. 42-59, 2016.
[https://doi.org/10.1016/j.marstruc.2016.02.004]

-
Deng, D., Liang, W., and Murakawa, H., “Determination of Welding Deformation in Fillet-Welded Joint by Means of Numerical Simulation and Comparison with Experimental Measurements,” Journal of Materials Processing Technology, Vol. 183, Nos. 2-3, pp. 219-225, 2007.
[https://doi.org/10.1016/j.jmatprotec.2006.10.013]

-
Barsoum, Z. and Lundback, A., “Simplified FE Welding Simulation of Fillet Welds-3D Effects on the Formation Residual Stresses,” Engineering Failure Analysis, Vol. 16, No. 7, pp. 2281-2289, 2009.
[https://doi.org/10.1016/j.engfailanal.2009.03.018]

- ISO 14341, “Welding Consumables - Wire Electrodes and Weld Deposits for Gas Shielded Metal Arc Welding of Non Alloy and Fine Grain Steels - Classification,” 2010.
-
Zubairuddin, M., Albert, S. K., Mahadevan, S., Vasudevan, M., Chaudhari, V., et al., “Experimental and Finite Element Analysis of Residual Stress and Distortion in GTA Welding of Modified 9Cr-1Mo Steel,” Journal of Mechanical Science and Technology, Vol. 28, No. 12, pp. 5095-5105, 2014.
[https://doi.org/10.1007/s12206-014-1132-0]

-
Peric, M., Tonkovic, Z., Rodic, A., Surjak, M., Garasic, I., et al., “Numerical Analysis and Experimental Investigation of Welding Residual Stresses and Distortions in a T-Joint Fillet Weld,” Materials & Design, Vol. 53, pp. 1052-1063, 2014.
[https://doi.org/10.1016/j.matdes.2013.08.011]


PhD candidate at Faculty of Mechanical Engineering, Universiti Teknologi MARA (UiTM), Shah Alam, Malysia. His research interest covers the application of FEM-based virtual manufacturing in welding, forming and additive manufacturing.
E-mail: keval.priapratama@gmail.com

Professor at Faculty of Mechanical Engineering, Unviersiti Teknologi MARA (UiTM), Shah Alam, Malaysia and Director of Smart Manufacturing Research Institute (SMRI). His research interest includes manufacturing technology, FEM-based Virtual manufacturing, welding technology and additive manufacturing.
E-mail: yupiter.manurung@uitm.edu.my

PhD candidate at Faculty of Mechanical Engineering, Universiti Teknologi MARA (UiTM), Shah Alam, Malaysia. His research interest involves FEM-based Virtual manufacturing of forming, welding and thermal cutting.
E-mail: msbn2212@gmail.com

PhD - currently working as Head of Manufacturing, Dynamics & Numerical Computation at Smart Manufacturing Research Institute (SMRI), Universiti Teknologi MARA (UiTM) Malaysia. His research interests are in surface engineering and virtual manufacturing. Much of his works focus on surface treatment of stainless steel as well as simulation of micromachining and joining processes.
E-mail: mshahriman@uitm.edu.my
