Performance Evaluation of Atomization-Based Uniform Spray Coating for 3D Scanning
Copyright © The Korean Society for Precision Engineering
This is an Open-Access article distributed under the terms of the Creative Commons Attribution Non-Commercial License (http://creativecommons.org/licenses/by-nc/3.0) which permits unrestricted non-commercial use, distribution, and reproduction in any medium, provided the original work is properly cited.
Abstract
Three-dimensional (3D) scanning processes have been applied to a wide range of manufacturing industries for inspection and reverse engineering. Especially, optical scanning method is used mostly as a non-contact scanning technique in manufacturing field. However, it can be influenced from surface characteristics such as transparency and reflectivity. To resolve these problems, various coating techniques have been studied for years. Among them, atomization-based coating method is one of the key technologies to change its characteristics before scanning the objects. In this study, atomization-based spray coating system is developed for producing a uniform thin layer. Then, a series of experiments are conducted to evaluate the coating performance with the developed coating system. As a result, after coating the surface of transparent and shiny target objects: glass slide, colour sample, cell cover, and clutch lever, 3D scanning results show that a uniform coating of target objects is significantly improved. Its coating thickness is less than 1 μm which means that it is important to keep the geometry unchanged of the part.
Keywords:
Atomization, Uniform spray coating, 3D scanning, Coating thickness키워드:
미립화, 균질 스프레이 코팅, 3차원 스캐닝, 코팅 두께1. Introduction
Three-dimensional (3D) scanning processes have been widely used in various manufacturing industry.1 As the demand for complex geometry has increased, the necessity of 3D scanner has continually increased. A variety of 3D scanning methods have been developed for evaluating the part quality and applying the reverse engineering. 3D scanning process is one of the easy and fast techniques for collecting the geometry information on manufactured parts. The collected 3D data is useful for inspection and quality control on manufactured parts.
3D scanning process can be categorized into two major classes: contact and non-contact methods.2-5 Contact methods require direct access the object which is scanned by physical touch probe. However, it cannot apply the complex geometry because it is too time consuming and limited to probing the surface with various features. To overcome the limitation of contact methods, non-contact techniques have been developed for many years. In noncontact scanning method, geometry information on target object can be stored by using reflective technique. 3D model is made by passing radiation through the transmissive technique. Among them, the reflective method is divided into optical and non-optical based on the radiation type.6-9 Optical method is one of the basic technologies for developing the optical scanners which are based on a source of light from the target object. The scanning results are dependent on the reflective index of the target surface because various scanning methods are limited to scanning dark colours, transparent and shiny samples due to the light absorption and high and low refractive index.
To help the scanning process, various surface coating techniques such as aerosol spray and atomization-based spray have been studied.10,11 They can help to improve scanning results of shiny and transparent parts. Especially, atomization-based spray is one of the best ways to coat the target objects for producing a uniform thin layer. It is crucial to keep the part geometry unchanged in less than one micron.
Therefore, in this paper, the atomization-based spray coating system is developed for assisting the 3D scanning process. Then, characterization of atomization-based spray coating method is carried out to find appropriate process parameters. The experimental results show that the scanning performances are significantly improved based on atomization-based spray coating technique. The spray coatings are conducted up to 10 layers that have a thickness of less than 1 μm which means that atomization-based coating spray technique cannot affect the part geometry and can be useful for obtaining a uniform thin layer.
2. Experimental Setup
2.1 Development of Spray Coating System
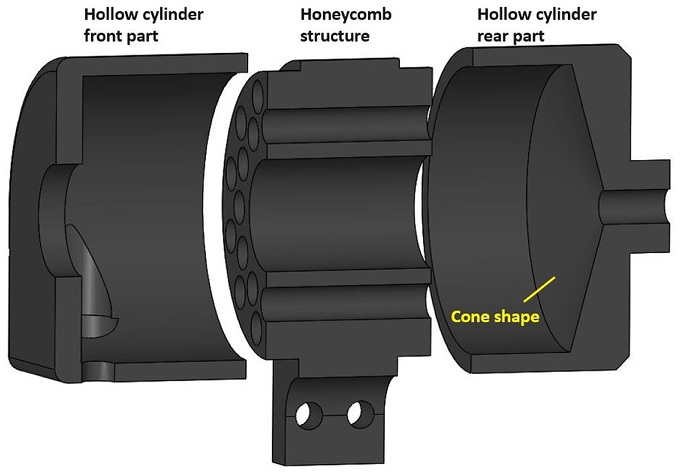
Fig. 1 shows the design of spray coating unit which consists of hollow cylinder parts with a honeycomb structure inside. The hollow cylinder and honeycomb structure were fabricated from PVC plastic. Especially, the honeycomb part can stabilize the flow and reduce the turbulence.12
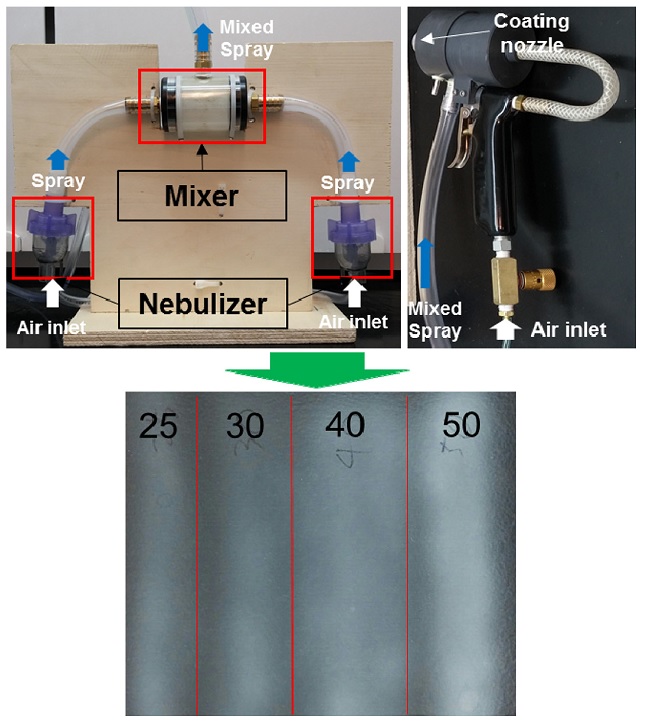
To produce micro-particles for a uniform spray coating, atomization-based spray coating system was developed. As can be seen in Fig. 2, it included a mixer with nebulizers (3655D-621, VixOne). The compressed air was supplied to the nebulizers and spray coating unit.
The developed system was preliminarily tested up to 50 layers by using the black paper based on the water soluble white acrylic paint. As a result, appropriate process parameters such as spraying distance and air pressure were chosen by preliminary test. The spraying distance and air pressure were about 30 mm and 2.07 bar, respectively.
2.2 Selection of Target Object and Coating Material
Transparent glass slide, semi-gloss colour sample, shiny cell cover, and shiny motor bike clutch lever were chosen as target objects. As previously stated, the transparency, reflectivity, and dark colour of target objects were main factors in causing problems in optical 3D scanning processes. To overcome this problem, various coating materials were considered. Among them, titanium dioxide (TiO2) is the most important white pigment used in the coating industry because it has a high refractive index which makes sure of strong light scattering when incorporated into a coating.13 For that reason, titanium dioxide white pigments were chosen as a coating material to improve the scanning process.
3. Experimental Results and Discussion
3.1 Coating Thickness Measurement
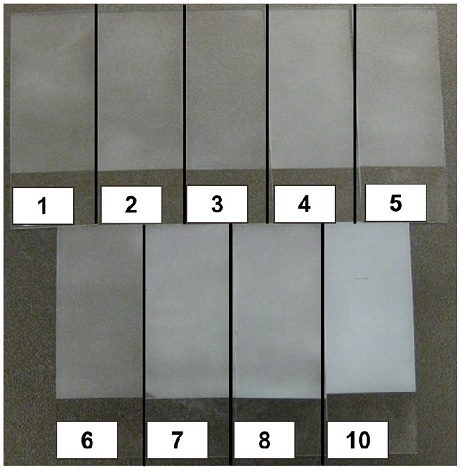
To study the coating thickness on the surface, nine glass sides were used as a target object. The coating thickness was measured by using a 3D non-contact optical profiler (Zeta-20, ZETA). All experiments were conducted manually by considering the industrial setting. The results of coated glass slides with 1 to 10 layers were shown in Fig. 3, respectively. As can be seen in Fig. 3, when applying more coating layers on glass surface, uniform distribution of coating material was visually observed. Especially, Colour of 10 layers was thickly laid on compared to 1 layer.
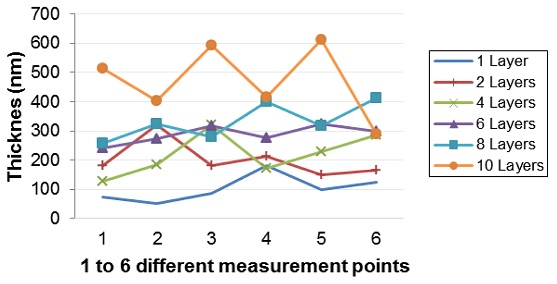
Fig. 4 shows the results of coating thickness in six different measurement points. As a result, thickness of each layer was 75 nm to 100 nm. For a uniform spray coating, the pigment size was one of the key factors. Depending on the pigment size, the coating thickness can be changed. In addition, coating speed and spraying time on the specific surface should be consistent.
3.2 Scanning Results of Target Objects
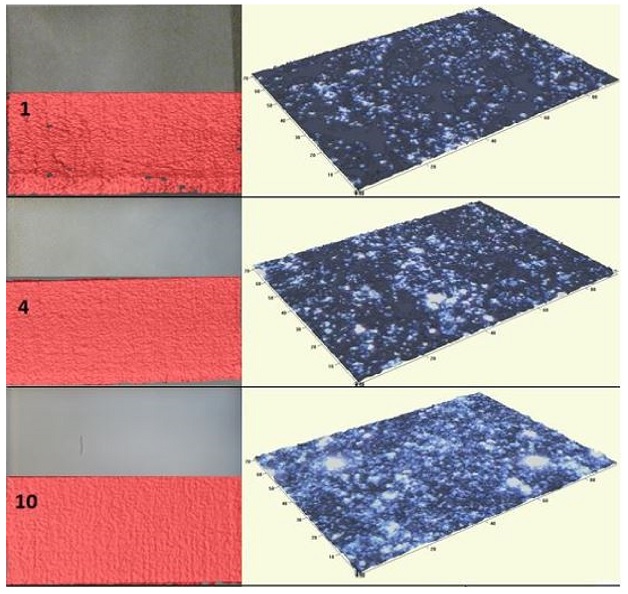
Coated objects were scanned by structured-light 3D scanner (HDI Blitz, LMI Technologies) with an accuracy of 120 μm. The 3D scanner was used to evaluate the performance of spray coating system. The scanning results of 1, 4, and 10 layers were shown in Fig. 5. More coating layers, up to 10, can cover the whole surface of glass slide. However, a few uncoated areas were observed at 1 and 4 layers.
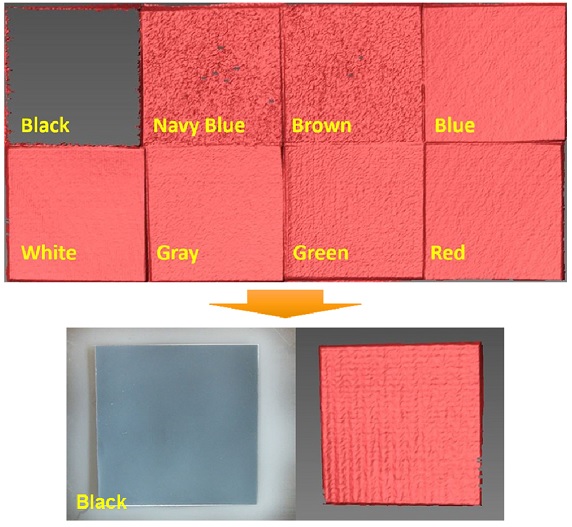
Fig. 6 shows the scanning results of various colour samples. Dark colour samples such as black, navy blue, and brown resulted in limited data from the 3D scanner. In particular, in the case of black colour, noisy result was captured because it had strong light absorption instead of reflection. After coating the black colour sample, the scanning result was substantially enhanced. The coating thickness was less than 300 nm.
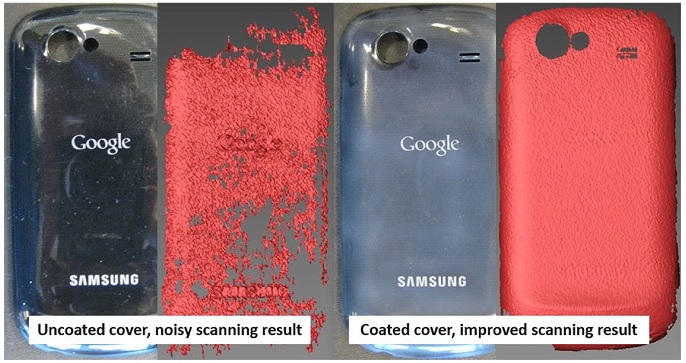
The shiny and black smartphone cover was used to study the efficiency of spray coating. Fig. 7 shows that the uncoated cover had noisy results whereas the thin layer coating of less than 200 nm was applied to the smartphone cover. After coating the surface, the quality of 3D image was significantly improved.
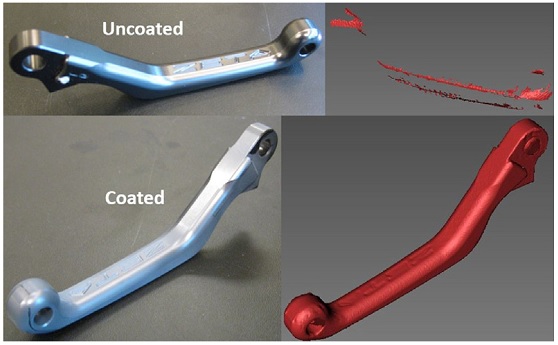
An anodized aluminium lever having a reflective surface was used to study the coating effect in the 3D scanning process. Fig. 8 shows the scanning results of a lever. The scanning data of uncoated parts was incomplete due to a shiny surface. After coating the thin layer of about 300 nm with the atomization based spray system, the lever was coated completely and scanned successfully.
4. Conclusion
In this paper, the characterization of the atomization-based uniform spray coating was studied. In order to coat the various target objects, the atomization based spray coating system was designed by means of 3D CAD software and developed. Developed spray coating system was able to help the 3D scanning process which was used to detect various manufactured parts. Then, a series of case studies: glass slides, colour samples, smartphone covers, and clutch lever with atomization based spray coating system were conducted. In particular, 3D scanning results were influenced from various properties such as transparency, glossiness, and dark colour of the target object.
To overcome the problems, atomization based spray coating method with titanium dioxide of coating materials was used. In this experiment, when applying the 10 layers with a uniform spray coating, the layer thickness was less than 600 nm. Therefore, the micro-sized coating method was to improve the scanning results and not affect the part geometry (less than 1 μm).
For the future work, the developed atomization-based spray coating units can be applied to automated robotic spray system for smart manufacturing. In addition, various machine learning algorithms can be used to obtain the optimal parameters. Automated robotic spray system will be expected to reduce the production cost and improve the coating quality more than previous coating methods.
REFERENCES
-
Remondino, F. and El-Hakim, S., “Image-Based 3D Modelling: A Review,” The Photogrammetric Record, Vol. 21, No. 115, pp. 269-291, 2006.
[https://doi.org/10.1111/j.1477-9730.2006.00383.x]

-
Zexiao, X., Jianguo, W., and Qiumei, Z., “Complete 3D Measurement in Reverse Engineering Using a Multi-Probe System,” International Journal of Machine Tools and Manufacture, Vol. 45, No. 12, pp. 1474-1486, 2005.
[https://doi.org/10.1016/j.ijmachtools.2005.01.028]

- Curless, B., “Overview of Active Vision Techniques,” Proc. of Siggraph 2000 Course on 3D Photography, 2000.
-
Chen, F., Brown, G. M., and Song, M., “Overview of Three-Dimensional Shape Measurement Using Optical Methods,” Optical Engineering, Vol. 39, No. 1, pp. 10-22, 2000.
[https://doi.org/10.1117/1.602438]

-
Rocchini, C., Cignoni, P., Montani, C., Pingi, P., and Scopigno, R., “A Low Cost 3D Scanner Based on Structured Light,” Computer Graphics Forum, Vol. 20, No. 3, pp. 299-308, 2001.
[https://doi.org/10.1111/1467-8659.00522]

-
Bernardini, F. and Rushmeier, H., “The 3D Model Acquisition Pipeline,” Computer Graphics Forum, Vol. 21, No. 2, pp. 149-172, 2002.
[https://doi.org/10.1111/1467-8659.00574]

- Böhler, W. and Marbs, A., “3D Scanning Instruments,” Proc. of the CIPA WG 6 International Workshop on Scanning for Cultural Heritage Recording, pp. 9-18, 2002.
- Beraldin, J.-A., Blais, F., Cournoyer, L., Godin, G., and Rioux, M., “Active 3D Sensing,” 2003.
-
Geng, J., “Structured-Light 3D Surface Imaging: A Tutorial,” Advances in Optics and Photonics, Vol. 3, No. 2, pp. 128-160, 2011.
[https://doi.org/10.1364/AOP.3.000128]

-
Kuş, A., “Implementation of 3D Optical Scanning Technology for Automotive Applications,” Sensors, Vol. 9, No. 3, pp. 1967-1979, 2009.
[https://doi.org/10.3390/s90301967]

-
Lefebvre, A. H. and McDonell V. G., “Atomization and Sprays,” CRC Press, 2nd Ed., 2017.
[https://doi.org/10.1201/9781315120911]

-
Valinasab, B., Rukosuyev, M., Lee, J., Ko, J., and Jun, M. B. G., “Improvement of Optical 3D Scanner Performance Using Atomization-Based Spray Coating,” Journal of the Korean Society Manufacturing Technology Engineers, Vol. 24, No. 1, pp. 23-30, 2015.
[https://doi.org/10.7735/ksmte.2015.24.1.023]

- Ti-Pure, “Titanium Dioxide for Coatings,” https://www.chemours.com/Titanium_Technologies/en_US/assets/downloads/Ti-Pure-for-coatings-overview.pdf, (Accessed 25 SEP 2017)
