Influence of the Deformation on the Microstructure and Mechanical Properties of TBF Steel
Copyright © The Korean Society for Precision Engineering
This is an Open-Access article distributed under the terms of the Creative Commons Attribution Non-Commercial License (http://creativecommons.org/licenses/by-nc/3.0) which permits unrestricted non-commercial use, distribution, and reproduction in any medium, provided the original work is properly cited.
This paper was presented at PRESM 2019
Abstract
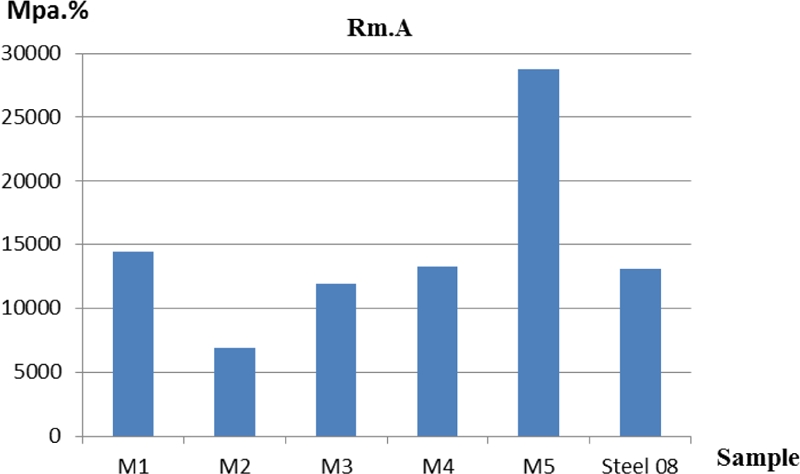
The article presents the influence of the deformation process on the microstructure and mechanical properties of low carbon alloy steel which heat treatment by TBF processing. When the samples are deformed at different levels: 20, 40, and 80%. The research results show that when the sample was deformed with the 80%, the highest strength was 800 MPa, the highest elongation was 36%, the product between the strength and the elongation (Rm*A) was the highest, 28774 MPa*%. This alloy deformed at a level of 80%, the content of austenite in this microstructure of this alloy was the highest about 16%. The content of ferrite was 52% with the average particle size of ferrite was 6.4 μm, the particle of residual austenite was 2 μm. The results of the microstructure have contributed to improving the mechanical properties of steel. The phase which was improved the mechanical properties of this alloy had grain size and dispersed.
Keywords:
TBF steel, Austenite, Ferrite, Bainite, Deformation1. Introduction
The low alloy steel is added elements with a small amount of Mn and Si, which are increasingly being developed with the propose, improving the mechanical properties and technology of this steel. However, to improve the quality of steel not only concern the composition but also constantly improve the technical processing of steel. After melting and solidification, thermal processing was carried out to create a multiphase structure with highly plasticity ferrite, the martensite structure, bainite, and a certain amount of austenite thereby improving ductility compared to AHSS steel. The TRIP (Transformation Induced Plasticity) aided bainite ferrite (TBF) steels is a group of steel that has been developed recently in terms of phase transformation due to plastic deformation and transformed into bainite, martensite or residual austenite. Besides, when combined with the cold deformation, it transforms into a hard martensite phase of the austenitic phase when plastic deformation occurs.1-5
To receive the multi-phase structure, special mechanical-heat treatment steel includes (Fig. 1).
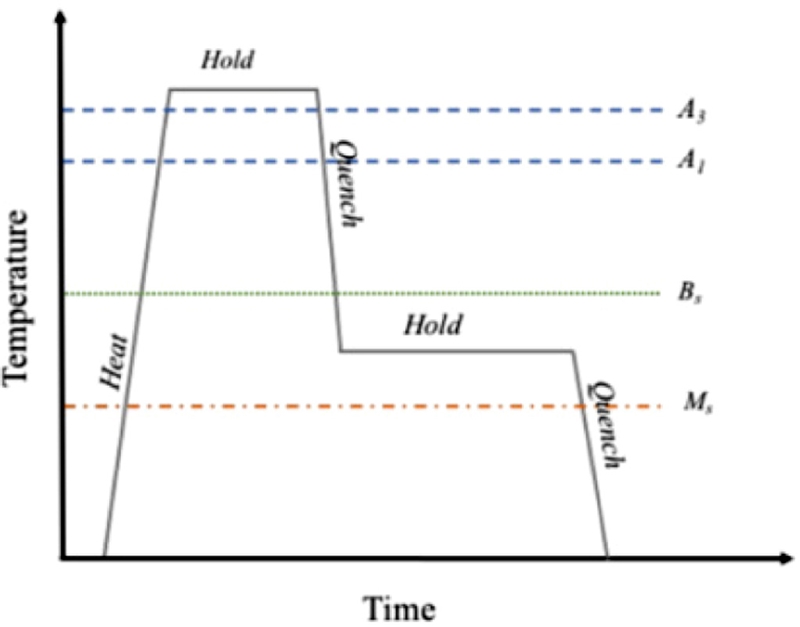
The heat treatment process of TBF steel.5 (Adapted from Ref. 5 on the basis of OA) A3 is completely austenite temperature. A1 the temperature that starts austenite transformation and Bs is bainite transformation temperature. Ms is the martensite transformation temperature
(1) The steel is heated to austenitizing temperature then keep the heat at a certain time to ensure the process is uniform. The austenitizing temperature is larger than the completely austenite temperature (A3). The temperature starts austenite transformation which calls A1.
(2) Then, cooling steel to the Bainite transformation zone (Between Bainite (Bs) and the Martensite (Ms) Transformation Temperature), keeping the appropriate heat to obtain a three-phase structure, such as Ferit, Bainite, and Austenite. Finally, cool down in the water to avoid degradation of the austenite.
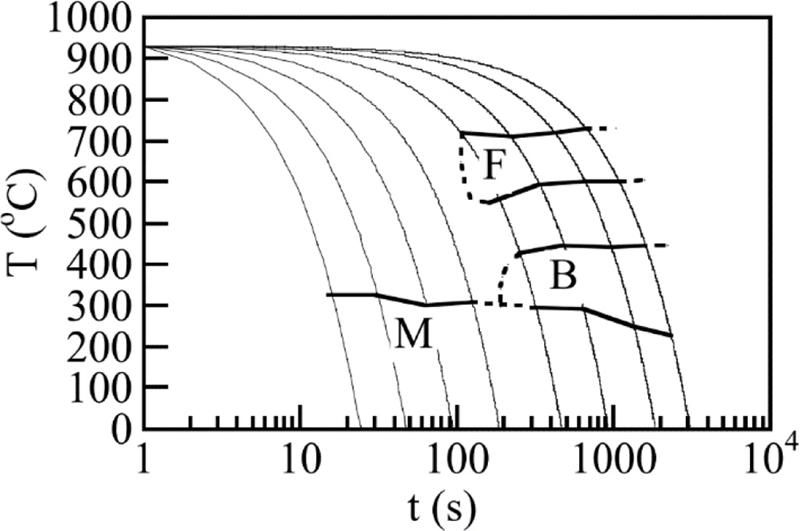
When retaining heat in the Bainite transition zone, the conversion of austenite to bainite occurs simultaneously, while the carbonation of the austenite has not yet changed (Second Carbon Enrichment) without the occurrence of austenite decomposition to bainite due to the significant presence of Si-1.5% element that inhibits the secretion of carbide.3,6-8 Element C-0.2% and Mn-1.5% in TBF steel are sufficiently high to lower the starting temperature of the excess austenite martensite, increasing the mechanical stability of this phase. To achieve the multi-phase microstructure for this steel, it is necessary to determine the Bainite phase transition temperature. According to the Bainite phase transition, the temperature is determined according to the continuous cooling transformation (CCT) diagram, and the conversion temperature is about 400oC (Fig. 2).6
With the TBF process, effects on the deformation process on the microstructure and mechanical properties of steel have not been studied. In this article, we present the results about the effect on the deformation with 20, 40, and 80% and heat treatment to the microstructure and mechanical properties of this steel.
2. Materials and Method
Cast post-cast billets are cut into blocks of size 80 × 70 mm, annealed for uniform composition caused by castings, tempering temperature is 1000oC, keeping heat 3 hours.
After uniform annealing, steel billets are hot forged. The steel blocks were forged into a 20 × thick 70 mm wide plate. The temperature begins to forge about 1200oC and finish forging at a temperature of about 900oC.
Then hot rolling with relative pressures of 50% to 10 mm thickness to produce the initial castings. The microstructure of the steel has a small grain size.
Steel billets are then cut into slabs of different thicknesses and cold rolled to a thickness of 2 mm to ensure a correspondingly cold rolling rate of 20, 40, and 80%. The post-cold steel samples were subjected to two-stage heat treatment, phase-1 heating at 900oC for 10 minutes. In the temperature range of 400oC, the temperature of Bainite (Bainite, Bs, and Martensite, Ms) starts to change and the temperature is kept for 10 minutes. country. Iodine medium is a mixture of molten salt of 45% NaOH+30% NaNO3+25% NaNO2.
Forged, cold-rolled and heat-treated samples were photographed on the Axiovert 25 A optical microscope and X-Ray analysis, SEM as well as strength testing.
3. Results and Discussion
3.1 Microstructure
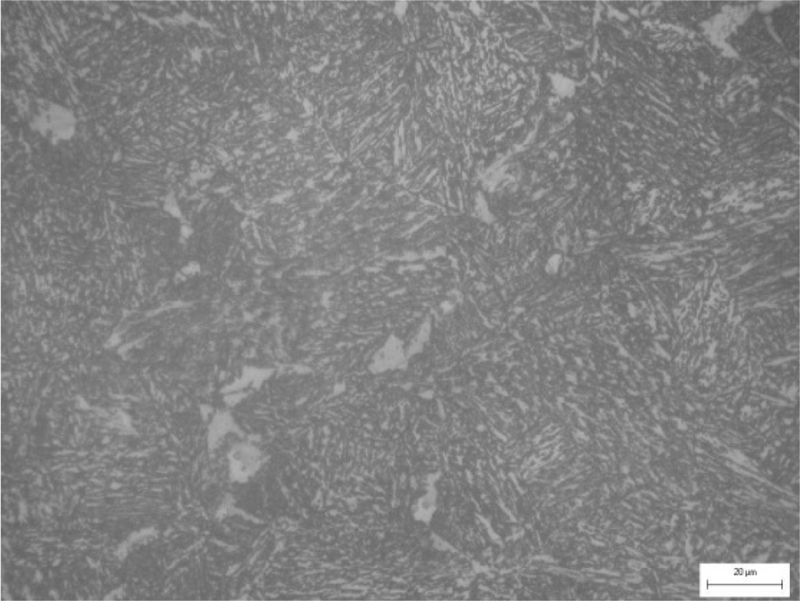
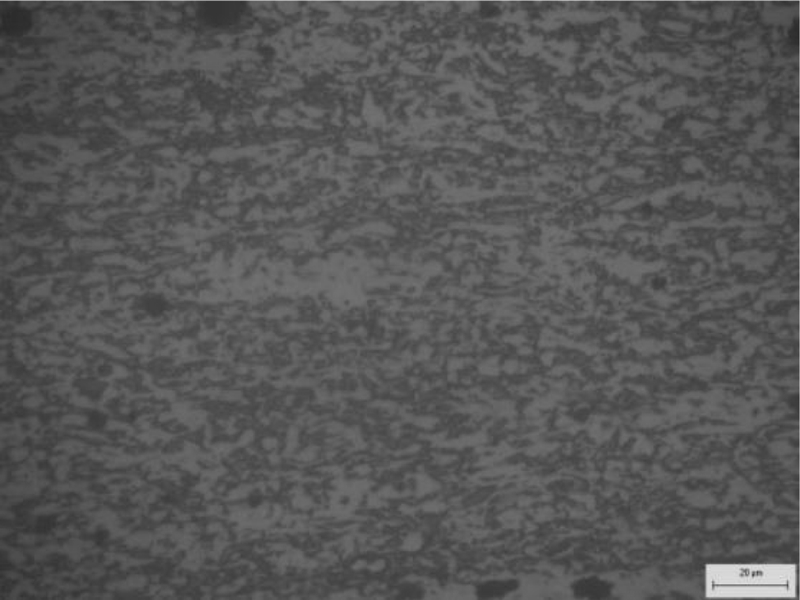
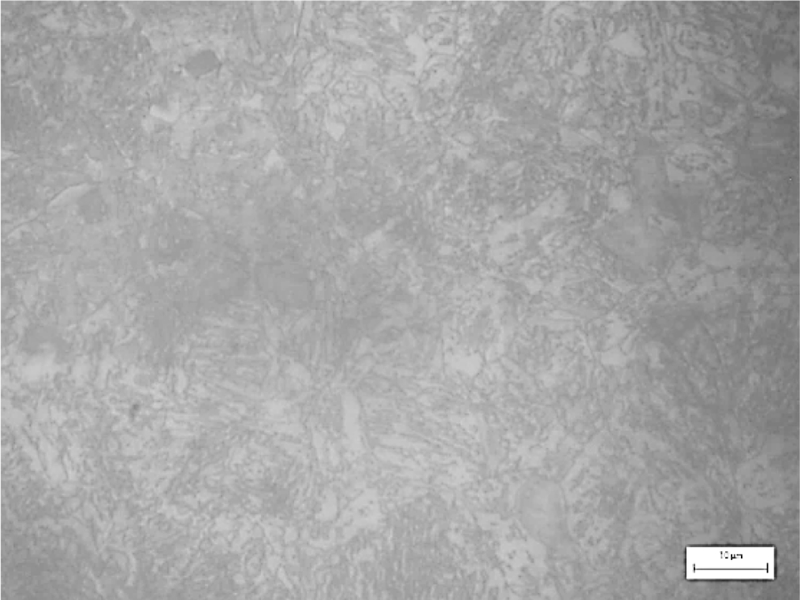
Analysis of the microstructure of the steel sample after the hot rolling process, cold rolling and heat treatment showed that after hot rolling (Fig. 3), the geometry of the sample after casting was removed, more uniform grain size, more edge (The average width of the grain is only about 40 μm). Continuing the deformed sample with the amount of deformation up to 80% (Fig. 4), the particles are deformed in millimeters with the dimensions perpendicular to the rolling are smaller (The average width of the grain is only about 10 μm). This, in turn, results in finer particle size and increases the mechanical properties of the material.
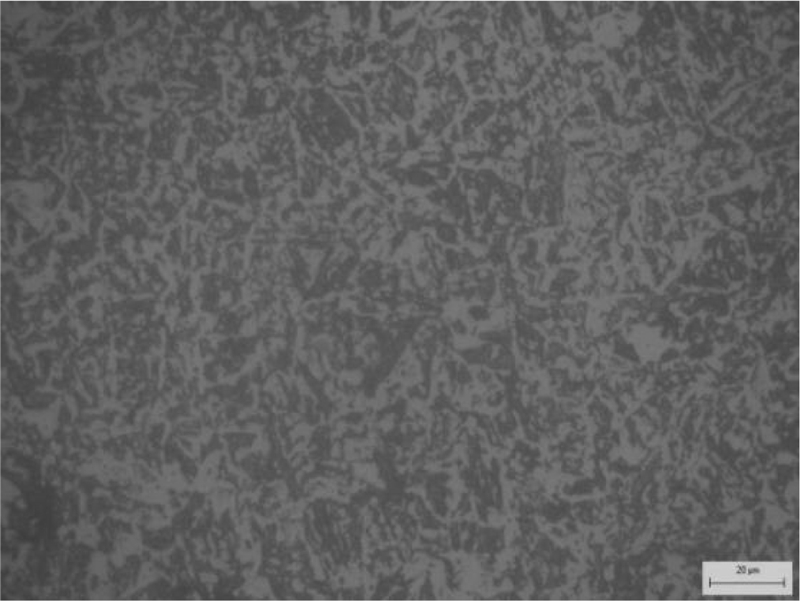
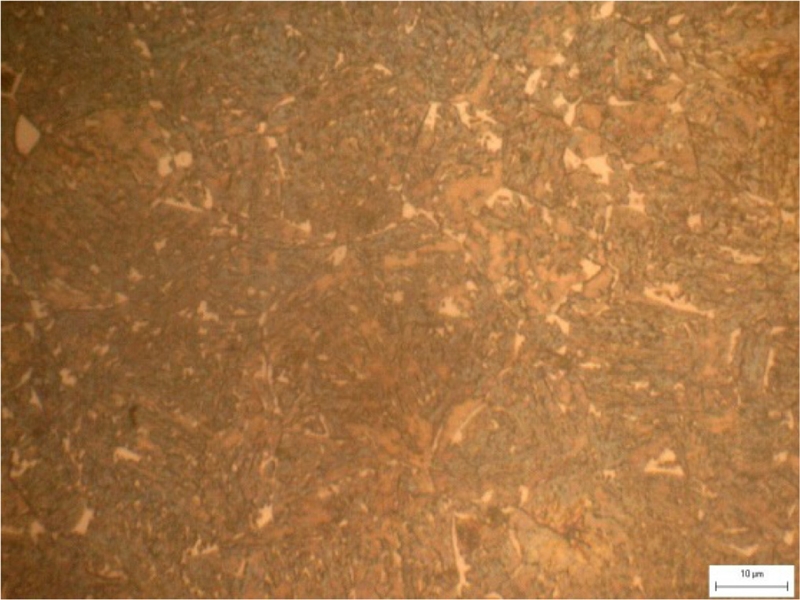
After the heat treatment process, the results showed that the fine particle size was obtained with the light and dark phases (Fig. 5). The grain size is smaller than 10 μm. However, by optical imaging, it is often difficult to detect in a phase. This is further explained in real color photos.
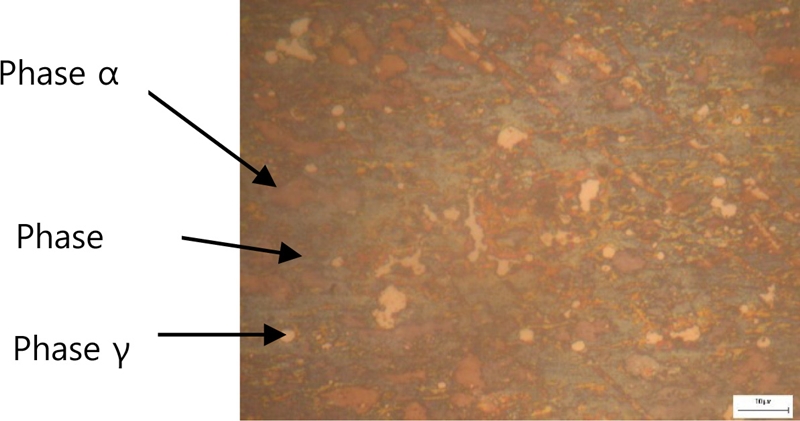
Analysis of real color photos after deformation indicates that the microstructure includes, ferrite and austenite.
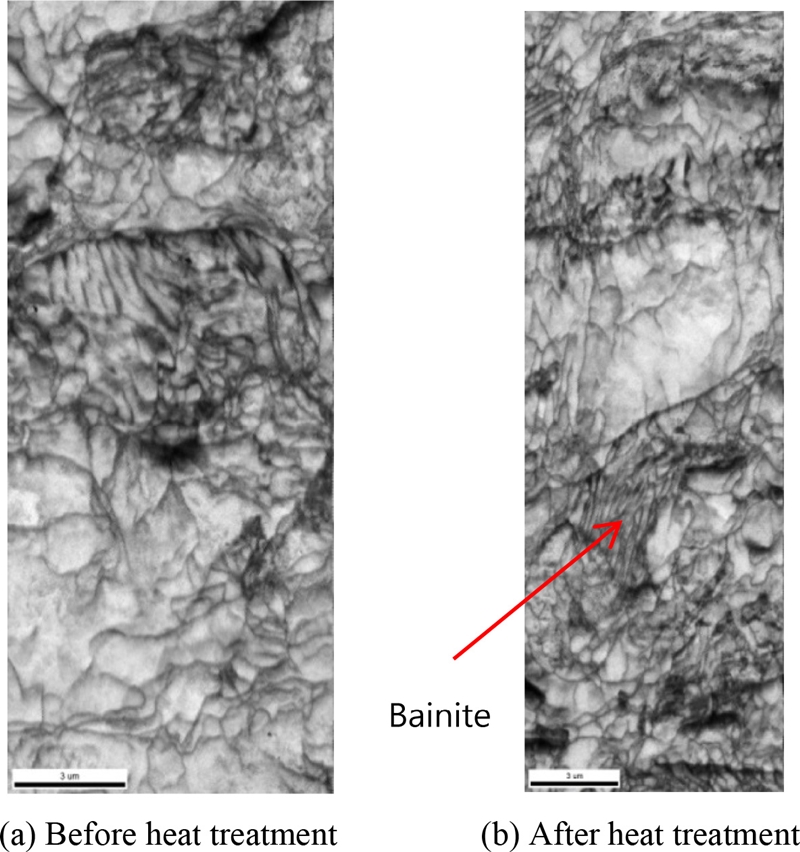
Analysis of real color image after heat treatment showed ferrite phases, Bainite and residual austenite. The phase-to-phase analysis shows that the ferrite phase ratio is about 52%. The excess austenite is about 16% and the rest is Bainite.
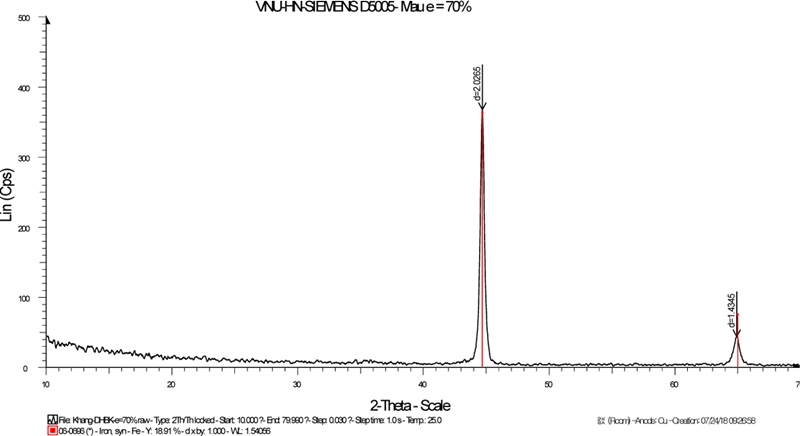
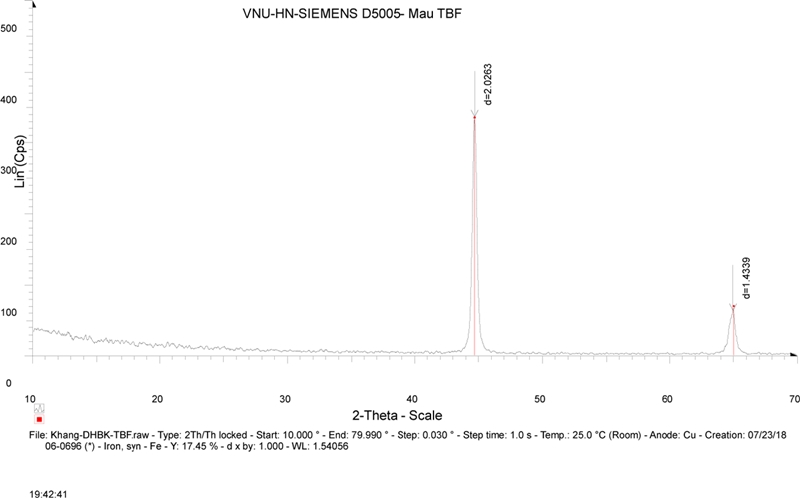
The results of the microstructure analysis were also demonstrated by X-Ray analysis when determining the austenite phase balance before and after heat treatment.
By SEM, after heat treatment, the microstructure of the sample showed the appearance of bainite (Fig. 12(b)). Moreover, the microstructure still appears residual austenite.
3.2 Mechanical: Hardness
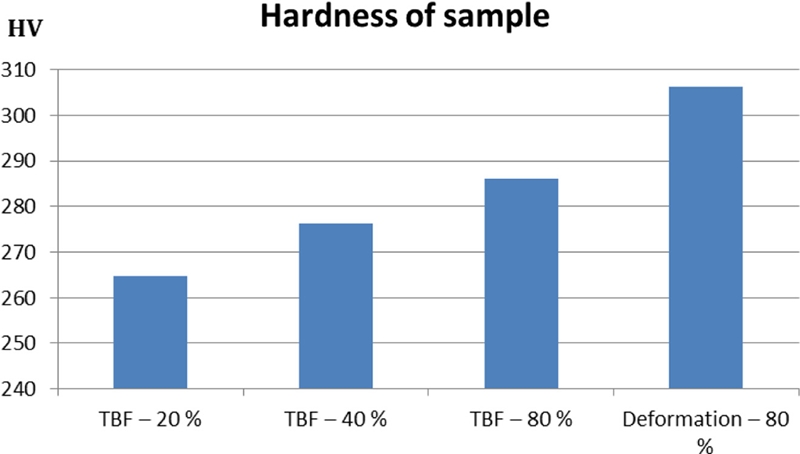
The microstructure hardness analysis of the samples showed that, in general, the hardness value after heat treatment was lower than the deformation pattern. This can be explained. When performing distortion with rather large pressure, up to 80% of the samples can be converted to austenite by martensite, but not much. For TRIP steels treated in TBF type, the hardness value does not fully reflect the properties but the other values are shown in Table 3.
Analysis of the strength shows that when the cold deformation increases the strength, the ductility decreases markedly. However, if the TBF heat treatment, but the strength is reduced compared with the cold-rolled but increased sharply than after hot rolling and more importantly, increases the ductility. This satisfies both the increased strength and the plasticity of the steel. Besides, the index of uniform elongation, relative elongation, the hardness and stress ratio have demonstrated the shaping capabilities of TBF steel. Besides, the Rm*A value shows a much greater value even for steel 08 indicating the adsorption capacity of the sample.
4. Conclusion
TBF heat treatment for low alloy steels CMnSi received mixed polyurethanes containing excess ferrite, bainite, and austenite to improve the strength and ductility of steel.
When increasing cooling deformation, the grain size of ferrite is decreased but increased in the percentage of austenite, the strength of the steel, and the modulus of elongation in small increments.
When the previous 80% cold-rolled, the grain size of ferrite is 6.4 μm, a large austenite fraction of 0-16%, and the best combination of strength and ductility.
Acknowledgments
This study was supported by Viet Nam Maritime University and School of Materials and Engineering, Ha Noi University of Science and Technology.
References
- Tomohiko, H., Tomohiro, K., and Koh-Ichi, S., “Effects of Alloying Elements on Impact Properties of Ultra High-Strength Trip-Aided Bainitic Ferrite Steels,” NIT, Tsuyama College-Repository, Vol. 52, pp. 9-16, 2010.
- Kobayashi, J., “A Basic Study on the Microstructure and Mechanical Properties of Ultrahigh-Strength Trip-Aided Martensitic Steel,” Doctoral Dissertation, Shinshu University, 2014.
-
Demeri, M. Y., “Advanced High-Strength Steels: Science, Technology, and Applications,” ASM International, 2013.
[https://doi.org/10.31399/asm.tb.ahsssta.9781627082792]

-
El-Din, H. N., Showaib, E. A., Zaafarani, N., and Refaiy, H., “Structure-Properties Relationship in TRIP Type Bainitic Ferrite Steel Austempered at Different Temperatures,” International Journal of Mechanical and Materials Engineering, Vol. 12, No. 1, pp. 1-9, 2017.
[https://doi.org/10.1186/s40712-017-0071-9]

- Padgett, M. C., “Phase Transformations during Cooling of Automotive Steels,” M.Sc. Thesis, The University of Alabama, 2017.
- Bhadeshia, H., “Bainite in Steels-Transformation, Microstructure and Properties,” Institute of Materials, http://www.phase-trans.msm.cam.ac.uk/2004/bainite.book.review2.pdf, (Accessed 17 JULY 2020)
- Syammach, S. M., “Mechanical Properties of Steels with a Microstructure of Bainite/Martensite and Austenite Islands,” M.Sc. Thesis, Colorado School of Mines, 2016.
-
Sugimoto, K. I., Hojo, T., and Kobayashi, J., “Critical Assessment 29: Trip-Aided Bainitic Ferrite Steels,” Materials Science and Technology, Vol. 33, No. 17, pp. 2005-2009, 2017.
[https://doi.org/10.1080/02670836.2017.1356014]


Ph.D. in Viet Nam Maritime University. His research is Science and technology metal
Email: namnd.khcs@vimaru.edu.vn

Eng in Viet Nam Maritime University. His research is Science and technology metal
Email: tranphapdong@gmail.com

Ph.D. in Viet Nam Maritime University. His research is ship machine
Email: thenam@vimaru.edu.vn

Ph.D. in Ha Noi University of Science and Technology. His research is Science and technology metal
Email: hai.nguyenhong1@hust.edu.vn

Assoc. Prof. Ph.D. in Ha Noi University of Science and Technology. His research is Science and technology metal
Email: khanh.phammai@hust.edu.vn

