Error Compensation Software to Remove the Low-Frequency Error of Aluminum Freeform Mirror for an Infrared Off-Axis Telescope
 ; Soojong Pak1 ; Byeongjoon Jeong3 ; Sanghyuk Kim4 ; Hye-In Lee4 ; Sunwoo Lee1 ; Sangwon Hyun3 ; Geon-Hee Kim5 ; Dae Wook Kim6
Copyright © The Korean Society for Precision Engineering
This is an Open-Access article distributed under the terms of the Creative Commons Attribution Non-Commercial License (http://creativecommons.org/licenses/by-nc/3.0) which permits unrestricted non-commercial use, distribution, and reproduction in any medium, provided the original work is properly cited.
This paper was presented at PRESM 2020
Abstract
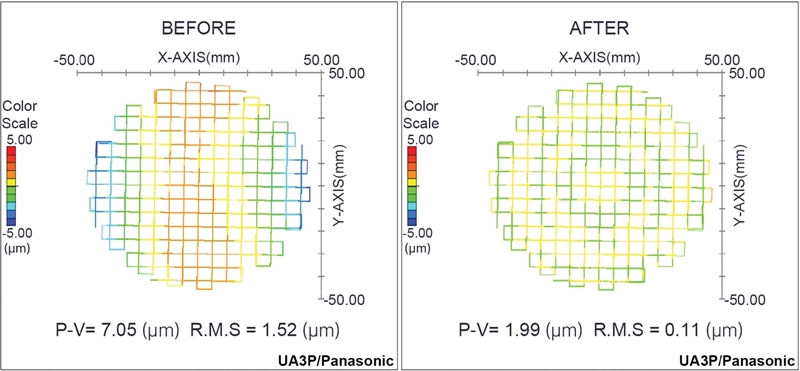
We present Error Compensation Software (ECS) which uses a decic polynomial model and three-dimensional surface measurement data for the fabrication of high precision freeform mirrors. ECS is designed based on a graphic user interface that includes an error calculation mechanism and surface distribution maps, and it accepts the Ultrahigh Accurate 3D Profilometer (UA3P) measurement data of the fabricated mirror surface. It exports surface coefficients and tool paths for the Single Point Diamond Turning (SPDT) machine which allows engineers to utilize the software during the compensation process. The ECS is based on Visual C++ and runs on the Windows operating system. The error compensation process with ECS has been applied to the 90 mm diameter aluminum freeform mirrors for usage in view infrared satellites, and the root mean square and peak-to-valley surface errors were reduced from 1.52 to 0.11 μm, and from 7.05 to 1.99 μm, respectively, satisfying the requirement of the infrared camera.
Keywords:
Optical fabrication, Freeform mirror, Single point diamond turning, Error compensation1. Introduction
High resolution imaging systems require complex surface shapes of optical components. Freeform surfaces have become popular in recent years thanks to the technological development in optical component fabrication. They are widely applied to various industries such as mobile phones, digital cameras, laser tracking systems, and illumination systems and are also used for scientific researches as a high-end optical system.1-3 Linear Astigmatism Free (LAF) confocal off-axis systems are one of the representative optical systems that use aluminum freeform mirrors.4 It has been designed for satellite cameras and other wide field of view telescopes.5,6
Traditionally, the aspheric mirrors have been fabricated using grinding and fly cutting techniques that can provide high-accuracy surfaces. However, these methods are inappropriate for fabricating freeform surfaces because of the asymmetrical shape of the mirror.7 One of the common methods for fabricating the freeform mirror is to use ultra-high precision diamond turning technology with slow slide servo (SSS) techniques.7,8 In this method, machining errors can occur due to a combination of various conditions such as geometric errors, kinematic errors, temperature fluctuations, etc,9,10 which implies that an appropriate way of the compensation process is required.
The error compensation process reduces the low-frequency error (LFE) that seriously degrades optical performance.11 Reproducibility in both machining and measurement is a critical factor for the high precision compensation process. On-machine measurement is a technique that fabricates and measures the optical surface without detaching the specimen from a spindle, so the error compensation process can be effectively performed. There have been recent researches of on-machine measurements in ultra-precision diamond turning. Chen12 proposed a compensation approach of an aspheric surface by calculating the surface profile error data using a contact probe in the on-machine measurement. This system has equal measuring performance compared with commercially available profilometers. However, this method uses the contact onmachine measurement method with a probe which can damage the fabricated optical surface. Zou13 presented a non-contact onmachine measurement using the chromatic confocal sensing method, which is capable of reconstructing the surface flat, spherical, and aspheric surfaces. This system shows the overall measurement uncertainty of 83.77 nm in standard deviation. Li14 developed an integrated system for interferometric on-machine surface measurement. The system configuration and calibration scheme are described, and various scanning strategies are used for consistent measuring performance. In previous reviews, the most challenging part of on-machine measurement is calibration of measurement system to improve the measuring accuracy. The measurement calibration is required because of the vibration from the machining device during the machining process. It has also limitations to using various measuring devices, such as 3D optical profilometer and other interferometers to measure surface figure and roughness. Off-machine measurement requires a precise alignment of the specimen for high reproducibility during machining and measurement for the error compensation process. In this case, well-made reference blocks or optomechanical structures are normally used.15,16 The recent study shows that reproducibility can be improved when using a jig on the specimen and the measuring instrument.17,18
In this paper, we introduce the error compensation method and the Error Compensation Software (ECS) for fabricating an aluminum freeform mirror with single point diamond turning (SPDT) machining. We have tested the ECS using a freeform aluminum mirror that is designed for the confocal off-axis system.19-21Section 2 describes the error compensation process for high precision freeform mirror fabrications using SPDT. Software architecture and graphical user interface (GUI) of ECS are introduced in Section 3. Section 4 explores the application of ECS to the freeform mirror of the confocal off-axis system. We summarize and discuss the development and application of ECS in Section 5.
2. Error Compensation Process
In the error compensation algorithm, we iterate the fabrication and measurement of a spaceman to reduce the LFE of the fabricated freeform surface. It follows the process described in Fig. 1. This error compensation algorithm has an advantage as it can be applied to the three-dimensional measurement data without distinction of coaxial and axial asymmetry optics.
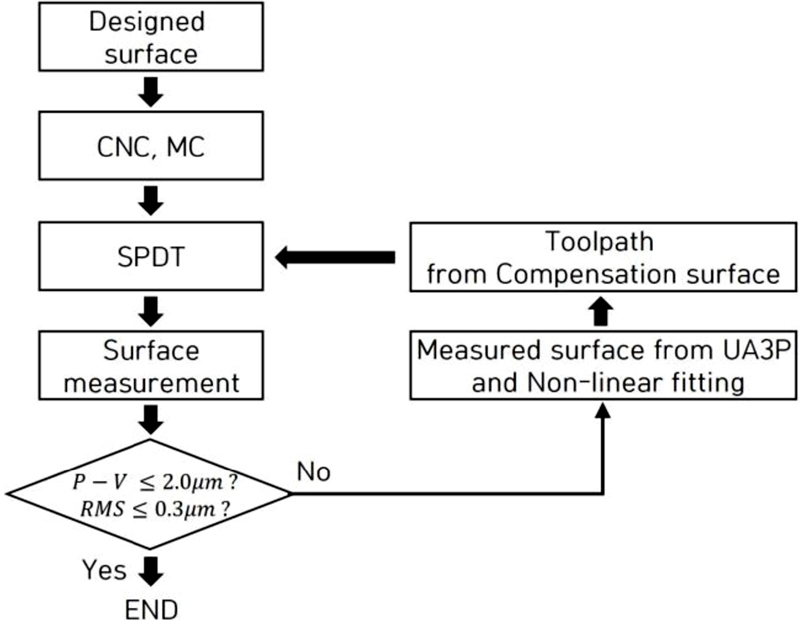
The flow chart of error compensation algorithm for high-precision aluminum freeform mirror fabrications
The first step of the compensation process is to get a surface model of the mirror. The surface of the freeform mirrors is designed to the decic polynomial with 66 coefficients which is expressed as,
| (1) |
where ai is designed polynomial coefficients for freeform surfaces.
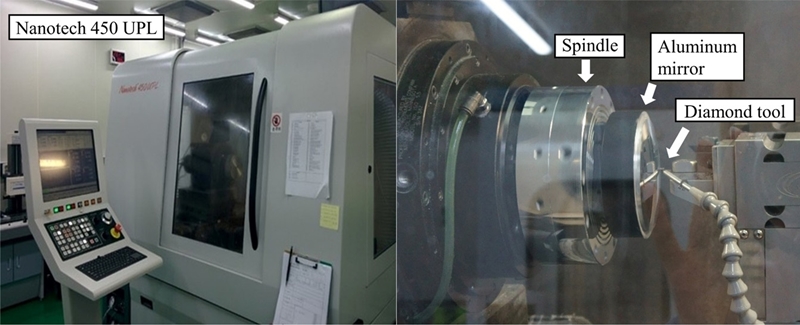
A rough cutting using CNC and MC machining is performed within 5-10 μm root mean square (RMS) surface figure error before fabricating the surface with SPDT. The Nanotech 450 UPL (Moore Nanotechnology Systems, LLC., USA) is selected for ultra-precision machining (Fig. 2), which offers the 5-axes SPDT machining with SSS technology.22 A workpiece is directly attached to a vacuum chuck mounted on a work spindle. As the spindle rotates on the c-axis and its holder oscillates on the x-axis, a diamond tool oscillates on the z-axis in a sine wave type motion to fabricate the surface.
The fabricated surface error is measured using the Ultrahigh Accurate 3D Profilometer-5 (UA3P-5, Panasonic), which has the measuring accuracy of 0.01-0.05 μm under 30 degrees on surface angularity and a measurable range is 200 × 200 × 45 mm.23 UA3P-5 has an atomic force probe that can approach by 0.01 μm to the specimen, which measures the surface without any damages. A three-dimensional surface measurement data is composed of x-, y-, z-axes, and zd (z Deviation).
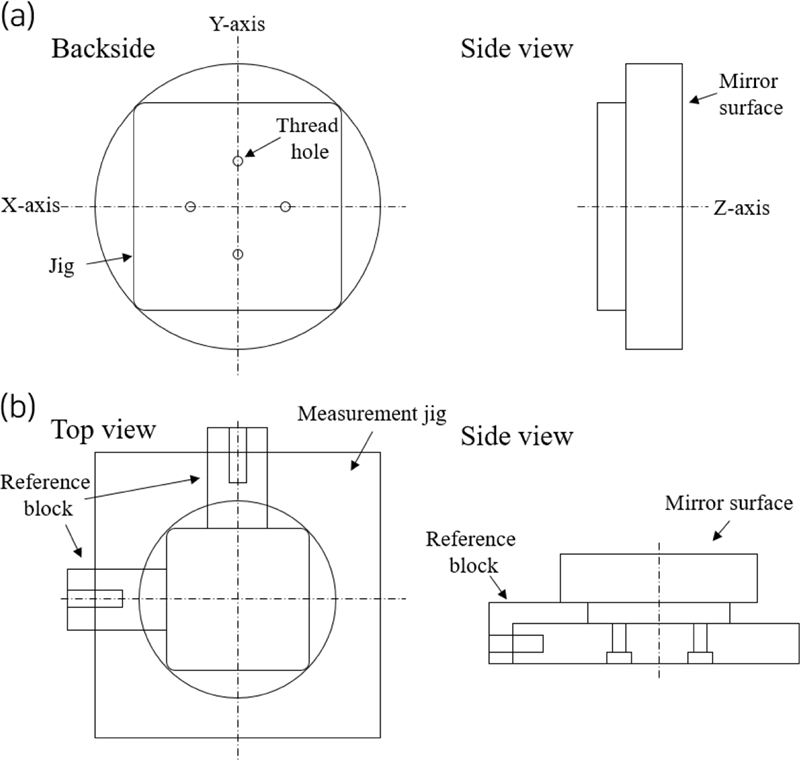
To ensure the reproducibility of the compensation process, both on-and off-machine measurements were used. When positioning a specimen for SPDT machining, the commercial self-indicator of Nanotech 450 UPL was used to precisely align the concentricity and angle of the specimen. A reference structure and a fixture were designed for off-machine measurement (Fig. 3). The backside of the mirror has a jig structure that provides references to the x-and y-axes. The fixture is mounted on the measurement instrument and contains two references used to align the mirror. The measurement proceeds after mounting the mirror on the fixture along the reference direction.
After initial surface fabrication and measurement, we decide whether additional error compensation is needed or not. If the surface errors are not satisfied their requirements, the compensation process is delivered. The compensation surface is obtained by the subtraction of an error from the design surface, whose error is given by the deviation between the design and measurement surfaces. Since there is a limitation to measure the three-dimensional coordinates over the whole surface, the grid date of the measured surface (Zm) is precisely fitted using a non-linear fitting algorithm,
| (2) |
where bi is measured polynomial coefficients. Finally, the error surface (Ze) and the compensation surface (Zc) is calculated by,
| (3) |
| (4) |
| (5) |
where ci is polynomial coefficients for compensation surface.
The toolpath for SPDT machining consists of c-, x-, and z-axis coordinates. The new toolpath from the compensation surface is calculated as following steps,
| (6) |
| (7) |
where C is rotation angle of work spindle in degree, which the initial angle depends on the rotation direction (Eq. (6)). Cincrement represents angle increment of work spindle. In the Eq. (7), θ [Radian] is derived from the unit conversion of C [Degree], and r is given by,
| (8) |
where xincrement is increment of x coordinate, roptics is radius of the spaceman, and N is the cumulative number of the Cincrement during the rotation cycle of work spindle. From this, the z coordinate of the toolpath is calculated by the compensation surface Eq. (5). The cutting depth is adjusted by adding the offset from Zc.
3. Error Compensation Software (ECS)
The customized error compensation software is required to effectively handle and calculate data from the algorithm described in Section 2. The ECS is designed with integration software based on a GUI that offers convenient management of the produced data. The ECS is written in Visual C++ and runs on the Windows operating system.
3.1 Software Architecture
The software architecture of the ECS is described in Fig. 4. In this Fig. 4, the yellow boxes are functions connected to the button components on the user interface. An engineer directly controls them for running actions such as loading the measurement data, making a toolpath, etc.
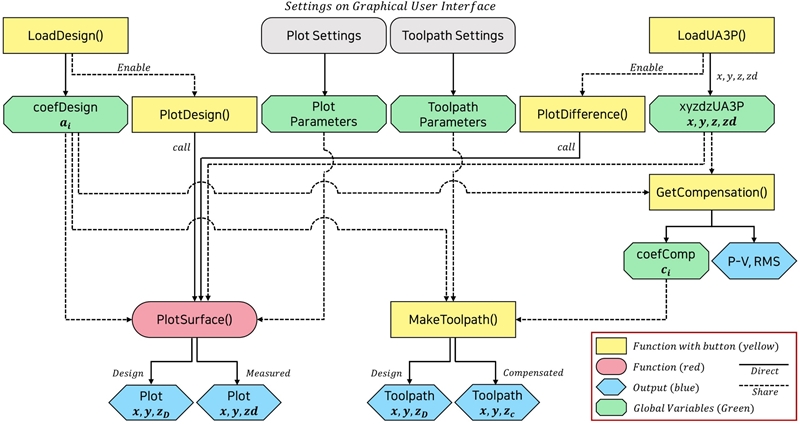
The software architecture of ECS shows the data flow between the functions and parameters. The yellow and red boxes represent the main functions. The blue and green boxes indicate the outputs and global variables respectively (Color online)
The red box is a function for creating the two-dimensional surface distribution plots. This function has two sub-functions.
(1) Generating the designed surface using Eq. (1). In this case, 66 coefficients of the decic polynomial function are input parameters.
(2) Making a surface distribution of a fabricated mirror. It is required to use the measurement dataset from UA3P. The number of sampling points of the fabricated surface depends on the measurement option in UA3P, which generally obtains > 100,000 samples.
The blue and green boxes represent the outputs and global variables, respectively. The gray box sets parameters that are inputted by an engineer. It is used for plotting a surface distribution and generating a toolpath. The toolpath is generated based on the calculation of the compensated coefficient described in Section 2.
The ECS applies the Levenberg-Marquardt fitting algorithm, which is a standard nonlinear least-squares routine,24 to fit the measured surface. The fitting performance with three sample mirrors showed the fitting errors on average 0.95 ± 0.30 μm peak to valley (P-V) and 0.06 ± 0.04 μm RMS.
The toolpath consists of a dataset including the c-axis of rotating angle in degree, x-and z-axes in millimeter. These are adjusted by input parameters: diameter of the mirror, the increment for x-axis, offset for z-axis, a step angle, and a rotational direction for the spindle.
The log data is saved on the path specified by the user and automatically recorded the messages about the status of the current action as a text file while the software runs.
3.2 GUI
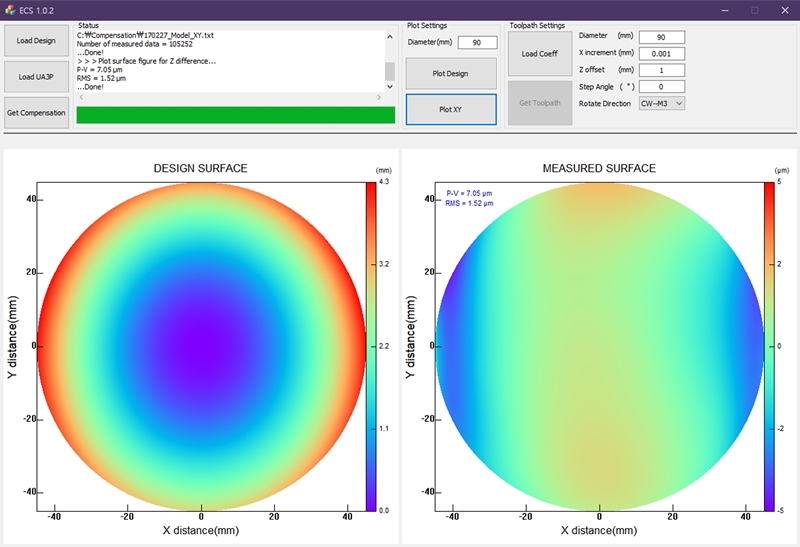
We designed the GUI of the ECS so that users can intuitively control the software (Fig. 5). The GUI of the ECS is based on the Microsoft Foundation Class Library (MFC). It allows easy modification when a user requires a new feature or interface. An engineer can easily take the data file by clicking the buttons and loading the text file that includes 66 coefficients of the designed surface or measurement dataset from UA3P via the pop-up dialog. A status indicator shows the messages about the working status, and it also records a log file. The progress bar indicates the progress of actions such as loading a measurement dataset, making a toolpath, etc. The designed and measured surface distributions are displayed side-by-side under the control panel.
4. Freeform Mirror Fabrication Using ECS
We have tested the performance of the ECS with an aluminum freeform mirror of 90 mm in diameter. It is made of Al6061-T6 aluminum alloy. The SPDT machining condition is shown in Table 1. The compensation criterion is set to P-V ≤ 2.0 μm and RMS ≤ 0.3 μm. The SPDT process is sensitive to temperature changes of the laboratory, so we precisely controlled the room temperature to minimize the thermal variation of the specimen.

Machining conditions for the ultra-precision machining of the aluminum freeform mirror using Nanotech 450 UPL
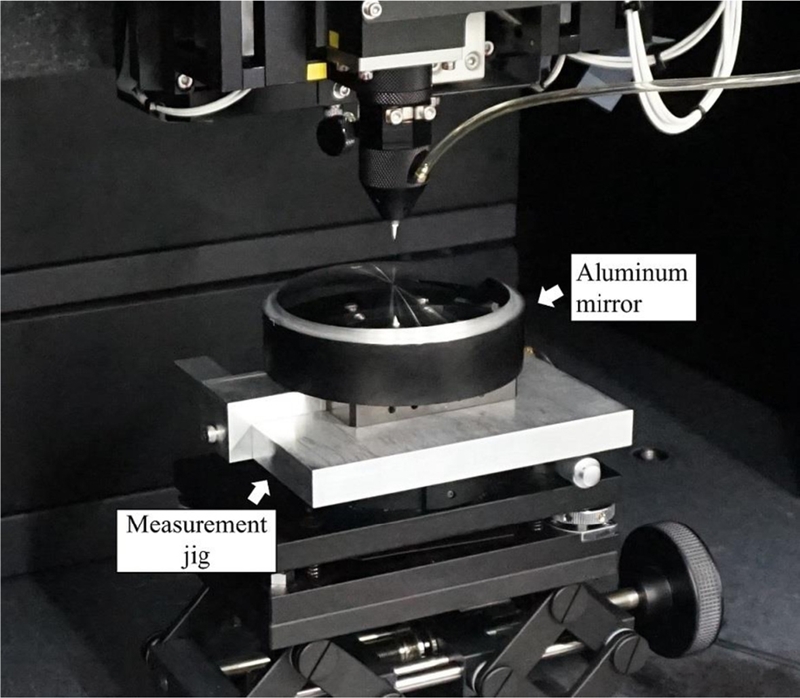
After the SPDT machining, we have measured the surface using UA3P-5 with the measurement jig as shown in Figs. 3 and 6. The measured surface is generated by the ECS (Fig. 5). It used the coordinate samples of 102,525, whose fitting errors are 0.85 μm PV and 0.1 μm RMS. As shown in Fig. 7, the P-V and RMS values for the LFE of the mirror before the error compensation process are 7.05 and 1.52 μm. The compensation process is performed with the calculated coefficients from the ECS and in the same machining conditions. After the compensation process, the LFE is reduced to 1.99 and 0.11 μm for P-V and RMS values, respectively.
5. Summary and Discussion
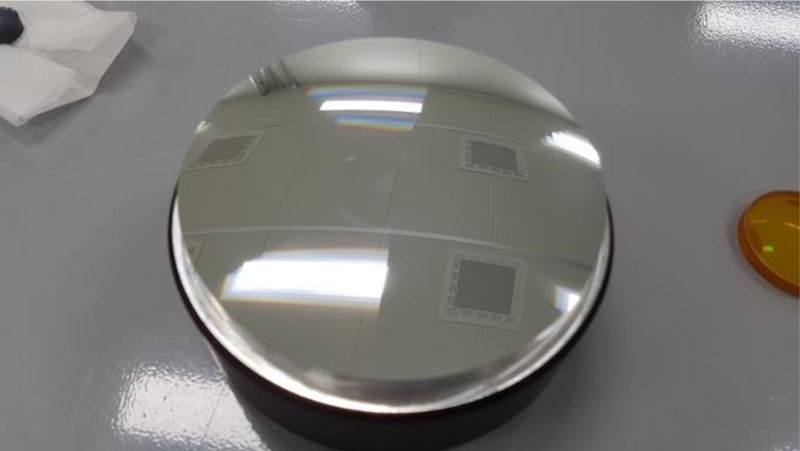
The high LFE is a critical problem to freeform mirrors, which contains low order aberrations, e.g., third-order coma and third-order astigmatism, so it significantly degrades optical performance. We have designed the error compensation algorithm to reduce LFE. This algorithm has the advantage to fabricate high accuracy freeform surfaces as it is capable of the three-dimensional measurement data without distinction of coaxial and axial asymmetry optics. The reproducibility of machining and measurement can be realized by precise alignment using the jig structure, fixture, and the commercial indicator of SPDT machine without complex hardware systems. Based on the algorithm, we have developed the ECS, which is designed with the user-friendly interface for engineers and can make the dataset for the compensation process. The ECS includes functions for plotting the two-dimensional surface distribution, calculating a compensated model, and making a toolpath for SPDT machining. Its GUI offers an intuitive control interface that allows engineers to manage the measured data using UA3P during the compensation process. We have tested the performance of the ECS with the aluminum freeform mirror of 90 mm in diameter (Fig. 8). The result shows the P-V and RMS values of the mirror reduced from 7.05 to 1.99 μm and from 1.52 to 0.11 μm respectively. Based on these results, we expect the ECS can improve the engineers’ convenience and productivity in the high precision aluminum freeform mirror fabrication.
Acknowledgments
This research was supported by the Korea Astronomy and Space Science Institute under the R&D program (No. 2020-3-850-02) supervised by the Ministry of Science and ICT.
REFERENCES
-
Pang, K., Fang, F., Song, L., Zhang, Y., and Zhang, H., “Bionic Compound Eye for 3D Motion Detection Using an Optical Freeform Surface,” Journal of the Optical Society of America B, Vol. 34, No. 5, pp. 28-35, 2017.
[https://doi.org/10.1364/JOSAB.34.000B28]

-
Li, L. and Allen, Y. Y., “Design and Fabrication of a Freeform Microlens Array for a Compact Large-Field-of-View Compound-Eye Camera,” Applied Optics, Vol. 51, No. 12, pp. 1843-1852, 2012.
[https://doi.org/10.1364/AO.51.001843]

-
Druart, G., Guérineau, N., Haïdar, R., Thétas, S., Taboury, J., et al., “Demonstration of an Infrared Microcamera Inspired by Xenos Peckii Vision,” Applied Optics, Vol. 48, No. 18, pp. 3368-3374, 2009.
[https://doi.org/10.1364/AO.48.003368]

-
Park, W., Chang, S., Lim, J. H., Lee, S., Ahn, H., et al., “Development of Linear Astigmatism Free-Three Mirror System (LAF-TMS),” Publications of the Astronomical Society of the Pacific, Vol. 132, No. 1010, Paper No. 044504, 2020.
[https://doi.org/10.1088/1538-3873/ab7547]

-
Park, W., Hammar, A., Pak, S., Chang, S., Gumbel, J., et al., “Flight Model Characterization of the Wide-Field Off-Axis Telescope for the MATS Satellite,” Applied Optics, Vol. 59, No. 17, pp. 5335-5342, 2020.
[https://doi.org/10.1364/AO.392187]

-
Hammar, A., Park, W., Chang, S., Pak, S., Emrich, A., et al., “Wide-Field Off-Axis Telescope for the Mesospheric Airglow/ Aerosol Tomography Spectroscopy Satellite,” Applied Optics, Vol. 58, No. 6, pp. 1393-1399, 2019.
[https://doi.org/10.1364/AO.58.001393]

-
Yin, Z., Dai, Y., Li, S., Guan, C., and Tie, G., “Fabrication of Off-Axis Aspheric Surfaces Using a Slow Tool Servo,” International Journal of Machine Tools and Manufacture, Vol. 51, No. 5, pp. 404-410, 2011.
[https://doi.org/10.1016/j.ijmachtools.2011.01.008]

-
Chen, C. C., Huang, C. Y., Peng, W. J., Cheng, Y. C., Yu, Z. R., et al., “Freeform Surface Machining Error Compensation Method for Ultra-Precision Slow Tool Servo Diamond Turning,” Optical Manufacturing and Testing X, Vol. 8838, Paper No. 88380Y, 2013.
[https://doi.org/10.1117/12.2022981]

-
Ramesh, R., Mannan, M., and Poo, A., “Error Compensation in Machine Tools-A Review: Part I: Geometric, Cutting-Force Induced and Fixture-Dependent Errors,” International Journal of Machine Tools and Manufacture, Vol. 40, No. 9, pp. 1235-1256, 2000.
[https://doi.org/10.1016/S0890-6955(00)00009-2]

-
Liu, X., Zhang, X., Fang, F., and Liu, S., “Identification and Compensation of Main Machining Errors on Surface Form Accuracy in Ultra-Precision Diamond Turning,” International Journal of Machine Tools and Manufacture, Vol. 105, pp. 45-57, 2016.
[https://doi.org/10.1016/j.ijmachtools.2016.03.001]

-
Kim, S., Chang, S., Pak, S., Lee, K. J., Jeong, B., et al., “Fabrication of Electroless Nickel Plated Aluminum Freeform Mirror for an Infrared Off-Axis Telescope,” Applied Optics, Vol. 54, No. 34, pp. 10137-10144, 2015.
[https://doi.org/10.1364/AO.54.010137]

-
Chen, F., Yin, S., Huang, H., Ohmori, H., Wang, Y., et al., “Profile Error Compensation in Ultra-Precision Grinding of Aspheric Surfaces with On-Machine Measurement,” International Journal of Machine Tools and Manufacture, Vol. 50, No. 5, pp. 480-486, 2010.
[https://doi.org/10.1016/j.ijmachtools.2010.01.001]

-
Zou, X., Zhao, X., Li, G., Li, Z., and Sun, T., “Non-Contact On-Machine Measurement Using a Chromatic Confocal Probe for an Ultra-Precision Turning Machine,” The International Journal of Advanced Manufacturing Technology, Vol. 90, No. 5, pp. 2163-2172, 2017.
[https://doi.org/10.1007/s00170-016-9494-3]

-
Li, D., Jiang, X., Tong, Z., and Blunt, L., “Development and Application of Interferometric On-Machine Surface Measurement for Ultraprecision Turning Process,” Journal of Manufacturing Science and Engineering, Vol. 141, No. 1, pp. 1-9, 2019.
[https://doi.org/10.1115/1.4041627]

-
Scheiding, S., Damm, C., Holota, W., Peschel, T., Gebhardt, A., et al., “Ultra-Precisely Manufactured Mirror Assemblies with Well-Defined Reference Structures,” Modern Technologies in Space and Ground-Based Telescopes and Instrumentation, Paper No. 773908, 2010.
[https://doi.org/10.1117/12.856244]

-
Zhang, X., Zeng, Z., Liu, X., and Fang, F., “Compensation Strategy for Machining Optical Freeform Surfaces by the Combined On-and Off-Machine Measurement,” Optics Express, Vol. 23, No. 19, pp. 24800-24810, 2015.
[https://doi.org/10.1364/OE.23.024800]

- Jeong, B., “Error Compensation Method of Aluminum Freeform Mirrors for Infrared Space Telescope,” M. Sc. Thesis, Kyung Hee University, 2016.
- Korea Basic Science Institute and University-Industry Cooperation Group of Kyung Hee University, “Jig for Error Compensation Machining of Off-Axis Mirror and Machining Method Thereof,” KR Patent, 10182199, 2017.
-
Chang, S., Lee, J. H., Kim, S. P., Kim, H., Kim, W. J., et al., “Linear Astigmatism of Confocal Off-Axis Reflective Imaging Systems and Its Elimination,” Applied Optics, Vol. 45, No. 3, pp. 484-488, 2006.
[https://doi.org/10.1364/AO.45.000484]

-
Chang, S., “Off-Axis Reflecting Telescope with Axially-Symmetric Optical Property and Its Applications,” Space Telescopes and Instrumentation I: Optical, Infrared, and Millimeter, Paper No. 626548, 2006.
[https://doi.org/10.1117/12.672695]

-
Kim, S., Pak, S., Chang, S., Kim, G. H., Yang, S. C., et al., “Proto-Model of an Infrared Wide-Field Off-Axis Telescope,” Journal of Korean Astronomical Society, Vol. 43, No. 5, pp. 169-181, 2010.
[https://doi.org/10.5303/JKAS.2010.43.5.169]

- Moore Nanotechnology Systems LLC., “Principles and Applications of the Slow Slide Servo,”http://nanotechsys.com/wp-content/uploads/2019/11/Slow-Slide-Servo-Applications-Y_-Tohme-05_05.pdf, (Accessed 13 APRIL 2021)
- Panasonic, “Ultrahigh Accurate 3D Profilometer General Catalog,” https://www.panasonicfa.com/sites/default/files/pdfs/UA3P.pdf, (Accessed 13 APRIL 2021)
- Press, W. H., William, H., Teukolsky, S. A., Saul, A., Vetterling, W. T., et al., “Numerical Recipes 3rd Edition: The Art of Scientific Computing,” Cambridge University Press, pp. 801-806, 2007.

Ph.D. candidate in the School of Space Research, Kyung Hee University. His research interest is software engineering for astronomy.
E-mail: jtg777@khu.ac.kr

Postdoctoral Researcher in Korea Astronomy and Space Science Institute (KASI). His research interest is astronomical instrumentation.
E-mail: wjpark@kasi.re.kr

Professor in the School of Space Research, Kyung Hee University. His research interest is astronomical instrumentation.
E-mail: soojong@khu.ac.kr

Research Assistant in Korea Basic Science Institute. His research interest is ultra-precision machining.
E-mail: embryo642@gmail.com

Senior Researcher in Center for Large Telescopes (CfLAT), Korea Astronomy and Space Science Institute (KASI). His research interest is astronomical instrumentation.
E-mail: kimsanghyuk@kasi.re.kr

Postdoctoral researcher in Korea Astronomy and Space Science Institute (KASI). Her research interest is astronomical observation instrument software.
E-mail: hyeinlee@kasi.re.kr

Ph.D. student in the School of Space Research, Kyung Hee University. His research interest is astronomical optical system alignment and performance test.
E-mail: lsw@khu.ac.kr

Senior researcher in Korea Basic Science Institute. His research interest is optical metrology.
E-mail: hyunsangwon@kbsi.re.kr

Professor in the Department of Mechanics-Materials Convergence System Engineering, Hanbat National University. His research interest is ultra-precision machining for optics.
E-mail: ghkim@hanbat.ac.kr

Assistant Professor in the Wyant College of Optical Sciences, Department of Astronomy and Steward Observatory. His research interest is optical engineering and instrumentation.
E-mail: dkim@optics.arizona.edu
