Weld Strength of Longitudinal and Longitudinal-Torsional Mode Horns in Ultrasonic Metal Welding
Copyright © The Korean Society for Precision Engineering
This is an Open-Access article distributed under the terms of the Creative Commons Attribution Non-Commercial License (http://creativecommons.org/licenses/by-nc/3.0) which permits unrestricted non-commercial use, distribution, and reproduction in any medium, provided the original work is properly cited.
Abstract
The ultrasonic metal welding technique has been widely used because of the need to weld different materials for meeting high quality performance requirements. The key part in this type of welding is the horn, which plays an important role in the weld quality. Longitudinal vibration has so far been the most popular vibration mode for ultrasonic horns, but the longitudinal mode coupled with torsional mode is gaining a lot of attention these days owing to its better performance compared to the pure longitudinal mode. Although there are many studies on the performance of these two mode horns, comparative studies based on the performance of these two modes, particularly in ultrasonic metal welding, are very rare. This study focuses on the welding performance comparison of these two horns with 20 kHz resonant frequency. Experimental results show that the performance of the longitudinal-torsional horn is better than that of the longitudinal horn in terms of welding strength.
Keywords:
Weld quality, Ultrasonic metal welding, Longitudinal-torsional mode, Ultrasonic horn, Welding strength, Performance comparison키워드:
용접품질, 초음파 금속 용착, 종진동-비틀림 모드, 초음파 혼, 용착 강도, 성능 비교1. Introduction
Ultrasound metal welding (UMW) has been considered as a promising application of ultrasonic in engineering where an ultrasonic welding horn vibrating at a very high frequency (i.e. 20 or 40 kHz) is used to join the two or multiple sheets of metal foils.1 Ultrasonic metal welding is a solid-state diffusion welding technique applied at the ambient or low temperature at which the welding is conducted by transferring high frequency vibration energy to particular parts under a certain pressure. Frictional energy caused by vibration is generated due to relative vertical and horizontal movements between the two welding surfaces; the vibration energy generated in the welding boundary surface removes the oxide films and contaminants dispersed throughout the boundary surface.2
Recently ultrasonic metal welding is applied for similar and dissimilar materials of thin sheets that are difficult to weld with ordinary methods. It is an economical and eco-friendly welding technique that does not require the use of supplementary lead or solders. Also, since the welding time is within one second generally, it can be easily grafted onto automation processes and applied to secondary battery electrode lead bonding,1 heat pipe joining for solar battery panels,3 aluminum wire bonding4 and aluminum alloy vehicle manufacturing.5 In addition, ultrasonic horn is used for pattern forming6 and polymer sheet forming.7 The key part in ultrasonic metal welding is the horn, which has the greatest effect on weld quality. Longitudinal vibration has been by far the most popular vibration mode for ultrasonic horns, but longitudinal mode coupled with torsional is gaining a lot of attention these days owing to its better performance compared to pure longitudinal mode. The longitudinal mode (L Mode) horn vibrates only in the longitudinal direction and the longitudinal and torsional mode (L-T Mode) horn vibrates in both longitudinal and torsional directions. There are different ways of achieving composite mode in welding horns. It can either be achieved by the introduction of the slanting grooves to the front part of the horn8,9 or by using coupled transducers where two sets of piezoelectric polarized in thickness and tangential directions are used.10,11
Previous studies using L-T mode horns showed that the high strength welds were formed with comparatively shorter welding times and smaller vibration velocities when using L-T mode in UMW.12,13 Besides the ultrasonic welding applications, in rotary ultrasonic machining (RUM), the L-T mode tool could reduce the cutting force by 55% and the edge chipping size by 45% compared to the conventional RUM.14 The cutting forces have also shown to decrease substantially in ultrasonic-assisted milling when the L-T mode horn was used.15
Although many kinds of research studied the performance of longitudinal and L-T modes ultrasonic devices in different contexts such as cutting and drilling, the comparative studies based on the performance of longitudinal and L-T modes particularly in the ultrasonic metal welding are very rare.
This study, therefore, focuses on the welding performance comparison of longitudinal and L-T modes horns with 20 kHz resonant frequency. The longitudinal mode horn was a commercial product, and the longitudinal-torsional mode horn was manufactured by introducing slanting grooves at the front mass of the horn, which is described in our previous research.8 During each experimentation welding parameters such as pressure, time, and amplitude were selected the same for both horns. Finally, the welds were tested via a tensile testing machine and weld strengths were compared for both horns.
2. Ultrasonic Metal Welding
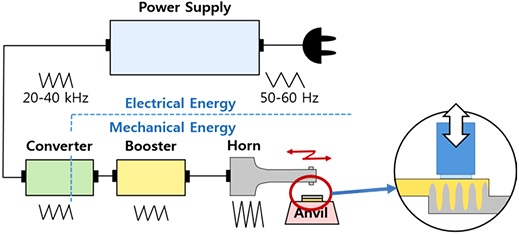
Fig. 1 shows schematics of ultrasonic metal welding. The converter or transducer converts an alternating current of 50-60 Hz into mechanical energy of 20 or 40 kHz, and the booster reduces or amplifies the amplitude of the converter. The horn, a key part of the ultrasonic welder, transfers the mechanical vibration energy to the welding materials. During welding, welding specimen is clamped under a predetermined load between vibrating horn and anvil, resulting in the development of high strain rates and temperatures at the weld interface. When the amplified ultrasonic vibration energy is transmitted to the weld through the horn, strong joining is achieved by solid-state diffusion in the weld interfaces. Ultrasonic welding is a coupled thermal-mechanical phenomenon since frictional heat generation stimulates severe plastic deformation at the weld interface with a temperature increase and introduces material softening, which forms a weld finally.16
In ultrasonic metal welding, welding parameters are clamping pressure, welding time, and amplitude of horn vibration. These parameters have great effects on the weld quality, and they should be appropriately selected. The welding energy delivered by the machine is directly proportional to pressure P, amplitude A, and time t. Welding energy E can be described as a product of these three parameters as following:
| (1) |
where the pressure P is in MPa, amplitude A in μm, and time t in seconds.
3. Experimental Methods
3.1 Welding Materials and Welding Machine
The welding materials used in this experiment are Cu and Ni. Two sheets of 0.1 mm thick copper (Cu 99.9%) and nickel (Ni 99%) are welded. The fabricated specimen was 10 mm wide and 50 mm long.
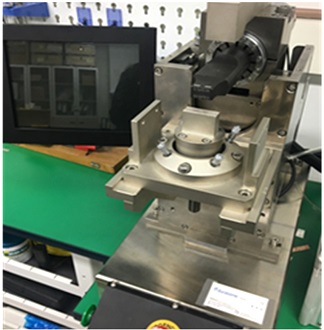
The welding machine shown in Fig. 2 is D9800, which is made in Durasonic Co. Ltd., Korea. This machine has four operation modes (Time Welding, Absolute Time, Correlative Length, Energy) and three monitoring functions (Rime, Welding Energy, Depth). Besides, the histories of 200 welding results can be saved with welding result graphs, which can be used to monitor or check the welding process.
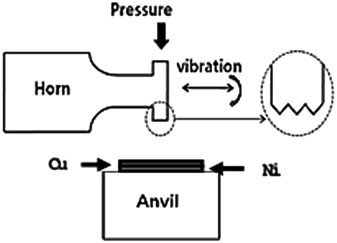
Fig. 3 shows a schematic diagram of the ultrasonic metal welding experiment and specimen setup. The direction of vibration is determined by longitudinal or longitudinal-torsional depending on the horn type.
3.2 Ultrasonic Horns
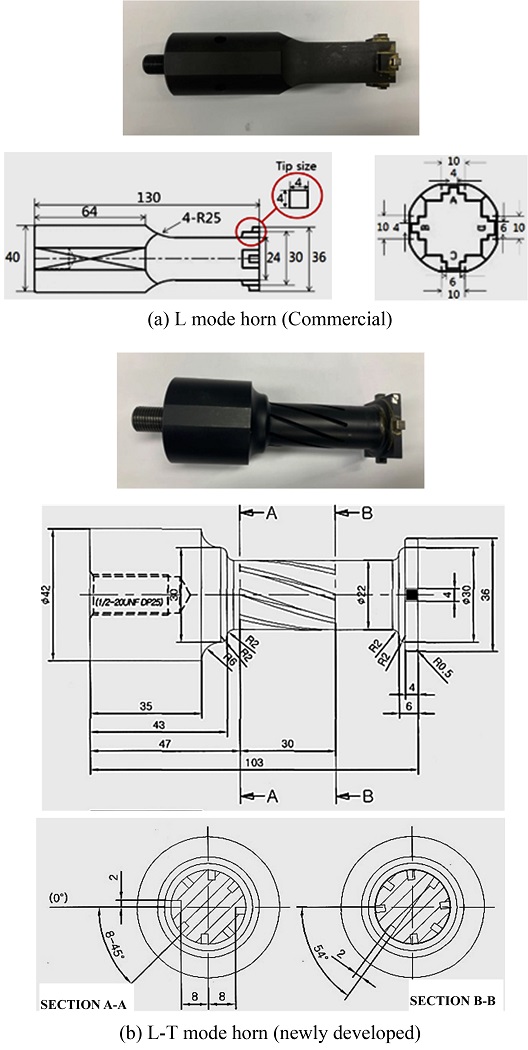
Two different types of horns are used for the experimentation (i.e., L and L-T Mode). The L mode horn vibrates only in the longitudinal direction and the L-T mode horn vibrates in both longitudinal and torsional directions. Two horns are shown in Figs. 4(a) and 4(b) respectively. The L mode horn was a commercial product, and the L-T mode horn was manufactured by introducing slanting grooves at the front mass of the horn, which is described in our previous research.8
As the knurling pattern is an important factor that affects the weld quality in ultrasonic metal welding, the same type of pattern was used for both horns and the pattern is shown in Fig. 5.
3.3 Welding Parameters
In this study, clamping pressure between horn and anvil, welding time, and amplitude of horn vibration were selected as welding parameters. As these three parameters have great effects on the weld quality, their values should be appropriately selected. Three different levels of these parameters were chosen for experimentation and the values of these parameters are shown in Table 1. These levels are widely used when performing ultrasonic welding for the type and thickness of the welding material used in this study.
Although the original amplitudes of L and L-T mode horns are 58 and 40 μm respectively, all welding parameters were kept the same for both of the horns to compare their performances. To collect enough data for comparison, seven experiments were made against each combination of the welding parameters for both horns. As there were 9 different values of three different parameters, there were 27 unique welding conditions.
3.4 Tensile Strength Test of Welding Specimens
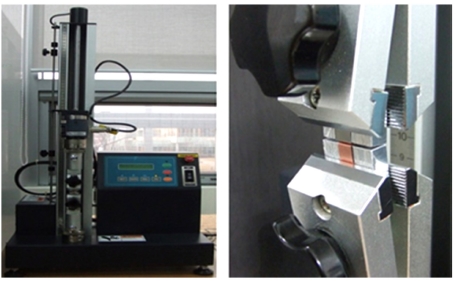
Once the welding experiments were completed, the tensile tests were made using COMETECH tensile test machine with a 1 kN load cell shown in Fig. 6. A pulling speed of 10 mm/min was used to minimize the unnecessary dynamic effects.
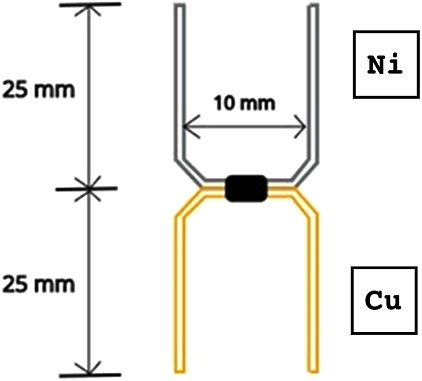
There are several methods to measure the welding strength, but in this study, the U-Tensile test was used in consideration of the size of the welding mark (i. e., The Area of the Horn Tip). The configuration for the U-Tensile tests is shown in Fig. 7, where the copper and nickel sheets are colored yellow and gray respectively.
4. Experimental Results and Discussions
4.1 Failure Behavior of the Weld
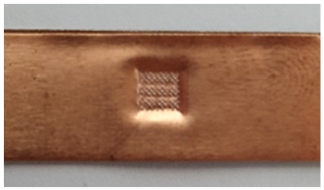
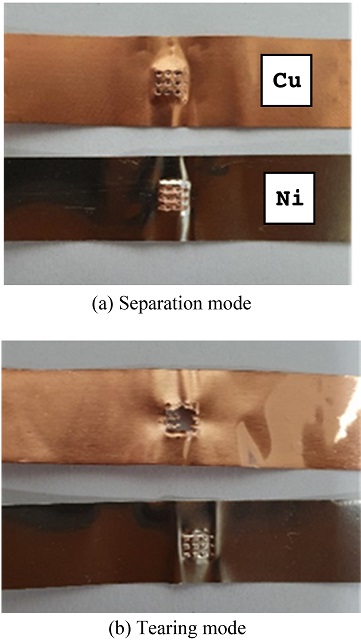
Fig. 8 shows the welding specimen before the tensile test, and the welding mark caused by pressure at the tip of the horn is observed on the weld surface. Figs. 9(a) and 9(b) show two modes of failures after the tensile test, i.e., the separation mode shown in Figs. 9(a) and the tearing mode shown in 9(b).
As shown in Fig. 9(a), the weld interface of the two welding materials is separated without tearing, but some of the other materials are finely attached to both surfaces due to solid- phase diffusion, which is an important characteristic occurring in ultrasonic welding. As seen in Fig. 9(a), the copper material adhered to the surface of the nickel material in the weld interface. In the tearing mode as shown Fig. 9(b), the weld interface does not separate and adheres strongly to each other, causing one of the two materials to tear along the edges of the welding mark.
4.2 Welding Strength of the Welding Specimen
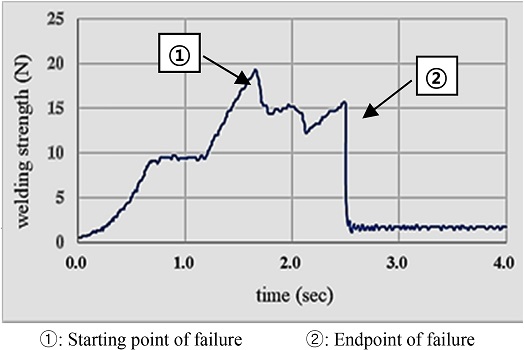
Tensile strength tests were performed as described in 3.4 above. Fig. 10 shows an example of the test results. During the tensile test, the weld failure starts at point ① and ends completely at point ②. In the period between these two points, the weld interface gradually separates. In this test maximum tensile strength is about 19.5 N.
To increase the reliability of the tensile strength test, five tests were made for each combination of the welding parameters for both horns. The mean strength of these five maximum strengths was calculated as the representative strength for each welding experiment.
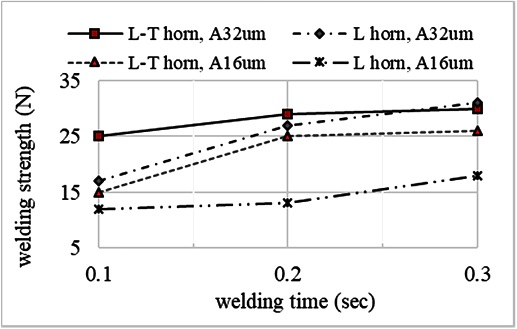
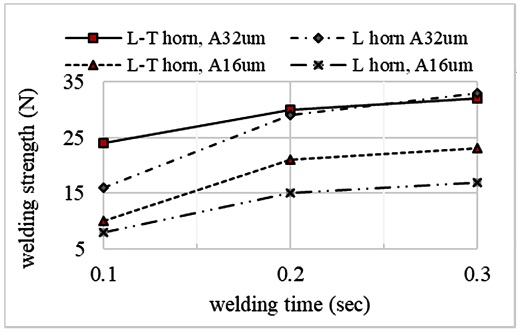
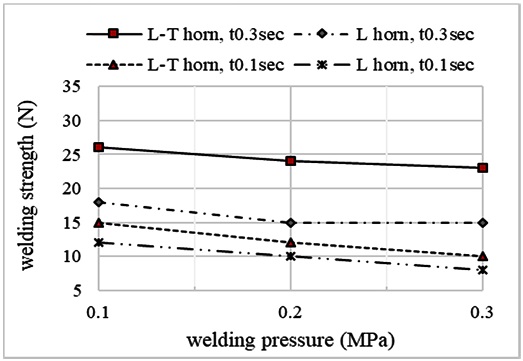
From Figs. 11 to 16 show the variations of welding strength when the three welding parameters (Welding Time, Welding Pressure, and Ultrasonic Vibration Amplitudes of the Horn) are changed. In all Figs., the L-T horn and L horn represent horns using the longitudinal-torsional mode and only the longitudinal mode respectively. ‘A’ means the vibration amplitude of the horn, ‘P’ means welding pressure, and ‘t’ means welding time.
Fig. 11 shows the comparison of the welding strength of the two horns according to the change of welding time when the welding pressure is 0.1MPa and the amplitude is 16 and 24 μm. It is shown the overall welding strength is high when using the L-T horn. Besides, as the welding time increases, the welding strength tends to increase, too. Exceptionally, when the amplitude is 32 μm and the welding time is 0.3 sec, the welding strength of the L horn is larger. This is considered to be the result of excessive plastic deformation or micro-cracks in the welding material due to excessive welding energy by the addition of torsional vibration. That is, severe welding conditions may lower the welding strength, so it is desirable to select appropriate welding conditions.
Fig. 12 shows the welding strength when the welding pressure is 0.3MPa and shows the same trend as when the welding pressure is 0.1MPa.
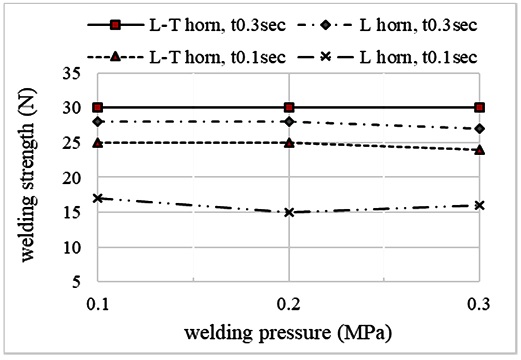
Fig. 13 shows the comparison of the welding strength of two horns according to the change of welding pressure when the vibration amplitude is 16 μm and the welding time is 0.1 sec and 0.3 sec. As the pressure increases, the welding strength tends to decrease, but the change is insignificant. This result means that the change in welding pressure does not have a significant effect on the change in welding strength under the constant welding time and the vibration amplitude of the horn.
However, at the same welding time, the welding strength of the L-T horn is higher, but when the welding time of the L horn is long, the welding strength is higher than that of the L-T horn. This means that the welding time has a greater influence on the welding strength.
Fig. 14 shows the comparison of the welding strength of the two horns according to the change in welding pressure when the amplitude is 32 μm and the welding time is 0.1 sec and 0.3 sec. The result is almost similar to the result shown in Fig. 13.
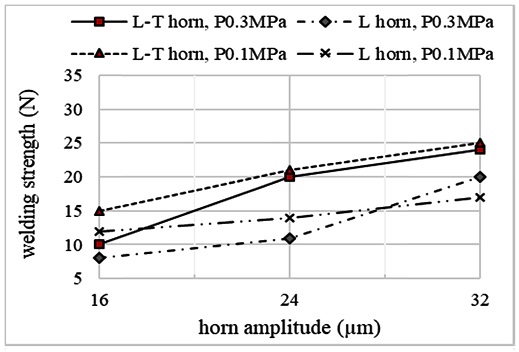
Fig. 15 shows the comparison of the welding strength of the two horns according to the variation of the vibration amplitude of the horn when the welding time is 0.1 sec and the pressure are 0.1 and 0.3MPa. As the amplitude increases, the welding strength increases. In special, when the welding pressure is high, the welding strength of the L horn is higher than that of the L-T horn. This means that when the welding pressure acting on thin material with a thickness of 0.1 mm is high, the tip end of the horn penetrates the material deeply and causes excessive plastic deformation in the material, which causes work hardening or fine cracks in the welding area, which reduces welding strength. Moreover, it is judged that such a tendency has increased because the L-T horn uses composite vibrations.
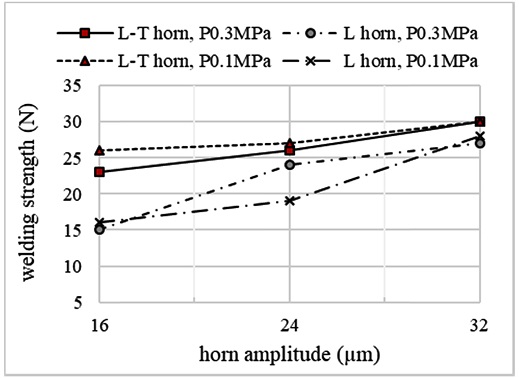
Fig. 16 shows the comparison of the welding strength of the two horns according to the variation of the amplitude of the horn when the welding time is 0.3 sec. This result shows that it is very similar to that of Fig. 15. Therefore, when welding a thin material, excessive welding pressure negatively affects the welding strength and can be an important factor causing welding defects, so it is very important to choose an appropriate welding pressure during ultrasonic thin metal welding.
5. Conclusions
This study focused on the welding performance comparison of longitudinal and L-T modes horns with 20 kHz resonant frequency. The longitudinal mode horn was a commercial product, and the longitudinal-torsional mode horn developed by our previous research was manufactured by introducing slanting grooves at the front mass of the horn. Welding parameters such as pressure, time, and amplitude were selected the same for both horns for performance comparison. Welding strengths were used for the performance index. As a result of the experiment, the following conclusions were obtained.
The overall welding strength of the L-T horn was higher than that of the L horn. As the welding time and the vibration amplitude of the horn increased, the welding strength also increased. However, when the welding pressure increased, the welding strength decreased or had little effect. In particular, when the welding pressure is high, the welding strength of the L-T horn is lower. It is judged that this is because the tip end of the horn penetrates the material deeply in thin material, causing excessive plastic deformation in the material, which causes work hardening or minute cracks in the welding area. The L-T horn using complex vibration seems to have a greater such tendency. Therefore, when welding a thin material, it is very important to select an appropriate welding pressure because excessive welding pressure negatively affects the welding strength and can be an important factor causing welding defects.
Acknowledgments
This work was supported by Incheon National University Research Grant in 2018.
REFERENCES
-
Shahid, M. B., Han, S. C., Jun, T. S., and Park, D. S., “Effect of Process Parameters on the Joint Strength in Ultrasonic Welding of Cu and Ni Foils,” Materials and Manufacturing Processes, Vol. 34, No. 11, pp. 1217-1224, 2019.
[https://doi.org/10.1080/10426914.2019.1643474]

- Jung, J. P., “Ultrasonic Bonding of Electronic Parts,” Proc. of the KWS Conference, Vol. 50, pp. 7-9, 2008.
- Lee, J. H., Kim, S. H., Cheon, C. G., Kim, S. U., and Kim, J. D., “Effects of Welding Parameters on Ultrasonic Bonding Strength of Solar Collector,” Proc. of the KWS Conference, pp. 233-235, 2006.
- Lee, G. and Kim, H., “Aluminum Wire Bonding by Longitudinal Vibration of Ultrasonic Transducer,” Journal of the Korean Society for Precision Engineering, Vol. 13, No. 11, pp. 38-45, 1996.
- Kim, H. and Kil, S., “Trends of Welding Technologies (Aluminum Structure),” Journal of Welding and Joining. Vol. 22, pp. 29-34, 2004.
- Seo, Y. S. and Park, K., “Finite Element Analysis of an Ultrasonic Tool Horn for Pattern Forming,” Journal of the Korean Society for Precision Engineering, Vol. 28, No. 3, pp. 363-369, 2011.
-
Bae, H. and Park, K., “Design and Analysis of Ultrasonic Horn for Polymer Sheet Forming,” International Journal of Precision Engineering and Manufacturing-Green Technology, Vol. 3, No. 1, pp. 49-54, 2016.
[https://doi.org/10.1007/s40684-016-0007-5]

-
Bilal, S. M., Jung, J. Y., and Park, D. S., “Finite Element Analysis Coupled Artificial Neural Network Approach to Design the Longitudinal-Torsional Mode Ultrasonic Welding Horn,” The International Journal of Advanced Manufacturing Technology, Vol. 107, Nos. 5-6, pp. 2731-2743, 2020.
[https://doi.org/10.1007/s00170-020-05200-5]

-
Tsujino, J., Sano, T., Ogata, H., Tanaka, S., and Harada, Y., “Complex Vibration Ultrasonic Welding Systems with Large Area Welding Tips,” Ultrasonics, Vol. 40, Nos. 1-8, pp. 361-364, 2002.
[https://doi.org/10.1016/S0041-624X(02)00122-1]

-
Shuyu, L., “Sandwiched Piezoelectric Ultrasonic Transducers of Longitudinal-Torsional Compound Vibrational Modes,” IEEE Transactions on Ultrasonics, Ferroelectrics, and Frequency Control, Vol. 44, No. 6, pp. 1189-1197, 1997.
[https://doi.org/10.1109/58.656619]

-
Asami, T., Tamada, Y., Higuchi, Y., and Miura, H., “Ultrasonic Metal Welding with a Vibration Source Using Longitudinal and Torsional Vibration Transducers,” Japanese Journal of Applied Physics, Vol. 56, No. 7S1, Paper No. 07JE02, 2017.
[https://doi.org/10.7567/JJAP.56.07JE02]

-
Tsujino, J., Ueoka, T., Hasegawa, K., Fujita, Y., Shiraki, T., et al., “New Methods of Ultrasonic Welding of Metal and Plastic Materials,” Ultrasonics, Vol. 34, Nos. 2-5, pp. 177-185, 1996.
[https://doi.org/10.1016/0041-624X(96)81780-X]

- Tsujino, J., “Recent Developments of Ultrasonic Welding,” Proc. of the IEEE Ultrasonics Symposium, pp. 1051-1060, 1995.
-
Wang, J., Zhang, J., Feng, P., Guo, P., and Zhang, Q., “Feasibility Study of Longitudinal-Torsional-Coupled Rotary Ultrasonic Machining of Brittle Material,” Journal of Manufacturing Science and Engineering, Vol. 140, No. 5, Paper No. 051008, 2018.
[https://doi.org/10.1115/1.4038728]

-
Wu, C., Chen, S., Cheng, K., Ding, H., and Xiao, C., “Innovative Design and Analysis of a Longitudinal-Torsional Transducer with the Shared Node Plane Applied for Ultrasonic Assisted Milling,” Proceedings of the Institution of Mechanical Engineers, Part C: Journal of Mechanical Engineering Science, Vol. 233, No. 12, pp. 4128-4139, 2019.
[https://doi.org/10.1177/0954406218797962]

-
Zhang, C. S. and Li, L., “A Coupled Thermal-Mechanical Analysis of Ultrasonic Bonding Mechanism,” Metallurgical and Materials Transactions B, Vol. 40, No. 2, pp. 196-207, 2009.
[https://doi.org/10.1007/s11663-008-9224-9]


Professor in the Department of Mechanical Engineering, Incheon National University. His research interest is Ultrasonic welding and cutting.
E-mail: dspark@inu.ac.kr

Ph. D. candidate in the Department of Mechanical Engineering, Graduate school, Incheon National University. His research interest is ultrasonic welding.
E-mail: kkjb0525@hanmail.net

MS candidate in the Department of Mechanical Engineering, Graduate school, Incheon National University. His research interest is ultrasonic welding.
E-mail: kooi45645@naver.com

