Application of Fractography and Finite Element Analysis Adopting Elastic Foundation Stiffness to Improve Fatigue Life of Main Shaft in Mechanical Press
Copyright © The Korean Society for Precision Engineering
This is an Open-Access article distributed under the terms of the Creative Commons Attribution Non-Commercial License (http://creativecommons.org/licenses/by-nc/3.0) which permits unrestricted non-commercial use, distribution, and reproduction in any medium, provided the original work is properly cited.
Abstract
The main shaft of a mechanical press inevitably includes significant stress concentrations that can trigger severe mechanical damage and finally lead to failure under repetitive use. In this study, an efficient procedure to quantitatively evaluate the fatigue life of the shaft system including the main shaft and its support bearings, based on the macroscopic failure analysis of the main shaft broken during actual use, was investigated. For this purpose, the bearing support was modeled as an elastic foundation, and the elastic foundation stiffness value was varied to determine the optimal value that best simulates the failure behavior, especially with respect to the failure location and failure sequence, of an actual shaft. While the finite element mesh size was kept the same, only the effect of elastic foundation stiffness was investigated. The optimum value for the main shaft investigated in this study was approximately 60 N/mm3, and the fatigue life of the shaft was evaluated based on the conventional maximum principal stress theory. Based on this, two modified designs to enhance the fatigue life of the existing shaft are proposed.
Keywords:
Elastic foundation stiffness, Fatigue life, Finite element analysis, Fractography, Main shaft, Mechanical press키워드:
탄성지반강성, 피로수명, 유한요소해석, 파면해석, 주축, 기계식 프레스1. Introduction
There are many high-capacity presses with compressive loads of more than 1 MN in the industrial manufacturing fields of powder metallurgy, metal forming, and metal shaping [1-4]. Mechanical presses are still preferred over hydraulic or electromagnetic presses, owing to their cost-effectiveness, and thus are widely used in industrial fields such as automotive component manufacturing [4,5]. A crankshaft or a cam and shaft is utilized to convert the rotational motion of a motor into the reciprocating motion of a ram [6,7]. In the case of an ultrahigh-capacity press, a cam and follower is advantageous in terms of manufacturing cost and ease of maintenance. A main shaft holding cams is vulnerable to failure, owing to a large number of stress concentration sources caused by carrying adjoining components as well as the simultaneous application of both flexural loads transmitted through the cams and torsional loads from the motor. Henceforth, main shafts should be designed to have an infinite life, but failures still occur in high-capacity mechanical presses.
Several previous studies used metallurgical analysis, such as fractography and material characterization, as well as finite element simulations to elucidate the causes of failure of various shafts for several machines, such as a linear motor compressor and a positive displacement motor [8-10]. Metallurgical analyses reveal traces of actual failure that are not controversial if performed correctly [11,12]. On the other hand, finite element analyses of shafts tend to produce different results depending on the modeling methods such as mesh size, especially with respect to the shaft and bearing support modeling. Therefore, it is necessary to improve the accuracy of analysis through comparison with real cases. Seifi and Abbasi [13] modified their initial finite element model by updating the friction coefficient at the contact surface of the interference shaft and bush joints through conducting suitable experiments. Guddad and Venkataram [14] conducted a tooth contact analysis of a gear pair, considering shaft and bearing flexibilities for the varying center distance between a gear and pinion and backlash to evaluate the stress in gears. Yang, et al. [15] suggested a dynamic model of a rotor-bearing-casing system with a nonlinear rolling element bearing. They considered nonlinear factors such as Hertzian contact, time-varying characteristics, clearance, and slippage in the bearing model. Recently, Engel and Al-Maeeni [16] proposed an integrated reverse engineering approach using nondestructive inspections, analytical calculations, and finite element analysis for recovering the shaft of a rotary draw bending machine.
The elastic foundation (or elastic support) is a way of specifying a spring stiffness per unit area that only acts in the direction normal to the face of the element [17]. The elastic foundation is typically utilized to mimic an external elastic support on a wall. If the stiffness of the foundation is similar to that of the structure or a nonuniform support is present, then the frictionless support assumption must be replaced with a more explicit model of the foundation. The advantage of these elements over individual springs is that they automatically adjust the spring support stiffness for a variable size mesh. In the case of a mechanical press, a main shaft is made of high-strength steel alloy, but the shaft supporting structures (or elastic foundation), which consist of journal bearings, bearing housings, and general structural steel frames, are made of materials of even lower stiffness.
The main aim of the present study included developing an efficient finite element method that can effectively evaluate the fatigue life of a main shaft based on engineering failure analysis results. An elastic foundation model was adopted to simulate the failure locations and failure sequences of a main shaft based on the conventional maximum normal stress theory.
2. Details of Main Shaft
2.1 Components Related to Main Shaft
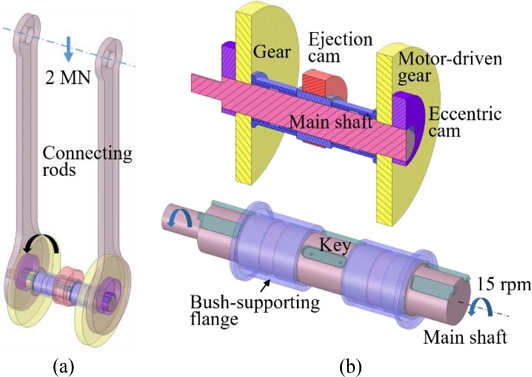
In the mechanical press we analyzed, the main shaft performed two key functions. First, it converted rotational motion, which was generated by a motor (30 kW) and transmitted through a reduction gear, into reciprocating motion with the aid of eccentric cams and connecting rods to generate 2 MN of compressive force required to manufacture automotive parts. Next, it rotated the ejection cam installed at its middle section to produce reciprocating motion of the cam follower and forcibly eject a component from the forming jig after completing pressing. The second process did not occur at the same time as the first and the force generated during ejection was relatively small in magnitude, and was thus ignored in the following analyses.
A 3D model is shown in Figs. 1 to illustrate the power transmission mechanism 1(a) and the major components to be analyzed 1(b). The main shaft suffered significant stress concentrations owing to the three sets of keyways to secure the adjoining components of eccentric cams, gears, and an ejection cam. The main shaft including a set of two flanges holding four metal bushes was the structure to be analyzed in this study.
2.2 Fabrication Processes, Material Properties, and Metallurgical Observations
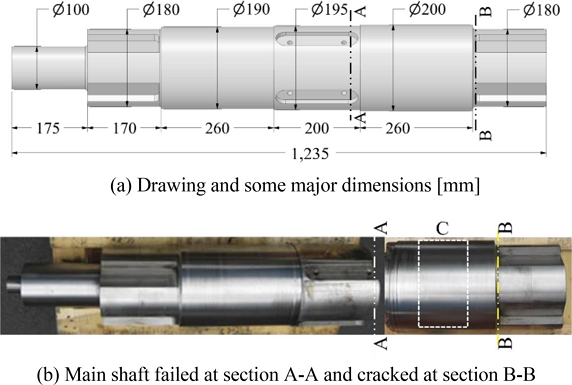
The main shaft was made of a round Ni-Cr-Mo steel (AISI 4340) cylinder through forging, annealing, coarse machining, quenching, tempering, fine machining, grinding, and finally, machining of keyways. The shaft had the dimensions shown in Fig. 2(a) and the failure occurred at the sections denoted by A-A and B-B. The crack most likely originated at A-A and B-B, and the final failure occurred at A-A.
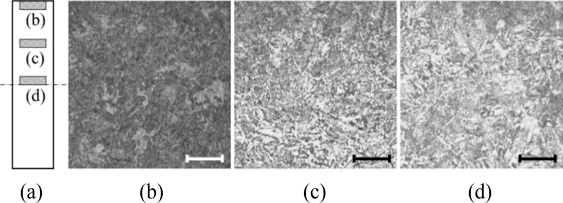
The necessary metallurgical and tensile test samples were taken from the region C, as indicated by the dashed rectangle in Fig. 2(b). The chemical compositions based on weight percentage are given in Table 1. The compositions of C, Cr, and Mo were slightly lower than the lower specification designated by ASTM A29M [18], but they met the local standard. The tensile tests were conducted thrice based on ASTM E8M [19]. The averaged 0.2% proof stress was 645, tensile strength was 823 MPa, elongation was 23.6%, and Rockwell hardness was 24.8. The chemical and mechanical properties satisfied all the necessary requirements. The microstructures were observed using samples collected at three locations, as shown in Fig. 3(a). The martensitic microstructure was observed near the surface Figs. 3(b) and the Bainitic microstructure was observed in the interior 3(c) and 3(d). No problematic defects or microstructures were found with respect to the metallurgy.
3. Failure Analysis by Macro Fractography for a Failed Main Shaft
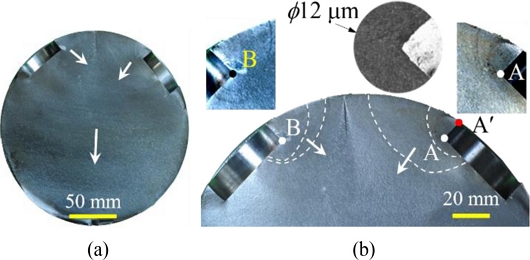
The main shaft was broken as shown in Fig. 4(a) after 8.9 million cycles of operation. The broken counterpart of Figs. 4(a) is shown in 4(b). It was noted that the failure occurred approximately 10 mm away from the step caused by the diameter change from 200 to 195 mm. Detailed observations of the shaft showed that cracks also initiated and propagated at section B-B as shown in Fig. 4(c), in addition to the failure at A-A. This suggested that the stress states at A-A and B-B would be similar and that the stress at A-A was the highest. The fracture surface at A-A is shown in Figs. 5(a) and its enlarged view is shown in 5(b). As can be seen in Fig. 5, vivid beach marks were observed around the corners of the keyways. The cracks initiated at the sharp corners, such as points A and B in Fig. 5(b), owing to high stress concentrations. The inset at the top-right of Fig. 5(b) shows an enlargement of point A, where the diameter of 12 μm represents the diameter of the magnified portion. The fracture surface showed a typical pattern under alternating flexural loading at low stress amplitude [12].
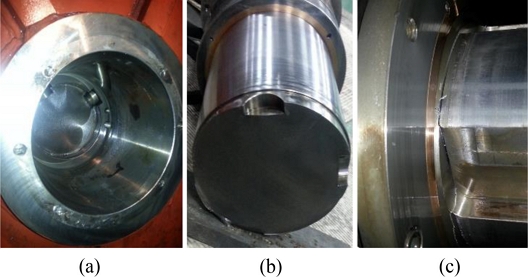
Failed main shaft: (a) Complete fracture at section A-A in a press, and (b) Failed part taken from (a), (c) crack at section B-B
4. Fatigue Life Estimation of Main Shaft by Finite Element Analysis
4.1 Effects of Elastic Foundation Stiffness
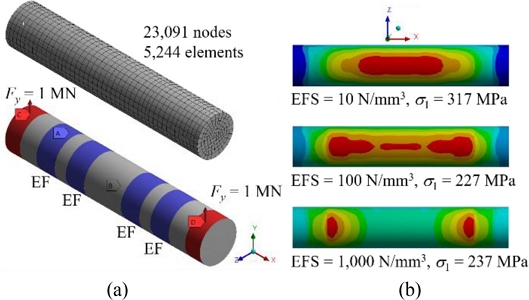
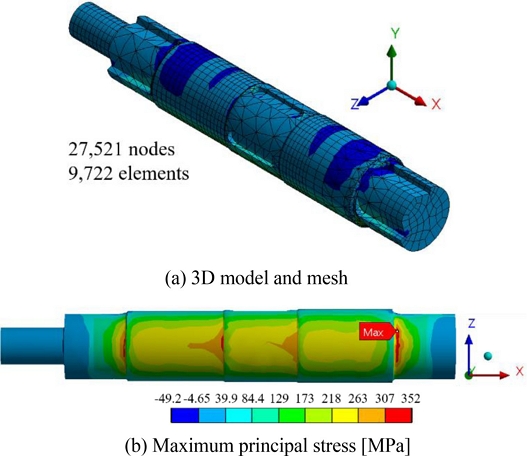
To study the effects of elastic foundation stiffness (EFS), the main shaft was simplified to a cylinder of diameter 200 and length 1,060 mm. In Fig. 2(a), the section of length 175 mm at the left end was not loaded at all, which was thus removed from the total length of 1,235 to obtain the shortened shaft of length 1,060 mm. ANSYS Workbench (Ver. 2021 R1) was used to conduct the finite element analysis. The cylinder was meshed with hexahedral elements, and the number of nodes and elements were 23,091 and 5,244, respectively. The boundary and load conditions are represented in Fig. 6(a). The four metal bushes (or thrust bearings) were modeled by elastic foundation (or elastic support) and the maximum load of 2 MN was applied, with 50% of the bearing load applied to each end of the shaft. Additionally, in order to prevent the rigid body motion of the cylinder, the displacement of the central point of the cylinder was fixed using the remote displacement. The magnitude and location of the maximum principal stress varied with the EFS values, as shown in Fig. 6(b). The maximum principal stress (σ1) was selected as a key parameter to predict failure, because the fracture surface exhibited brittle fracture, as shown in Fig. 5. As the value of EFS increases, the maximum stress point tended to move from the interior to the exterior of the shaft. In the actual main shaft analysis, the optimum EFS value should be found and used to simulate the actual failure locations.
4.2 Stress Distribution for an Asymmetric Cylinder
The main shaft was fabricated asymmetrically, as shown in Fig. 2(a), for easy assembly and disassembly on the mechanical press. The maximum principal stress for the asymmetric model is shown in Fig. 7. In this case, the load was applied symmetrically, with 1 MN applied to the left and right ends as shown in Fig. 6(a). As can be seen in Fig. 6, the maximum stress always occurred at the left part, irrespective of the EFS values. However, this was completely different from the actual failure case. This was presumably because the mechanical press had an operating mechanism as shown in Fig. 1(a). That is, if the deformation of the connecting rod in Fig. 1(a) is ignored, the left and right connecting rods move by the same amount, so it is reasonable to assume that the main shaft connected to the connecting rod operates by displacement control, not load control. In addition, to monitor the state of the operating press, the amount of deformation at the end of the shaft is regularly measured using a dial gauge, and when converted to the value at the end of the shaft model used in this analysis, it was approximately 1 mm.
Maximum principal stress distribution for an asymmetric simple model under symmetric bearing loading (EFS = 500 N/mm3). The left diameter is 190 mm and the right diameter is 200 mm
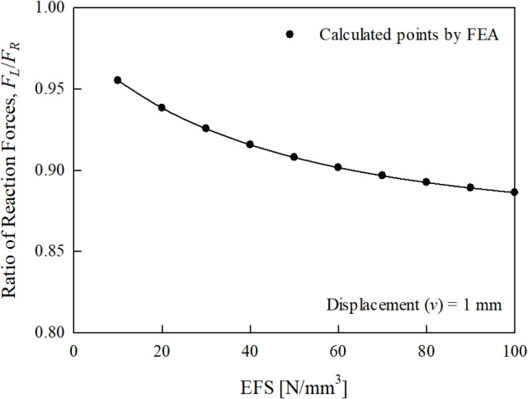
Therefore, instead of a uniform force applied at both ends, uniform displacements of 1 mm were applied to both ends as shown in Fig. 8, and then the reaction forces at the loading points were calculated according to the change in the EFS value. The ratio of the left to the right reaction force with respect to the EFS when a constant displacement of 1 mm was applied to both ends of the shaft is shown in Fig. 9. As the EFS increases, the ratio of the reaction forces decreases, which means that the force on the right side increases. In order to set an appropriate EFS value, the correlation between the calculated maximum principal stress and the actual failure location was required.
4.3 FEA for Failed Main Shaft and Fatigue Life Prediction
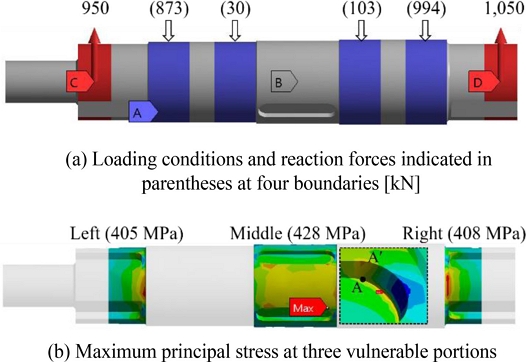
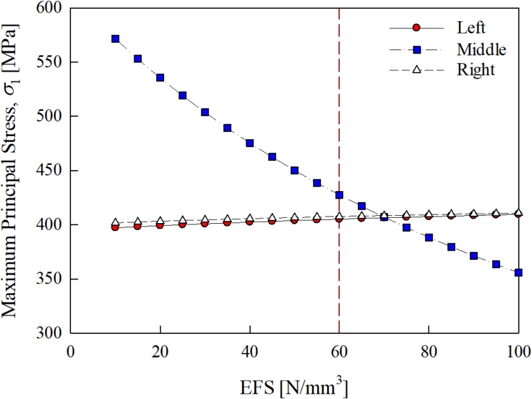
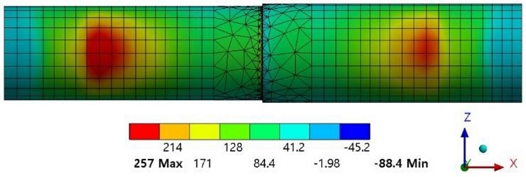
Based on the loading cycle diagram and previous analyses, the main shaft was modeled as shown in Fig. 10(a) because it suffered the maximum bending load at the position shown in the figure. The maximum principal stresses of the three main portions (Left, Middle, Right) denoted in Figs. 10(b) were calculated by varying the EFS from 10 to 100 N/mm3, as shown in 11. The left and right stresses were not significantly affected by the EFS value, but the stress at the middle changed significantly. The EFS value was chosen as the optimal value of 60 N/mm3 to simulate the actual failure behavior and was held constant for all the analyses. The maximum principal stress values denoted in Fig. 10(b) were calculated with the ESF value of 60 N/mm3. The location of the maximum principal stress in the middle portion depends on the size of the mesh used, but when the mesh size was 1.7 mm or less, the maximum principal stress occurred near A, the root of the notch groove, not point in A′ Fig. 5(b). Since the fatigue life was in the high-cycle fatigue regime, the conventional component stress-life (S–N) approach, or Basquin’s equation in Eq. (1), can predict fatigue life by adopting the universal slope of -0.085. The fatigue strength coefficient () was required to predict fatigue life; thus, it was calculated by Eq. (1).
| (1) |
4.4 FEA for the First Redesigned Main Shaft and Life Prediction
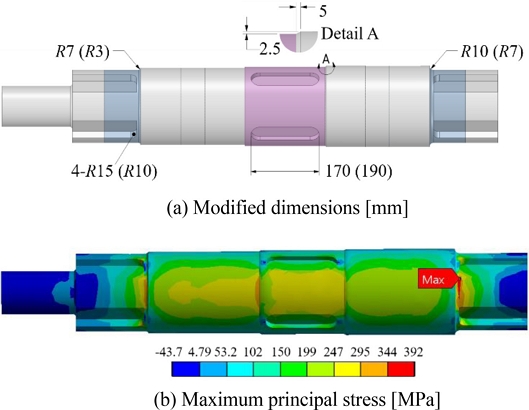
This redesign was effected to ensure that the existing system could be used with the fewest possible design changes. Some dimensions were changed to reduce the stress concentrations. The numbers in parentheses in Fig. 12(a) denote the original dimensions before the design change. In addition to the dimension changes, chamfering was applied at both edges of the middle portion, which are shaded in Fig. 12(a). Since the magnitude of stress in the finite element analysis largely depends on the shape and size of the mesh in the stress concentration region, the mesh size was maintained as constant as possible in the overall analysis based on the results of investigating the stress change according to the mesh size.
The maximum principal stress occurred at the right-hand side and its magnitude decreased from 428 to 392 MPa. The life calculated by Eq. (2) was enhanced by nearly a factor of 3 from 8.9 million cycles to 25 million cycles. If the endurance limit is estimated to be half of the tensile strength (823 MPa) of the actual shaft material, it would be approximately 410 MPa. Therefore, it can be estimated that the shaft would have infinite life at 392 MPa.
| (2) |
4.5 FEA for the Second Redesigned Main Shaft and Life Prediction
The redesign was effected to further improve the fatigue life even with major changes to existing systems. The broken main shaft was a structure in which tensile stress was generated where the keyways were machined and when the maximum flexural load was applied to the shaft. As shown in Figs. 13(a), the original main shaft as shown in 10(a) was only rotated by 135 degrees, such that the keyways were placed in the neutral axis or compressive stress area when the maximum flexural load was applied to the shaft. In other words, although Figs. 10(a) and 13(a) have the same shape, it is a method to drastically reduce the magnitude of the stress on the shaft by changing the load diagram. In this case, the maximum principal stress occurred at the right-hand side and its magnitude decreased from 428 to 352 MPa. The life calculated by Eq. (3) was enhanced from 8.9 million cycles to approximately 89 million cycles. This life can be regarded as infinite owing to the nature of the product.
| (3) |
5. Conclusions
A systematic and efficient durability estimation method based on the failure analysis of a broken main shaft and a meaningful life prediction using finite element analysis were proposed. The broken main shaft showed a brittle fracture surface and was found to be damaged by low flexural stress. The main shaft plays a key role in a mechanical press, and it was found that the finite element analysis should be performed by considering displacement control, rather than force control. Thrust bearings (or bushes) used to support the main shaft could be modeled by elastic foundations, and the EFS value of 60 N/mm3 was obtained by comparing the finite element analysis results with actual failure behavior, especially with respect to failure locations and failure sequence. Two new designs were suggested to improve the durability of the main shaft. As in the first proposed model, the fatigue life of the main shaft can be effectively improved by relieving the stress concentration by increasing the fillet radius. Fatigue life can be significantly increased if the shaft assembly is redesigned so that the source of stress concentration is in the neutral plane or in the compression region when the maximum bending load is applied. In the future, it is necessary to verify the validity of the proposed method using miniaturized models.
NOMENCLATURE
| σ1 : | Maximum Principal Stress |
| b : | Fatigue Strength Exponent |
| Nf : | Fatigue Life to Failure in Cycles |
| Sa : | Stress Amplitude |
| : | Fatigue Strength Coefficient |
Acknowledgments
This research was supported by the Kumoh National Institute of Technology (No. 2019-104-080). We would like to thank Editage (www.editage.co.kr) for English language editing.
REFERENCES
-
Akhtar, S., Saad, M., Misbah, M. R., Sati, M. C., (2018), Recent advancements in powder metallurgy: A review, Materials Today: Proceedings, 5(9), 18649-18655.
[https://doi.org/10.1016/j.matpr.2018.06.210]

-
Cristofolini, I., Molinari, A., Zago, M., Amirabdollahian, S., Coube, O., Dougan, M., Larsson, M., Schneider, M., Valler, P., Voglhuber, J., (2019), Design for powder metallurgy: predicting anisotropic dimensional change on sintering of real parts, International Journal of Precision Engineering and Manufacturing, 20(4), 619-630.
[https://doi.org/10.1007/s12541-019-00030-2]

-
Durand, C., Bigot, R., Baudouin, C., (2018), Contribution to characterization of metal forming machines: application to screw presses, Procedia Manufacturing, 15, 1024-1032.
[https://doi.org/10.1016/j.promfg.2018.07.391]

-
Osakada, K., Mori, K., Altan, T., Groche, P., (2011), Mechanical servo press technology for metal forming, CIRP Annals, 60(2), 651-672.
[https://doi.org/10.1016/j.cirp.2011.05.007]

-
Cheng, J., Zhou, Z., Feng, Y., Liu, Z., Zhang, Y., (2018), Thermo-Mechanical coupling analysis of the actuating mechanism in a high speed press, International Journal of Precision Engineering and Manufacturing, 19(5), 643-653.
[https://doi.org/10.1007/s12541-018-0078-z]

-
Halicioglu, R., Dulger, L. C., Bozdana, A. T., (2016), Structural design and analysis of a servo crank press, Engineering Science and Technology, an International Journal, 19(4), 2060-2072.
[https://doi.org/10.1016/j.jestch.2016.08.008]

- Angelopoulos, V., (2015), A model-based design approach to redesign a crankshaft for powder metal manufacturing, M.Sc. Thesis, KTH Royal Institute of Technology.
-
Lanzutti, A., Andreatta, F., Raffaelli, A., Magnan, M., Zuliani, L., Fantoni, M., Fedrizzi, L., (2017), Failure analysis of a continuous press component in MDF production plant, Engineering Failure Analysis, 82, 493-500.
[https://doi.org/10.1016/j.engfailanal.2017.03.016]

-
Khot, M., Gawali, B., (2015), Finite element analysis and optimization of flexure bearing for linear motor compressor, Physics Procedia, 67, 379-385.
[https://doi.org/10.1016/j.phpro.2015.06.044]

-
Liu, Y., Lian, Z., Xia, C., Qian, L., Liu, S., (2019), Fracture failure analysis and research on drive shaft of positive displacement motor, Engineering Failure Analysis, 106, 104145.
[https://doi.org/10.1016/j.engfailanal.2019.08.011]

- George, F. V., (2004), Metallography and microstructures, ASM Handbook, 9.
- ASM International, (1987), Fractograhy, ASM Handbook, 12.
-
Seifi, R., Abbasi, K., (2015), Friction coefficient estimation in shaft/bush interference using finite element model updating, Engineering Failure Analysis, 57, 310-322.
[https://doi.org/10.1016/j.engfailanal.2015.08.006]

-
Guddad, R., Venkataram, N., (2017), Effect of shaft and bearing flexibilities on gear tooth contact analysis, Materials Today: Proceedings, 4(10), 10823-10829.
[https://doi.org/10.1016/j.matpr.2017.08.034]

-
Yang, Y., Yang, W., Jiang, D., (2018), Simulation and experimental analysis of rolling element bearing fault in rotor-bearing-casing system, Engineering Failure Analysis, 92, 205-221.
[https://doi.org/10.1016/j.engfailanal.2018.04.053]

-
Engel, B., Al-Maeeni, S. S. H., (2019), An integrated reverse engineering and failure analysis approach for recovery of mechanical shafts, Procedia CIRP, 81, 1083-1088.
[https://doi.org/10.1016/j.procir.2019.03.257]

- Imaoka, S., (2012), Elastic foundation stiffness, ANSYS. https://dokumen.tips/documents/efs-ansys-tutorial.html
- ASTM A29M-20, (2020), Standard specification for general requirements for steel bars, carbon and alloy, hot-wrought.
- ASTM E8M-21, (2021), Standard test methods for tension testing of metallic materials.

Principal Researcher in the Department of Materials Testing and Evaluation at Korea Institute of Materials Science. His interest is the failure analysis and manufacturing process design for metallic materials and components.
E-mail: wjyang@kims.re.kr

Professor in the Department of Mechanical System Engineering at Kumoh National Institute of Technology. His current research interests include microscopic behavior of micro- and nano-materials, synthesis and evaluation of colorless and transparent polyimide films, micro-LED transfer, microstructure fabrication and behavior studies using a focused ion beam, and experimental and finite element stress analysis.
E-mail: ocs@kumoh.ac.kr

