Design of a 3-Axis Compliant Robotic Deburring Tool with Force Sensing and Variable Stiffness Capabilities
Copyright © The Korean Society for Precision Engineering
This is an Open-Access article distributed under the terms of the Creative Commons Attribution Non-Commercial License (http://creativecommons.org/licenses/by-nc/3.0) which permits unrestricted non-commercial use, distribution, and reproduction in any medium, provided the original work is properly cited.
This paper was presented at KSPE Spring/Autumn Conference in 2024
Abstract
In this paper, a deburring tool with 3-axis compliance is presented for deburring using a robot manipulator. Compliance is provided with beam structures instead of pneumatic pressure, which enables integrated 3-axis force sensing and variable stiffness. Two radial compliances were achieved using 4-PSS (Prismatic-Spherical-Spherical) legs, with P joints composed of cantilever beams. The one axial compliance was configured with two ball bushings and a linear spring. Strain gauges were attached to cantilever beams and a load cell was mounted between the linear spring and the universal joint to perform force sensing. The stability of vibrations and force sensing were verified through deburring experiments using the proposed deburring tool. Additionally, experiments on automatic offset for applying a constant force during deburring were conducted and results were validated by comparing the workpiece before and after the deburring process.
Keywords:
Deburring, Compliance, Parallel mechanism, Force sensing, Variable stiffness키워드:
디버링, 순응, 병렬 메커니즘, 힘측정, 가변 강성1. Introduction
Through post-machining processes in production, such as deburring and grinding, parts can achieve high value. Therefore, it is essential to perform deburring economically while minimizing scrap and rework [1]. In this context, workers are exposed to high levels of noise and vibration. Furthermore, it is becoming increasingly difficult to find workers willing to perform highly repetitive tasks. To address these issues, specialized CNC (Computer Numerical Control) machines can be used for deburring operations; however, the high investment costs are considered unsuitable for high-mix low-volume processes. The deburring using robot manipulators has been a focus of research for a long time as a cost-effective and suitable alternative, but transitioning from research to industrial applications has been challenging [2]. The robots are rarely used for contact operations such as machining and finishing. The contribution of robots in machining and finishing applications remains only about 2% [3]. Studies [4,5] on the challenges and obstacles of robotic machining have identified and discussed problems such as complex programming methods, low accuracy, and insufficient rigidity.
In the manufacturing industry, mechanical interaction with the environment or the object being manipulated is required. In this context, robot manipulation is performed within a confined workspace, and interaction forces related to the task are encountered. For tasks requiring constrained manipulation, such as deburring, both the position of the robot’s end-effector and the contact force should be considered. Therefore, the interaction force should be accepted rather than resisted [6]. Robotic deburring is generally performed using a spindle driven by a pneumatic rotary actuator. Typically, robotic deburring is performed in two ways, where either the deburring tool is fixed while the workpiece is manipulated by the robot, or the workpiece is fixed while the deburring tool is manipulated by the robot. Additionally, when the spindle contacts the workpiece during the deburring operation, impact forces are generated, causing impulse peaks in the system and potentially leading to unexpected large vibrations. Therefore, deburring operations using robots with high stiffness can be challenging [7]. In the case of robotic deburring, it is challenging to achieve high precision deburring through position control due to the varying geometric dimensions and material properties of the burr on the workpiece. To address this issue, recent studies have focused on force/position control strategies, and the compliance control of robotic deburring based on force impedance has also been studied [8].
Currently, in some manufacturing industries, robotic deburring operations are enhanced with increased stability due to the compliance provided by commercial robotic deburring tools, such as those from ATI [9] and SCHUNK [10]. Commercial robotic deburring tools provide compliance through a pneumatic system. Additionally, recognizing the importance of force sensing, most of the precise deburring operations are performed by installing commercial force/torque (F/T) sensor between the deburring tool and the robot end-effector. However, the integration of sensors and robotic tools can lead to increased costs, additional interfaces, and more complex control.
Chatter is a vibration that occurs during machining, negatively impacting surface quality and machining efficiency. Studies [11,12] have focused on detecting and predicting chatter, as well as reviewing research and advancements related to chatter stability.
In this paper, a deburring tool with 3-axis compliance was proposed. The compliance is provided by simple beams and springs instead of pneumatic pressure in commercial deburring tools, which enables integrated force sensing and variable stiffness. The hybrid mechanism for 3-axis compliance was designed based on the previous research of compliance devices [13-15]. The mechanism of the proposed deburring tool was explained, and the static analysis was performed. A prototype of the proposed deburring tool was developed, and stability in vibration and force sensing was verified through experiments. An automatic offset was applied to perform deburring with a constant force. Additionally, the experiment results of the automatic offset were presented, and the results were validated by comparing the workpiece before and after deburring.
2. Mechanism of Robotic Deburring Tool
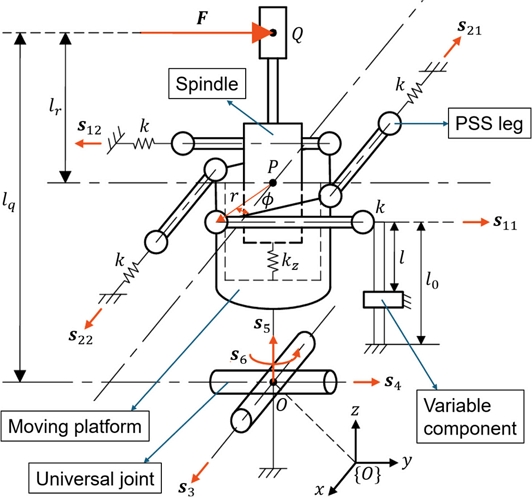
The proposed 3-axis deburring tool mechanism is a hybrid structure consisting of a 2-DOF parallel mechanism and one prismatic joint in series, featuring two radial compliances and one axial compliance, respectively. As shown in Fig. 1, the two radial compliances are achieved by the 2-DOF parallel mechanism. The moving platform is connected to the fixed base by a universal joint and two rotational motions by the universal joint are supported with four PSS (Prismatic-Spherical-Spherical) legs. The P joint of each leg is composed of a cantilever beam (k), and the S-S chain of each leg is constructed using rod-end-bearings. The one axial compliance is achieved by connecting a P joint between the moving platform and a spindle base. For constraining axial rotation, the P joint is constructed with two ball bushings, and a linear spring (kz) is installed for one axial compliance.
In the deburring operation, the interaction force is generated as F at point Q. The center of the moving platform is denoted as point P, and the center of the universal joint is denoted as point O. The center distances are defined by
| (1) |
The Jacobian matrix with respect to point Q is obtained by
| (2) |
where s11 = +j, s12 = -j, s22 = +i, s3 = +i, s4 = +j, s5 = s6 = +k. Also, for the simplicity of expression, rs≡r×s is defined and is r obtained by
| (3) |
where r is distance between point P and S joint in Fig. 1, and c() and s() denote cos() and sin() functions, respectively.
The stiffness matrix is obtained as follows.
| (4) |
where kd = diag [k,k,k,k,kl,kl,kz,kt]. k and are defined as the stiffness of the cantilever beams and linear spring. kl and kt are defined as the structural stiffness of s3, s4 and s6 in the universal joint. Furthermore, kl and kt are approximated to infinite values compared to k and kz, the compliance matrix can be simplified as
| (5) |
In the compliance matrix, the elements other than (1,1), (2,2) and (3,3) elements are relatively very small.
The algorithm of calculating the force vector at point Q is as follows. First, joint forces of the beams and linear spring are measured. The beam and linear spring deflections are calculated. Here, the infinitesimal displacements along the joint axes are defined as δq = [δx11, δx12, δx21, δx22, 0, 0, δx5, 0]T. The deflections at point Q, δD, can be calculated through the forward kinematics or the Jacobian matrix.
| (6) |
where the Jacobian matrix is a non-square matrix and is calculated using the pseudoinverse matrix. When δD = [δx, δy, δz, δθx, δθy, δθz] and the interaction force is given as δF = [δfx, δfy, δfz, 0, 0, δnz], the relationship between the force and deflection vectors is calculated through the compliance matrix by δD = C δF. Finally, the forces at point Q can be obtained by
| (7) |
3. Prototype of Robotic Deburring Tool
3.1 Force Sensing
For sensing the interaction force at the end of the proposed deburring tool, it is required to measure the joint forces and calculate the joint deformation. The joints composed of cantilever beams are equipped with strain gauges (CAS AP-11-T30S-120-EC [16]) attached to the beams to measure strain. Additionally, the joint calibration is performed to define the forces generated at the joints, and the interaction forces in the two radial directions are calculated using Eq. (7). The joint composed of linear spring is measured for force using tension/compression load cell (CAS SMNT-25 [16]). Therefore, the interaction force in the one axial direction is calculated using Eq. (7).
3.2 Joint Calibration
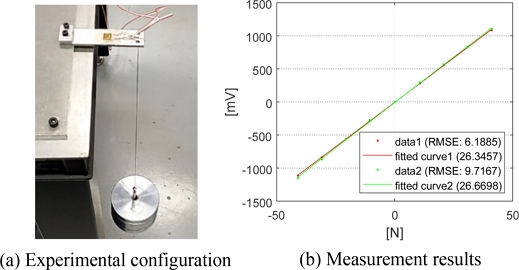
Each cantilever beam for force sensing was attached with strain gauge and a half-bridge circuit was utilized. The strain gauges were attached only to the two cantilever beams, excluding the symmetric PSS legs. As shown in Fig. 2(a), weights (1.034 kg each) were incrementally added to the end of the cantilever beam, up to a total of four weights, and the voltage from the strain gauges was measured. Additionally, the weight of the hooks used is 0.05 kg. The inverted cantilever beam was also measured, and the measurement results are shown in Fig. 2(b). The maximum RMSE (Root Mean Square Error) is 9.7167 mV, which is within 1% of the measurement range. Therefore, the gains G0, i(i = 1, 2) for each calibration results are G0, 1 = 26.3457 and G0, 2 = 26.6698 [N/mV], respectively, for force sensing of the deburring tool.
3.3 Natural Frequency
The proposed deburring tool utilizes high-speed rotation for the deburring process, which may result in significant vibrations due to the material of the workpiece, the type of tool tip, and the high-speed rotary actuator used. Although the vibration frequencies in machining are variable, the proposed deburring operation utilizing high-speed rotation generates at least several kHz [17,18]. Therefore, the natural frequency of the proposed deburring tool was analyzed using FEM (Finite Element Method), as shown in Table 1. The proposed deburring tool is stable against the vibrations of the deburring operation, as its natural frequencies up to the 5th mode are below 0.7 kHz.
3.4 Variable Stiffness Capabilities and Prototype
In deburring operations, the interaction force is calculated based on the stiffness of the proposed deburring tool. To vary the two radial stiffnesses, a variable component was equipped to change the effective length of the cantilever beams. The beam stiffness can be significantly varied, as it is inversely proportional to the square of the effective length for the beams. When the beam stiffness is k0 with the initial beam length l0, the gains for force sensing are obtained as follows, based on the variable beam stiffness k corresponding to the variable beam length l, as shown in Fig. 1.
| (8) |
where k0 = 72.3[N/mm]. As the cantilever beams are assembled with the variable component of the deburring tool, the effective length is reduced. Therefore, the stiffness and gains for force sensing are respectively satisfied by k0 < k and G0, i < Gi. The minimum stiffness was calculated as k = 116.8 [N/mm], and the experiments were conducted with this minimum stiffness. According to Eq. (8), the value of Gi was obtained as G1 = 42.5294 and G2 = 43.0526 [N/mV], respectively.
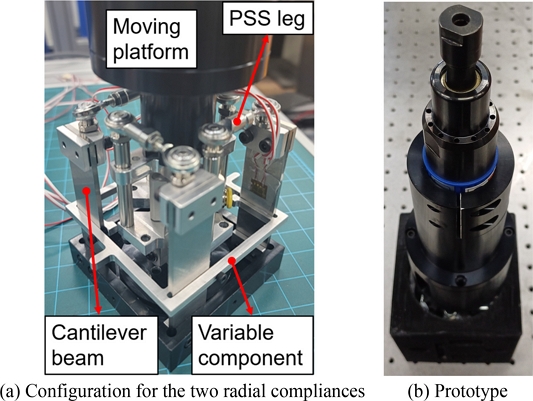
As shown in Fig. 3(a), the configuration for the proposed deburring tool is illustrated, and 3(b) presents the prototype of the proposed deburring tool. Additionally, a pneumatic rotary actuator for deburring is mounted on the moving platform.
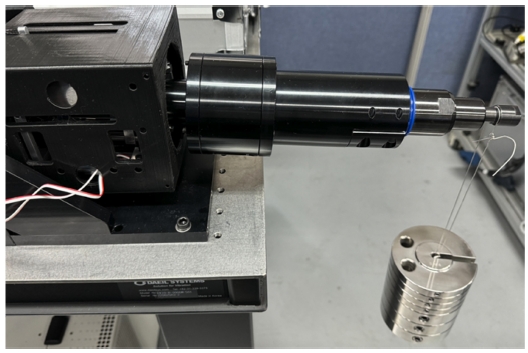
The resultant values from the experiments in Fig. 4 were compared with the reference values to evaluate the performance, as shown in Table 2. All values in Table 2 represent the averages of 10 measurements. For the reaction force, an error rate of 7.3% was calculated; however, the repeatability is 0.35 N, allowing the error rate to be minimized through error compensation. In the case of resolution, measurements were taken after first hanging 50 N to eliminate mechanical losses, followed by an additional 0.50 N.
4. Deburring Experiments
4.1 Measurement Experiments in Two Radial Directions
Deburring experiments were conducted using the prototype of the deburring tool, as shown in Fig. 5. For the deburring experiments, a collaborative robot (UR10e [19]) was position controlled, and the workpiece was composed of a rectangular aluminum plate (material: AL6061). The mounted pneumatic rotary actuator was operated at approximately 20,000 rpm under a pressure of 6 MPa. The tooltip for deburring was equipped with a cylindrical grinding stone. Initially, to focus on the analysis of the two radial directions, the mobility and measurements in the one axial direction were deliberately excluded from the experiment.
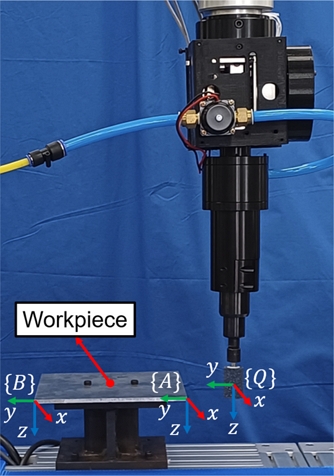
Configuration for deburring experiments (with the tool rotating in the z-axis direction based on the {Q} frame)
Through a simple deburring experiment, it was experimentally demonstrated that a reduction in interaction forces leads to increased vibrations. Therefore, assuming a low force of 5 N, it was confirmed that vibrations of less than 1 N were observed during deburring at a single point, as shown in Fig. 6.
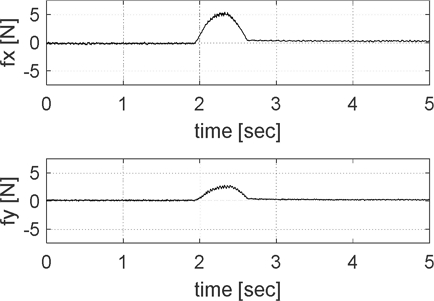
Experiment result of maximum vibration occurring at minimum interaction force during the point deburring
In subsequent experiments, the interaction force of the deburring tool was measured with 1 ms, and the experiment results were recorded every 50 ms by averaging 50 data.
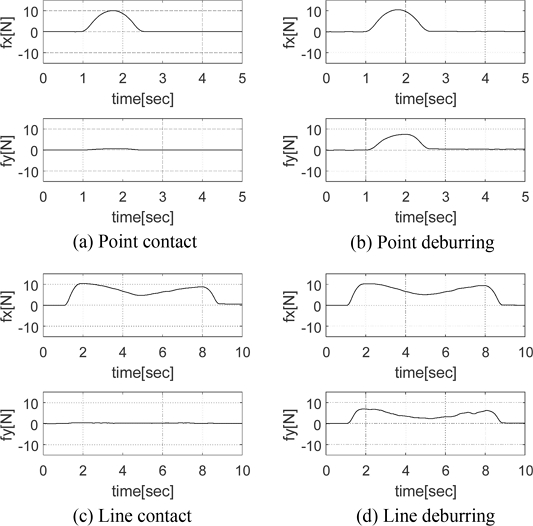
Figs. 7(a) and (b) show the interaction performed at a single point on the workpiece using the deburring tool, while Figs. 7(c) and (d) show the interaction performed along the edge line of the workpiece using the deburring tool. Figs. 7(a) and (c) show the only contact performed on the workpiece using the deburring tool, while Figs. 7(b) and (d) show the deburring operation performed on the workpiece using the deburring tool. As shown in Fig. 7(b), during the deburring operation at a single point, force was applied in the -x-axis direction based on the {Q} frame, resulting in a measured +fx value as the reaction force. Additionally, the force generated by the deburring operation resulted in a reaction force fy. As shown in Fig. 7(d), the path for line deburring is defined from the {A} frame to the {B} frame of the workpiece in Fig. 5. The fx value is affected by the size of the burrs present along the path on the workpiece, and as the burr size increases, fx value also increases. Therefore, fy value generated during the deburring operation is also affected by the size of the burrs. In other words, the proposed deburring tool adapts to the size of the burrs and performs the deburring operation with a force proportional to their size. Finally, according to the experimental results, significant vibrations did not occur, and the performance of stable force sensing was verified.
4.2 Deburring Experiments with a 3-Axis Deburring Tool
In this section, deburring experiments were conducted using the proposed 3-axis deburring tool. In previous experiments, deburring was performed with compliance to the shape of the workpiece, resulting in force sensing that varied depending on the shape of the workpiece. However, when deburring operations require a constant force, automatic offsets should be applied along the working path.
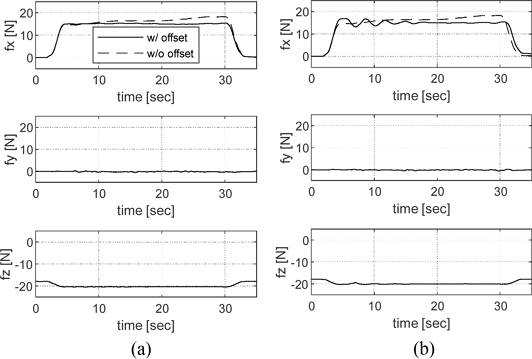
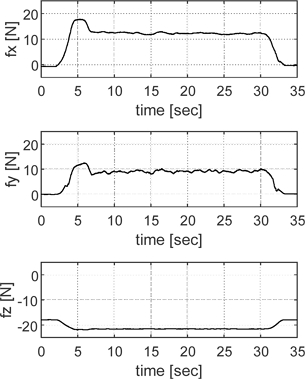
First, the working path was divided into 50 working points between the paths of the line deburring process. At each working point, an automatic offset was applied based on the force measured at the previous working point. The robot's working speed was set to 10 mm/s with an acceleration of 20 mm/s2. Additionally, position gain (Gp) was added to the automatic offset, and measurement experiments were conducted along the working path with contact only, as shown in Fig. 8, where fz is generated as a pre-load of 17.94 N, corresponding to the initial deformation (2.3 mm) of the applied linear spring stiffness (kz = 7.8 [N/mm]). The appropriate Gp is shown in Fig. 8(a). When Gp is large, overshoot and undershoot were observed, as shown in Fig. 8(b). Therefore, it was verified that maintaining a constant force (15 N) was achieved through the automatic offset with an appropriate Gp. Also, the effect of fz can be identified. Second, the deburring experiment was conducted under the same conditions as before, and the results are presented in Fig. 9. It is noted that a large force occurred during the initial contact due to deburring. Although a constant force was maintained through the automatic offset, it was sustained at approximately 12.5 N rather than the target force of 15 N. Furthermore, the surface condition of the workpiece before and after the deburring process is shown in Fig. 10. The difference in surface roughness from the experiment result of the deburring process is presented in Table 3.

Comparison of surface conditions (a) before and (b) after deburring in experiment result of the deburring process
5. Conclusions
In this paper, a 3-axis deburring robotic tool with compliance, force sensing, and variable stiffness capabilities were presented and evaluated. The proposed deburring tool is designed with a hybrid structure consisting of a 2-DOF parallel mechanisms and one prismatic joint in series, and the prototype was fabricated. The performance of the prototype was evaluated through experiments. The deburring experiments were conducted using the prototype of the deburring tool, mounted on a collaborative robot. In conclusion, the proposed deburring tool was demonstrated to be stable against vibrations, and its effective force sensing performance was verified. Additionally, an automatic offset for maintaining a constant force during deburring was applied to force measurement experiments for line contact, and differences based on position gain were observed to determine the optimal position gain. Through deburring experiments on the workpiece, it was observed that a slight deviation from the target force occurred, but the ability to maintain a constant force was verified. Finally, the deburring results were validated by comparing the workpiece before and after the deburring process.
Acknowledgments
This work was supported by the R&D Project (No. S3367855) of the Small and Medium Business Administration (Korea).
REFERENCES
-
Kazerooni, H., (1988), Automated robotic deburring using impedance control, IEEE Control Systems Magazine, 8(1), 21-25.
[https://doi.org/10.1109/37.464]

-
Onstein, I. F., Semeniuta, O., Bjerkeng, M., (2020), Deburring using robot manipulators: A review, 2020 3rd International Symposium on Small-scale Intelligent Manufacturing systems (SIMS), 1-7.
[https://doi.org/10.1109/SIMS49386.2020.9121490]

- International Federation of Robotics - Statistical Department, World robotics 2014 industrial robots. http://www.worldrobotics.org/
-
Karim, A., Verl, A., (2013), Challenges and obstacles in robot-machining, IEEE ISR 2013, 1-4.
[https://doi.org/10.1109/ISR.2013.6695731]

- Posada, J. R. D., Kumar, S., Kuss, A., Schneider, U., Drust, M., Dietz, T., Verl, A., (2016), Automatic programming and control for robotic deburring, Proceedings of the ISR 2016: 47st International Symposium on Robotics, 1-8.
- Kazerooni, H., Guo, J., (1987), Design and control of the active compliant end-effector, Proceedings of the 1987 American Control Conference, 845-851.
-
Matour, M. E., Thormann, C., Winkler, A., (2022), Force controlled deburring using a collaborative robot, Proceedings of the 2022 26th International Conference on Methods and Models in Automation and Robotics, 425-429.
[https://doi.org/10.1109/MMAR55195.2022.9874311]

-
Xu, G., Wang, Z., Zhang, J., Yang, B., Wang, Z., Xu, Y., (2020), Compliance control of deburring robots based on force impedance, Proceedings of the 2020 Chinese Automation Congress (CAC), 79-84.
[https://doi.org/10.1109/CAC51589.2020.9327372]

- ATI Technologies Inc., Material removal tools. https://www.ati-ia.com/Products/deburr/deburring_home.aspx
- SCHUNK Intec Inc., Machining tools. https://schunk.com/fi/en/automation-technology/machining-tools/c/PUB_8325
-
Basit, A., Khan, N. B., Ali, S., Muhammad, R., Abduvalieva, D., Khan, M. I., Jameel, M., (2024), Chatter detection and suppression in machining processes: A comprehensive analysis, International Journal on Interactive Design and Manufacturing (IJIDeM), 18(6), 3751-3771.
[https://doi.org/10.1007/s12008-023-01716-8]

-
Zhang, X., Wan, X., Ran, X., (2024), Research progress on the chatter stability in machining systems, The International Journal of Advanced Manufacturing Technology, 131, 29-62.
[https://doi.org/10.1007/s00170-024-13050-8]

- Tsai, L. W., (1999), Robot analysis: The mechanics of serial and parallel manipulators, Wiley New York.
-
Kim, H. S., (2014), Kinestatic control using six-axis parallel-type compliant device, Journal of the Korean Society of Manufacturing Technology Engineers, 23(5), 421-427.
[https://doi.org/10.7735/ksmte.2014.23.5.421]

- Kim, H. S., (2018), Design of a 6-axis compliance device with f/t sensing for position/force control, Journal of the Korean Society of Industry Convergence, 21(2), 63-70.
- CAS, Strain gauge and load cell products. https://www.caskorea.co.kr/
-
Xu, W.-X., Zhang, L.-C., (2015), Ultrasonic vibration-assisted machining: principle, design and application, Advances in Manufacturing, 3, 173-192.
[https://doi.org/10.1007/s40436-015-0115-4]

-
Brehl, D. E., Dow, T. A., (2008), Review of vibration-assisted machining, Precision Engineering, 32(3), 153-172.
[https://doi.org/10.1016/j.precisioneng.2007.08.003]

- Universal Robots GmbH, The robot for deburring experiments. https://www.universal-robots.com/

Ph.D. candidate in the Department of Mechanical Convergence Engineering, Kyungnam University. His research interest is robotic hand, and force control.
E-mail: shark-cat@daum.net

Master’s candidate in the Department of Mechanical Convergence Engineering, Kyungnam University. His research interest is haptics, and tele-operation.
E-mail: jjh990709@naver.com

Professor in the Department of Mechanical Engineering, Kyungnam University. His research interest is autonomous assembly robot system, robotic tools, and parallel robots.
E-mail: hkim@kyungnam.ac.kr

