Fabrication and Characterization of Automotive Aspheric Camera Lens Mold based on Ultra-precision Diamond Turning Process
 ; Jun Sae Han1, 2, #
Copyright © The Korean Society for Precision Engineering
This is an Open-Access article distributed under the terms of the Creative Commons Attribution Non-Commercial License (http://creativecommons.org/licenses/by-nc/3.0) which permits unrestricted non-commercial use, distribution, and reproduction in any medium, provided the original work is properly cited.
Abstract
Here in, a high-quality automotive camera lens was developed based on an ultra-precision diamond turning core and cyclic olefin polymer (COP) injection molding process. To improve surface roughness and achieve the accuracy of plastic injection molding lens, systematic mold core machining process was developed and demonstrated using the diamond turning machine. The cutting tool path was generated by using NanoCAM 2D, and it was partly revised to prevent interference between the cutting tool and the workpiece. After the initial machining using the generated tool path, the compensation-cutting process was conducted based on the measured surface profile of an initially machined surface. After two times of compensation machining, the fabricated core mold showed a shape error of 100 nm between peak to valley (PV) and Arithmetic mean roughness (Ra) of 3.9 nm. The performance of the fabricated core was evaluated using an injection molding test. Injection molded aspheric plastic lens showed contrasts that were higher than 55% at 0.0 F, 30% at 0.3 F, and 20% at 0.7 F without any moiré phenomenon that meets the specification for automotive vision module with 1MP and 140° field of view.
Keywords:
Ultra-precision diamond turning, Aspheric lens, Automotive camera module, Injection mold, Compensation machining1. Introduction
The optical lens is a key component of a camera module that concentrates or diffuses light onto the image sensor. The lens can be classified into spherical, aspherical, free-form, etc. according to the shape of the surface profile [1-3]. Typically, in the case of a spherical lens, there is spherical aberration between the focused light beam from the centre and the outside of the lens, which degrades the quality of the image. To reduce the aberration, the lens module is composed of a large number of concave and convex lenses. However, there are problems such as increased thickness and weight, and reduced optical efficiency. In contrast, aspherical lenses have the shape of a surface profile rather than a part of a sphere or cylinder. Therefore, problems such as spherical aberration and shape distortion can be improved. Aspherical lenses also have the advantage of being thinner than spherical lenses [4]. Due to these advantages, ultra-precision aspherical lens modules are widely used for high integration and high functionality of advanced devices in high technology industries such as smartphones, automobiles, augmented reality (AR) and virtual reality (VR), and medicine [5-7].
In the mass production of ultra-precision aspherical plastic lenses, the multi-cavity injection process using multiple mould cores is used. The shape error and surface roughness of the mould core play a major role in the quality of the aspherical plastic lens produced in each cavity and the quality of uniformity between cavities. In addition, the difference in the quality of manufactured lenses between cavities requires additional processing costs for optical axis alignment and performance evaluation [8,9]. Therefore, there is a need for research into the manufacturing technology of aspherical mould cores with high shape accuracy and ultra-smooth surface as close as possible to the optically designed shape.
Typically, polishing, grinding and diamond turning processes have been widely studied as manufacturing methods for ultra-precision aspherical lens shape mold cores [10,11]. The polishing process has the advantages of a shallow deformed layer, no cutting tool marks on the machined surface, and superior surface roughness and shape accuracy [12]. However, since the polishing process requires a larger contact area between the polishing tool and the workpiece compared to the ultra-precision cutting process, it is difficult to apply when the mold core with small effective diameter has steep curvature, such as an automotive device lens. The grinding process is widely used to machine the aspherical lens molds made of high-hardness materials with high precision [13,14]. However, in the case of soft material, such as electroless nickel plating, which is mainly used in the injection molding process, the machining efficiency is reduced by the load of the grinding tool. In addition, a post-treatment process is required to remove the many scratches on the machined surface after the grinding process [15].
The diamond turning process has the advantage that it is easier to machine small aspherical lenses with steep curvature compared to the polishing process by using a designed tool shape with micro to millimeter scale size considered with the shape of the aspherical lens [16-18]. In addition, the DTM process has the advantage that the process can produce a mold core with a surface roughness of a polishing level. However, since the shape accuracy and surface quality of the mold core are greatly affected by the accuracy of the tool position, the setting state of the workpiece, the machining conditions and the accuracy of the cutting tool path, process optimization studies are required.
Lee et al. conducted a study on the correction of residual form error in ultra-precision aspherical surface machining [19]. The shape error of the machined surface according to the decentering type of the cutting tool was investigated, and the effect on the shape accuracy according to the number of correction operations was analyzed. Pun et al. conducted research on diamond turning and injection molding technology using a uniquely structured fixture as an efficient process cost approach for manufacturing micro-aspherical lenses [20]. As a result, an aspheric lens with a form error of 230 nm was produced. However, these studies were insufficient in terms of process optimization to reduce shape error and evaluation of optical performance via the injection molded lenses for high quality industrial automotive vision application.
In this study, in order to improve the shape accuracy and surface quality of the aspheric lens core, the diamond turning process was broken down and optimized in detail. Through these processes, the ultra-precision aspheric lens core was obtained with a shape error of less than 100 nm and a surface roughness of less than 5 nm. In addition, the injection-molded aspherical plastic lens showed a modulation transfer function (MTF) value of about 55% at 75 lp/mm, which meets the requirements of automotive vision application. Through this process, an optical lens required for a high-performance automotive camera module was developed.
2. Experiment
2.1 Ultra-precision Diamond Turning
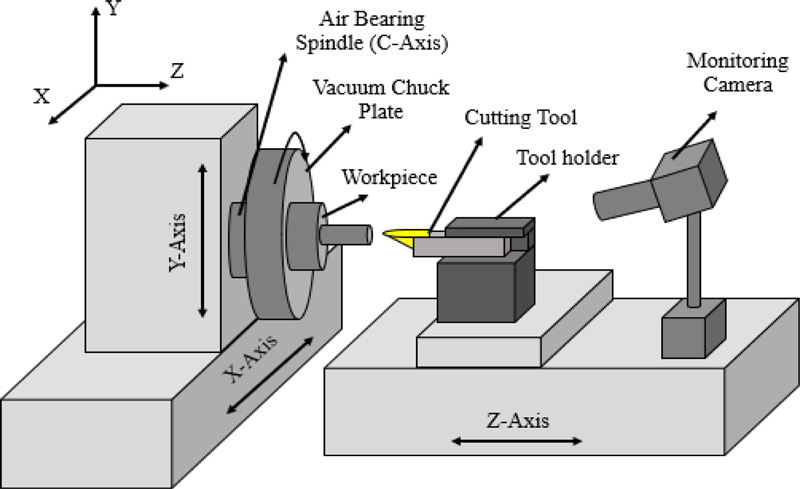
Figure 1 is a schematic diagram of an ultra-precision machining system (Nanotech 350FG, Moore Nanotechnology) used in this study. This machining system consisted of X, Y and Z axes with a resolution of 1 nm and the C axis of an ultra-precision air bearing spindle with a maximum speed of 10,000 RPM. Figure 2 shows the SCD cutting tool used to machine the aspheric lens mold core. To prevent interference between the cutting tool and the workpiece, it was designed with a nose radius of 105.08 μm, a window angle of 150° and a clearance angle of 15°. The cutting tool path was designed using NanoCAM 2D, developed by Moore Nanotechnology. The material of the mold core was electroless Ni plated, which was widely used for injection mold for optical component. The machining of the aspherical lens mold was divided into rough machining and fine machining. In both machining steps, the spindle speed was the same at 1,200 RPM. The cutting depth and feed were set to 10 mm/min and 5 μm for rough cutting and 1 mm/min and 1 μm for fine cutting, respectively.
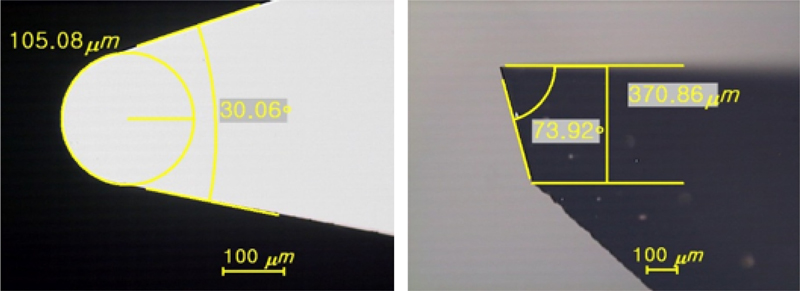
Single crystal diamond cutting tool with nose radius of 105.08 μm, window angle of 150° and clearance angle of 16.08°
2.2 Surface Profile Measurement
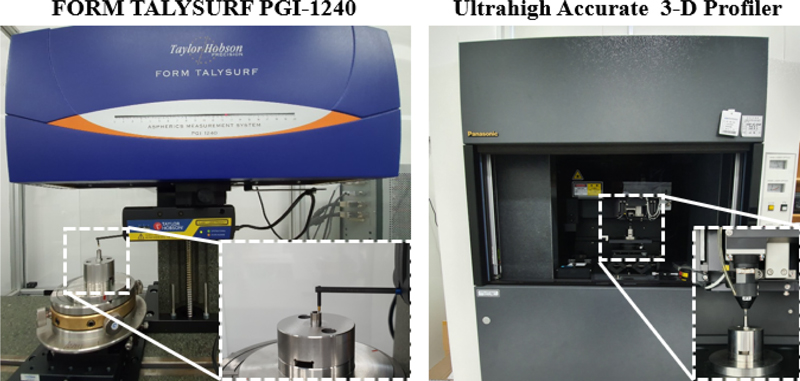
The shape of the machined core molds was measured using a FORMTALY SURF (PGI-1240, Taylor Hobson), which is a contact-type surface shape measuring system. The shape error of the machined surface was evaluated as the PV profile, which was the difference between the designed shape and the measured shape. The surface roughness of the machined mold was also evaluated by Ra. After the final correction machining, an ultra-precision three-dimensional measurement (UA3P, Panasonic) was used to prevent scratches on the surface of the lens core. The measuring systems used are shown in Fig. 3.
2.3 Precision Plastic Injection Molding
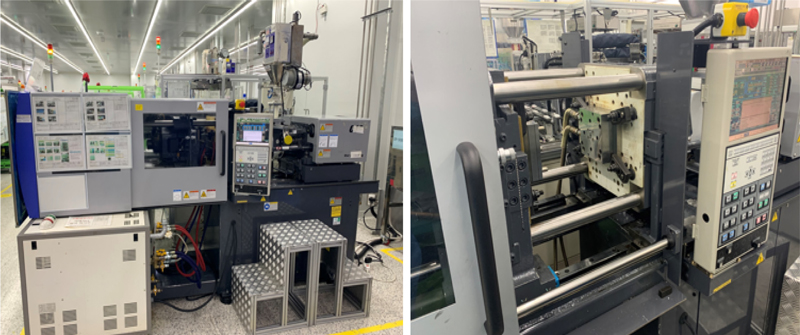
Figure 4 shows the electric injection machine (SE50D, Sumitomo) used to manufacture the aspherical lens. The maximum clamping force of this system is 50 t, the maximum filling and packing pressure is 223 MPa. And the maximum injection speed is 500 mm/sec. The conditions of the injection molding process for plastic aspherical lens are summarized in Table 2. The temperature of the upper and lower mold cores was set to 135°C. The filling and packing pressures were set to 1,000 and 850 kgf/c, respectively. The filling time was set to 2.82 seconds and the cooling time was set to 30 seconds.
3. Results and Discussion
3.1 Tool Path Generation
An ultra-precision diamond turning process was used and optimized to produce a high quality automotive lens mold core. Before machining the lens core, the tool and workpiece were precisely positioned to improve the shape accuracy and surface roughness of the core. Although there has been a lot of research related to the ultra-precision lens core machining process and conditions, ultra-precision setting was another key process to produce high-quality lens. The ultra-precision setting process was optimized and developed for single crystal diamond cutting tool and lens core workpiece. The first step of ultra-precision adjustment was to construct the tool path and check the interference. Typically, the profile height of the aspheric surface can be calculated by equation 1 [21-23].
| (1) |
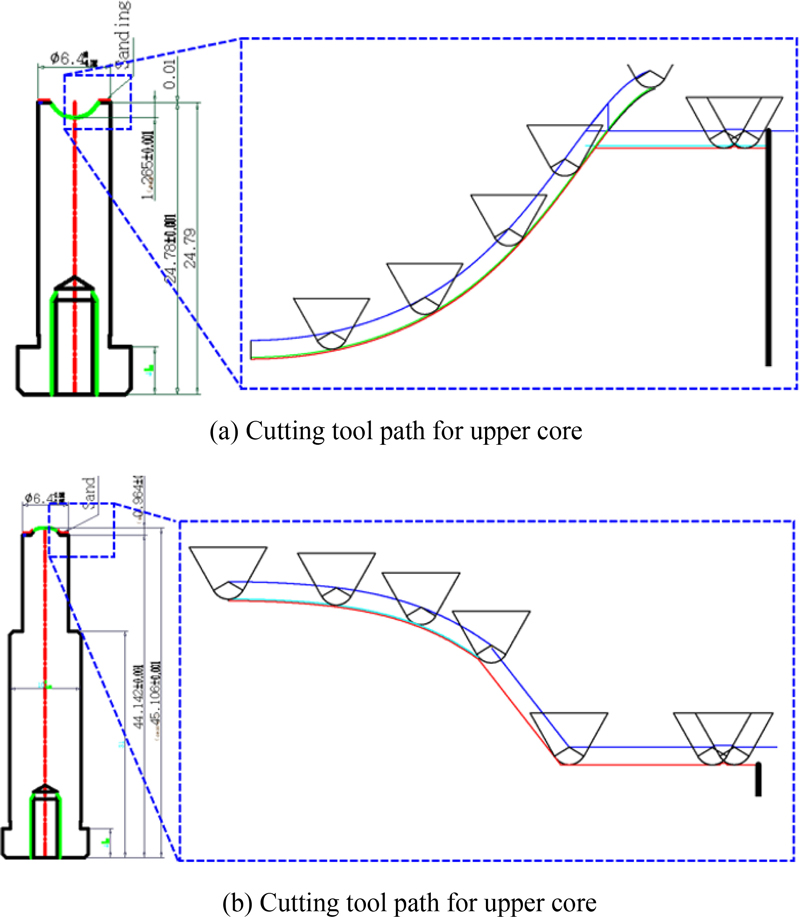
c is the curvature of the aspheric surface, r is the distance from the center of the lens, k is the conic constant, and An is the aspheric coefficient. Figures 5(a) and 5(b) show the designed surface profiles for 1 megapixel (MP), 140° field of view (FOV) high quality automotive lens core. To take into account the shrinkage of injection molding, the shape of the lens core was redesigned by multiplying the original aspheric coefficient by 1.004, as shown in Table 3. Especially for the 1 MP, 140° FOV automotive lens core, a flat land structure is required to form an etched surface region by grinding for scattering the incident light. Considering the tool diameter, the tool path was generated and simulated while checking the interference in the rib and flat land region as shown in Figs. 6(a) and 6(b).
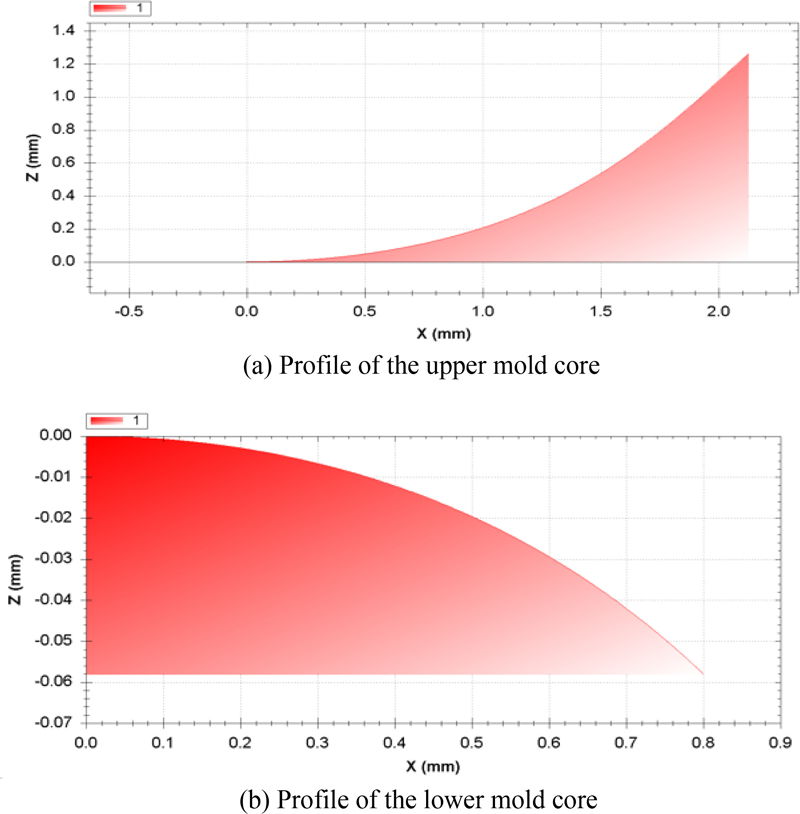
Surface profile of the aspherical mold core considering shrink rate after injection molding (a) profile of the upper mold core, (b) profile of the lower mold core
3.2 Compensation Machining
Automotive lens core was machined based on precisely positioned diamond turning process setting. To achieve ultra-high quality core surface without polishing process, compensation machining process is required. Considering the machining circumstances and equipment characteristics, the compensation machining toolpath was regenerated using the Form Talysurf measurement results. Figure 7 shows the trends of upper and lower core form accuracy with respect to the number of compensation operations.
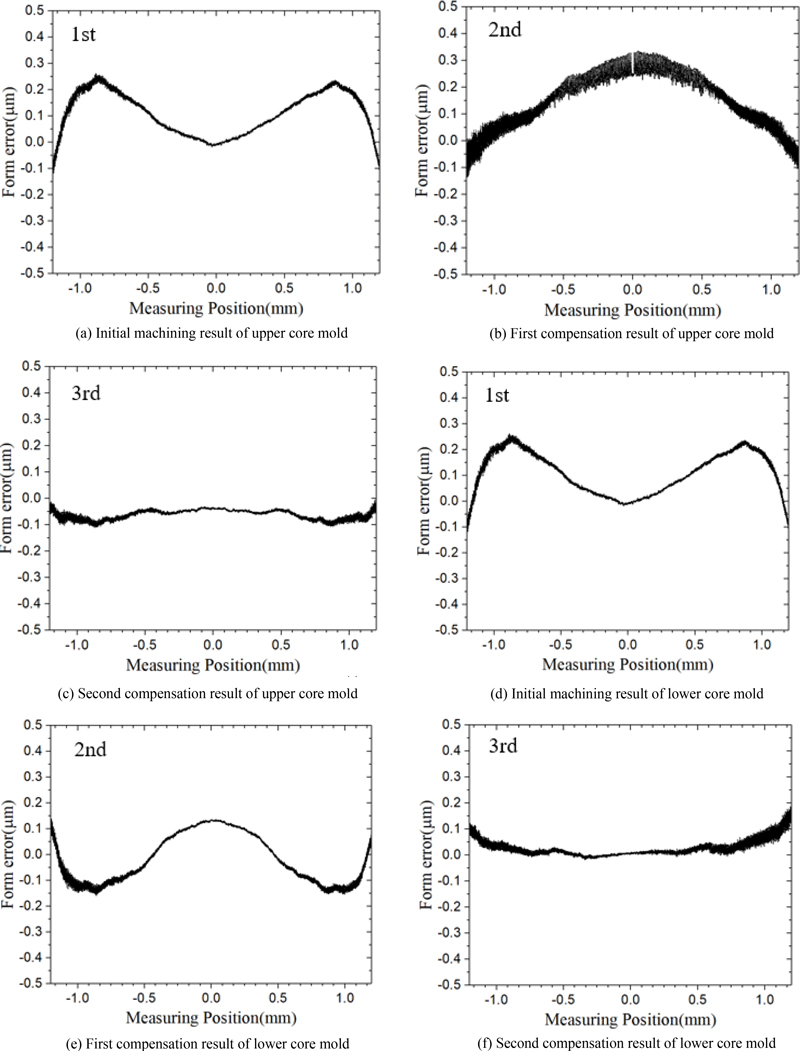
Form accuracy of machined surface by compensation machining (a), (b) and (c) are the initial machining, first and second compensation results of the upper core, (d), (e) and (f) are the initial machining, first and second compensation results of the lower core
Initial machining results showed symmetrical convex shape accuracy error trends. Due to the ultra-precision setting, the maximum peak-to-valley form accuracy was about 500 nm at the center position. Considering the machining results, the second compensation machining toolpath was redesigned in the reverse shape of the first machining shape accuracy results.
After applying concave compensation machining, the trend of shape accuracy was reversed. Although the maximum peak-to-valley was reduced to about 300 nm, the trend of shape accuracy was reversed due to excessive concave type compensation machining. Reverse trend was also observed in lower core. The maximum peak-to-valley region observed at 0.5 mm length becomes a negative peak-to-valley region, even though the maximum error was reduced.
It can be assumed that the reverse trend was caused by excessive compensation machining at outside of core mold. The maximum peak-to-valley value change, 80% of the gain was applied to the second compensation machining toolpath generation. After the machining, the shape accuracy was reduced to about 150 nm and 100 nm in the upper and lower cores, respectively.
In this study, the number of two compensation machining were performed to reduce the shape error. This is because the optimization of the compensation amount was not performed in advance in consideration of the cutting characteristics (such as the change of cutting force due to the change of cutting surface area) caused by the change of the contact position of the cutting tool according to the slope of the aspherical surface. If this is improved, it is thought that it can contribute to reducing the number of compensation operations and improving machining accuracy. In addition, it is expected that the results of this experiment can be further improved by applying on-machine measurement technology to match the machining environment and the measurement environment, and by continuously stabilizing the machining environment.
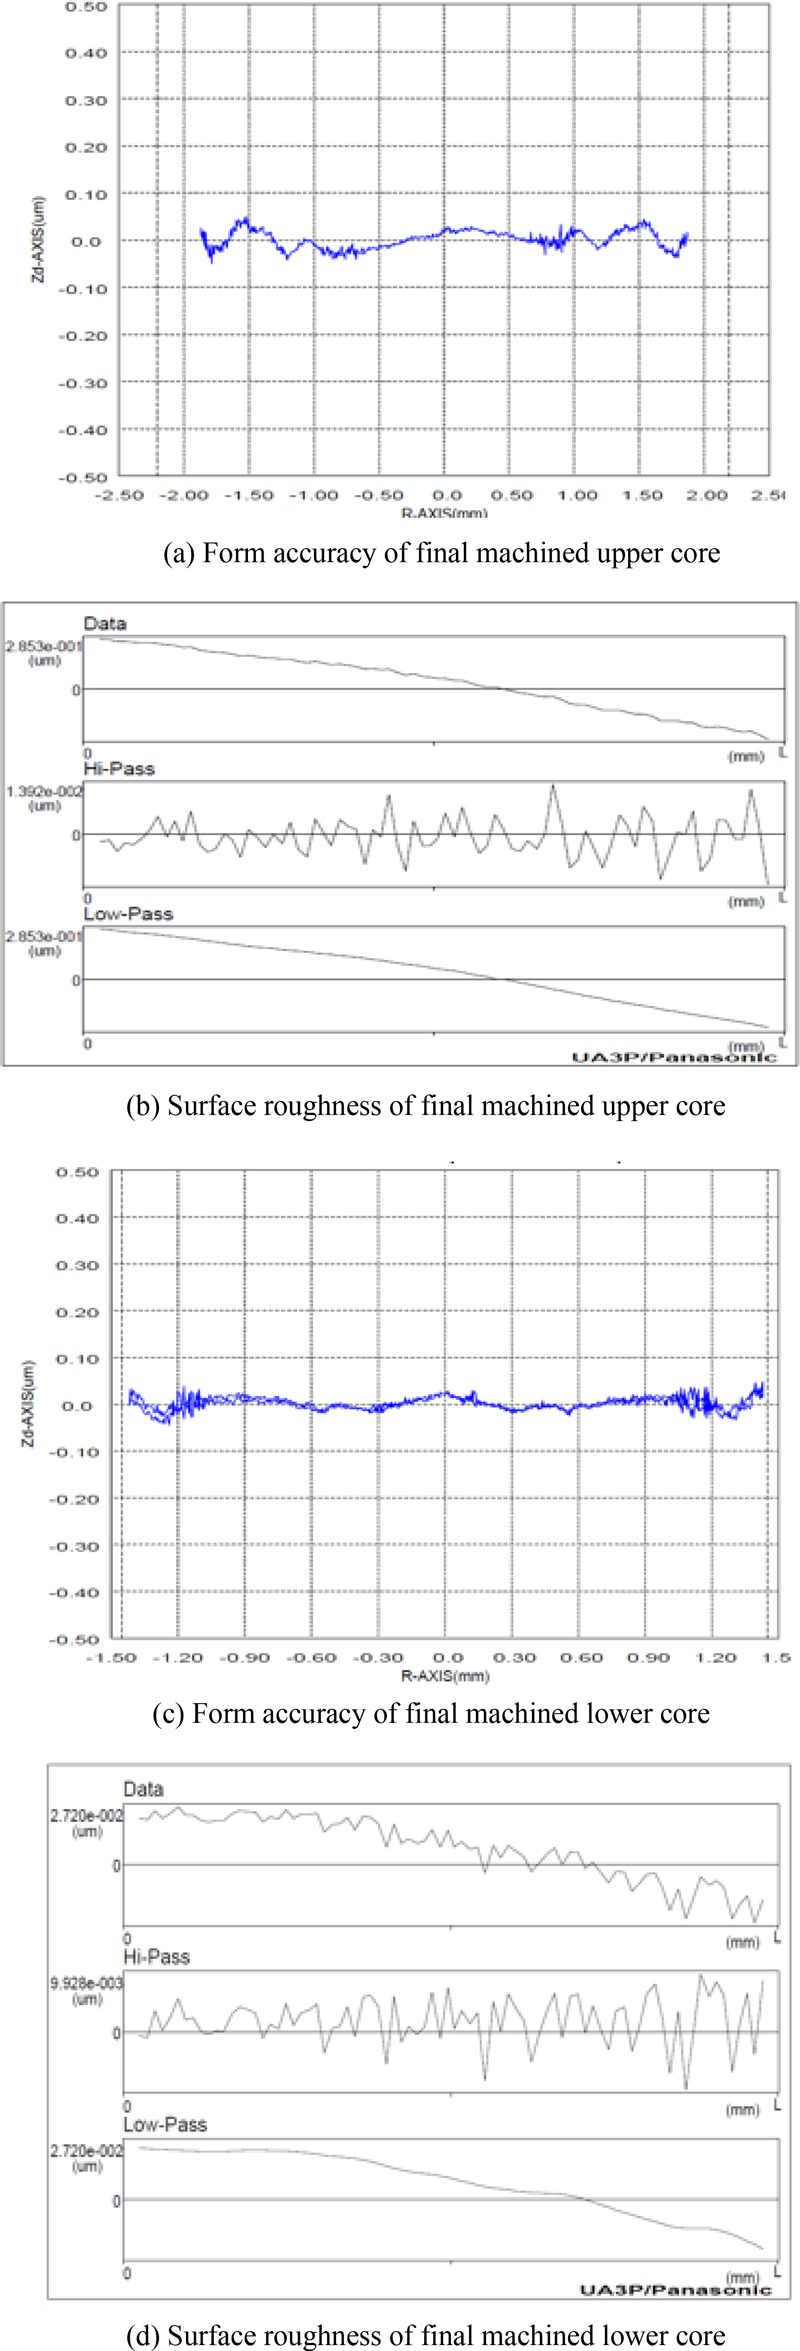
In order to protect the core surface quality for the injection molding test, the workpiece was finally machined, and the quality of the ultra-precision machined core was characterized using a non-contact ultra-high accuracy 3D profilometer (UA-3P). Figure 8 shows the measured shape accuracy and surface roughness for the upper and lower cores after four times of compensation machining. The PV value of the shape accuracy of the upper core was 99 nm, and the PV value of the shape accuracy of the lower core was 93 nm. The roughness of the upper and lower cores was 3.9 nm and 3.1 nm respectively.
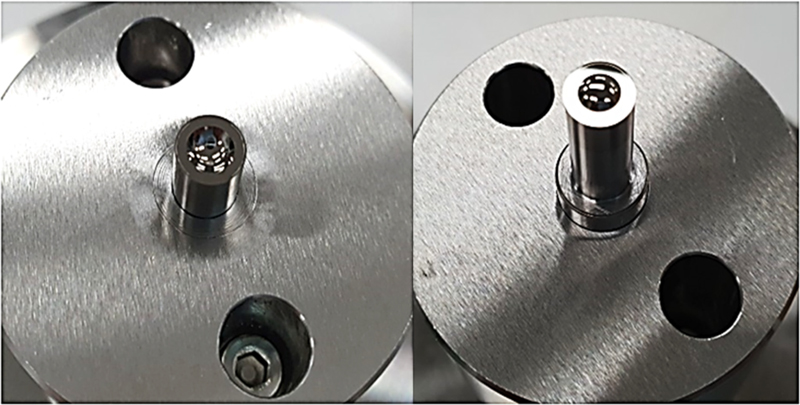
Based on optimized ultra-precision machining setting and compensation machining procedure, high-quality aspheric lens mold core for automotive vision module was successfully produced without showing any scratches, as shown in Fig. 9. In particular, the designed land structure and aspheric lens structure were precisely machined in a combined single-path. Any heavy tool marks and scratches on the machined surface were not observed in the lens mold core from an optical point of view. The performance of the fabricated ultra-precision lens core was characterized after the injection molding process.
3.3 Performance Evaluation with Injection Molding
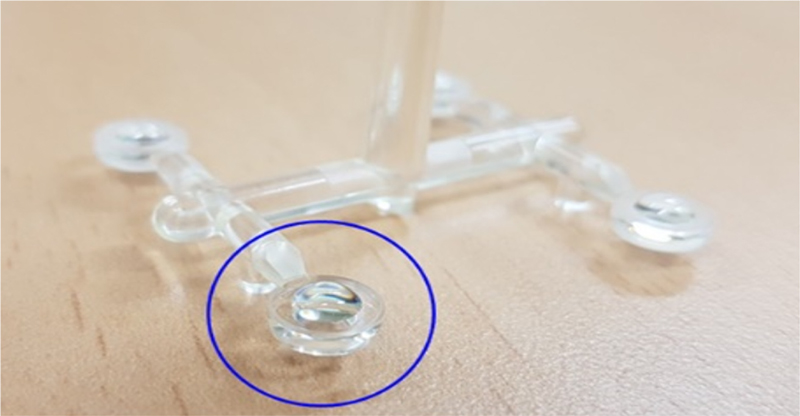
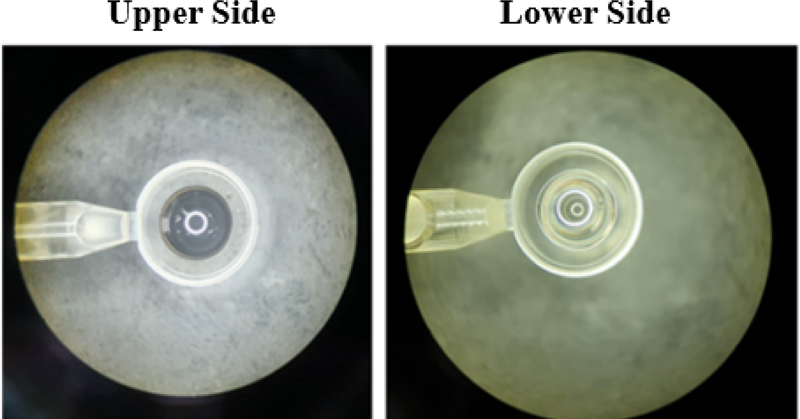
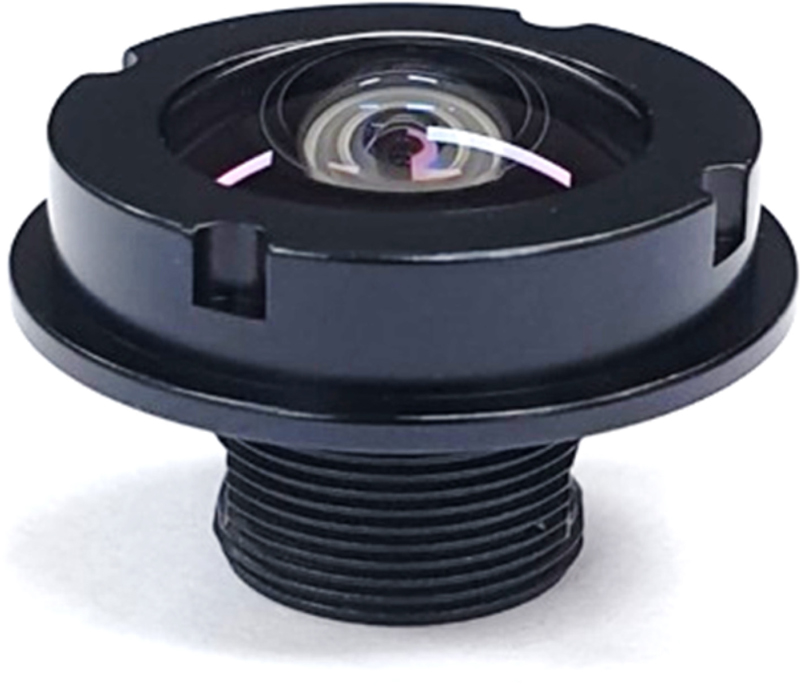
The validity of fabricated ultra-precision mold core was evaluated by injection molding process. COP resin was used to produce injection molded plastic lens. Due to the high-quality surface of the molded core, no defects such as tool marks, scratches, light scattering, moiré interference were observed after molding test. Figure 10 shows the injection molded lens, and Figure 11 shows the microscope surface image of the top and bottom sides. To measure the optical performance of the injection-molded aspherical plastic lens, it was assembled into a micro-lens module for automotive vision applications with specifications of 1Mega and H140, as shown in Figure 12.
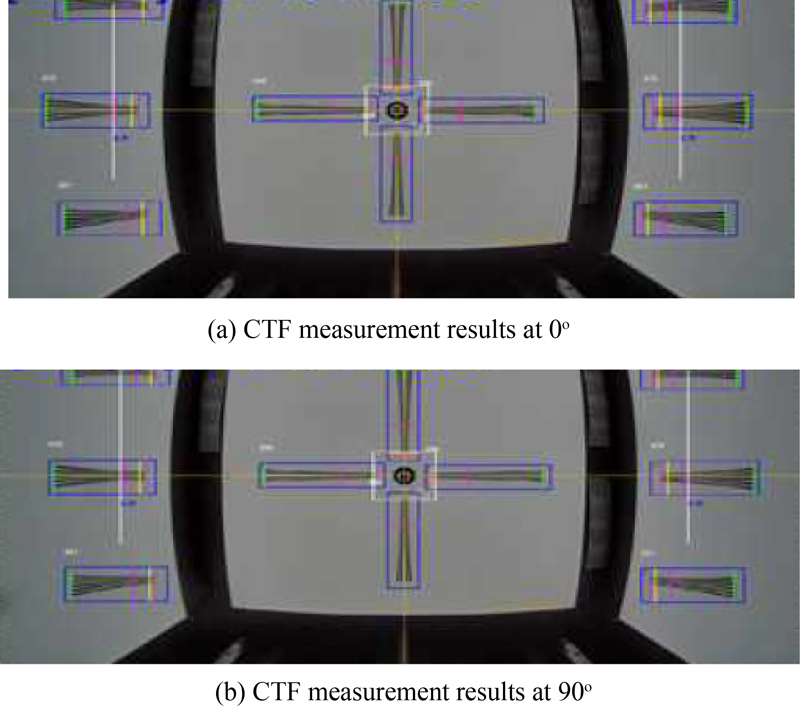
The MTF in tangential and sagittal directions were higher than 55% at 0.0F, 30% at 0.3F and 20% at 0.7F. These results meet the design specifications required by the company that wants to apply the developed lens module to automotive vision. Also, Fig. 14 shows the results of CTF (Contrast Transfer Function) evaluation, and the resolution performance at the center and outside of 0.7F in the direction of 0 and 90 were satisfied, respectively. Therefore, it was confirmed that injection-molded aspherical lenses can be applied to high quality automotive cameras.
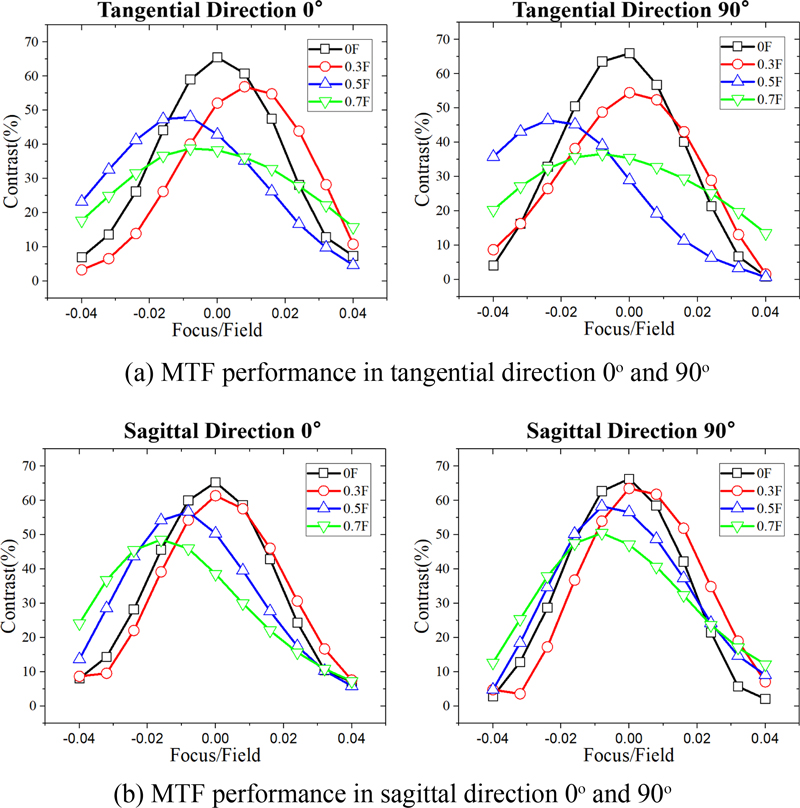
MTF performance of the injection molded aspheric lens (a) MTF performance in tangential direction, (b) MTF performance in sagittal direction
4. Conclusion
In this study, an ultra-precision aspheric lens manufacturing process was developed and optimized to fabricate a camera module with a performance of 1MP and 140° FOV for high quality automotive vision applications. Through these optimizations, a high-quality aspheric mold core with no scratches on the machined surface, a form error of less than 100 nm PV, and a surface roughness of less than 5 nm Ra was successfully produced. The ultra-precisely machined mold core was used in the COP plastic injection molding process to produce a microlens module. The optical characteristics of the fabricated lens showed contrasts higher than 55% at 0.0F, 30% at 0.3F, and 20% at 0.7F, which meets the requirements of 1MP and 140° FOV performance automotive vision application.
NOMENCLATURE
| z(r) : | Height of Aspheric Surface Profile |
| c : | Curvature |
| An : | Aspheric Coefficient |
| k : | Conic Constant |
| r : | Distance from Center of Lens |
| R : | Radius of Lens |
Acknowledgments
This work was funded by the Technology Innovation Program (20003945, Development of core manufacturing technology of 4-axes ultra-precision machining system and lens module for next-generation mobile lens having about 100 nm shape accuracy) and (20007244, A practical study of ultra-precision 5-axis machine for lens & grooving machine) funded by the Ministry of Trade, Industry & Energy (MOTIE, Korea). Also, this work was funded by the National Research Foundation of Korea (NRF) grant funded by the Korean Government (MSIT) (No. RS-2023-00210764).
REFERENCES
- Kingslake, R., Johnson, R. B., (2009), Lens design fundamentals, Academic Press.
- Sun, H. Y., Choi, D. S., Je, T. J., Choi, K. B., (2002), Analysis and comparison of the performance of optical collimator by lenses, Proceeding of the 2022 Autumn Conference on the Korean Society for Precision Engineering, 132-136.
-
Lee, J. H., Yum, S. H., Kim, S. M., (2018), Analysis of thermal reflow process for polymer microlens fabrication, Journal of the Korean Society for Precision Engineering, 35(3), 319-325.
[https://doi.org/10.7736/KSPE.2018.35.3.319]

-
Junqi, L., Qing, L., Nakamura, F., Nakagawa, T., (2007), Development of ultra-precision machining system for small lens mould, International Journal of Manufacturing Technology and Management, 12(1-3), 127-138.
[https://doi.org/10.1504/IJMTM.2007.014145]

-
Roeder, M., Guenther, T., Zimmermann, A., (2019), Review on fabrication technologies for optical mold inserts, Micromachines, 10(4), 233.
[https://doi.org/10.3390/mi10040233]

-
Chung, C.-Y., (2019), Integrated optimum layout of conformal cooling channels and optimal injection molding process parameters for optical lenses, Applied Sciences, 9(20), 4341.
[https://doi.org/10.3390/app9204341]

-
Peixoto, C., Valentim, P. T., Sousa, P. C., Dias, D., Araújo, C., Pereira, D., Machado, C. F., Pontes, A. J., Santos, H., Cruz, S., (2022), Injection molding of high-precision optical lenses: A review, Precision Engineering, 76, 29-51.
[https://doi.org/10.1016/j.precisioneng.2022.02.002]

-
Lee, S., Lee, H., (2021), Developed an in-line system of measuring MTF for automating the assembly process of lens-module in a smartphone camera, Journal of the Korean Society for Precision Engineering, 38(5), 359-363.
[https://doi.org/10.7736/JKSPE.020.111]

-
Sahin, F. E., (2017), Lens design for active alignment of mobile phone cameras, Optical Engineering, 56(6), 065102.
[https://doi.org/10.1117/1.OE.56.6.065102]

-
Hwang, Y., Cha, D.-H., Kim, J.-H., Kim, H.-J., (2012), Ultraprecision grinding of glassy carbon core for mold press lens, Journal of the Korean Society for Precision Engineering, 29(3), 261-265.
[https://doi.org/10.7736/KSPE.2012.29.3.261]

-
Kim, Y. J., Choi, H. J., Lee, K. H., Yeo, W. J., Jeong, J. Y., Kim, Y. S., Kim, G. H., (2020), A study on the characteristics of ultra-precision surface cutting of the mold material (STAVAX) for the development of large satellite lens, Journal of the Korean Society for Precision Engineering, 37(11), 819-825.
[https://doi.org/10.7736/JKSPE.020.088]

- Kim, H.-T., Yang, H.-J., Kim, S.-C., (2006), A study on the control method for the tool path of aspherical surface grinding and polishing, Journal of the Korean Society for Precision Engineering, 23(1), 113-120.
-
Ando, M., Negishi, M., Takimoto, M., Deguchi, A., Nakamura, N., (1995), Super-smooth polishing on aspherical surfaces, Nanotechnology, 6(4), 111.
[https://doi.org/10.1088/0957-4484/6/4/002]

-
Yan, G., You, K., Fang, F., (2020), Three-linear-axis grinding of small aperture aspheric surfaces, International Journal of Precision Engineering and Manufacturing-Green Technology, 7, 997-1008.
[https://doi.org/10.1007/s40684-019-00103-7]

-
Yin, S., Jia, H., Zhang, G., Chen, F., Zhu, K., (2017), Review of small aspheric glass lens molding technologies, Frontiers of Mechanical Engineering, 12, 66-76.
[https://doi.org/10.1007/s11465-017-0417-2]

-
Ham, J. K., Kang, J. K., Park, S. H., Maeng, H. H., Jeon, M. W., Han, J. S., et al., (2023), Analysis of surface characteristics and spoke-shaped removal through ultra-precision machining of germanium materials, Journal of the Korean Society for Precision Engineering, 40(6), 441-448.
[https://doi.org/10.7736/JKSPE.023.037]

-
Yu, D. P., Gan, S. W., Wong, Y. S., Hong, G. S., Rahman, M., Yao, J., (2012), Optimized tool path generation for fast tool servo diamond turning of micro-structured surfaces, The International Journal of Advanced Manufacturing Technology, 63, 1137-1152.
[https://doi.org/10.1007/s00170-012-3964-z]

-
Li, Y., Zhang, Y., Lin, J., Yi, A., Zhou, X., (2020), Effects of machining errors on optical performance of optical aspheric components in ultra-precision diamond turning, Micromachines, 11(3), 331.
[https://doi.org/10.3390/mi11030331]

-
Lee, W. B., Cheung, C. F., Chiu, W., Leung, T., (2000), An investigation of residual form error compensation in the ultra-precision machining of aspheric surfaces, Journal of Materials Processing Technology, 99(1-3), 129-134.
[https://doi.org/10.1016/S0924-0136(99)00403-3]

-
Pun, A. M.-H., Wong, C.-C., Chan, N. S.-W., Louie, D. C.-H., Li, L.-M., (2004), Unique cost-effective approach for multisurfaced micro-aspheric lens prototyping and fabrication by single-point diamond turning and micro-injection molding technology, Optical Fabrication, Testing, and Metrology, 217-224.
[https://doi.org/10.1117/12.513200]

-
Liu, Y.-T., Chang, W.-C., Yamagata, Y., (2010), A study on optimal compensation cutting for an aspheric surface using the Taguchi method, CIRP Journal of Manufacturing Science and Technology, 3(1), 40-48.
[https://doi.org/10.1016/j.cirpj.2010.03.001]

-
Hatefi, S., Abou-El-Hossein, K., (2020), Review of single-point diamond turning process in terms of ultra-precision optical surface roughness, The International Journal of Advanced Manufacturing Technology, 106, 2167-2187.
[https://doi.org/10.1007/s00170-019-04700-3]

-
Wilson, R. H., Brost, R. C., Strip, D. R., Sudol, R. J., Youngworth, R. N., McLaughlin, P. O., (2004), Considerations for tolerancing aspheric optical components, Applied Optics, 43(1), 57-66.
[https://doi.org/10.1364/AO.43.000057]


He was a researcher in the Korea Institute of Machinery & Materials (KIMM) and Hanhwasystems. Currently working in Blanket Shield Block Technology Team, Korea Institute of Fusion Energy. His research interest is ultra-precision cutting process for advanced key components.
E-mail: jyjeong@kfe.re.kr

Researcher in the Devision of R&D Equipment Industry, Korea Basic Science Institute. His research interests include ultraprecision freeform surface machining and large area optical components machining.
E-mail: chj1212@kbsi.re.kr

He was a Director in the Department of Automotive Lens Development, Digital Optics. Now he works in CLAROPTIC. His research interest is manufacturing technology for optical lens modules.
E-mail: nueta34@naver.com

He was a researcher in the Department of Nano Manufacturing Technology, Korea Institute Machinery & Materials (KIMM). His research interest is ultra-precision machining of functional materials and ultrasonic applications.
E-mail: shimjg95@gmail.com

He was a researcher in the Devision of R&D Equipment Industry, Korea Basic Science Institute. His research interests include ultraprecision freeform surface machining and large area optical components machining.
E-mail: kimyj0912@kbsi.re.kr

Senior Researcher in the Department of Nano Manufacturing Technology, Korea Institute Machinery & Materials (KIMM). Her research interest is nano-structured materials synthesis and manufacturing and ultra-precision machining technologies
E-mail: ejgwak@kimm.re.kr

Principal Researcher in the Department of Nano Manufacturing Technology, Korea Institute Machinery & Materials (KIMM). His research interest is ultra-precision micro/nano machining and forming technologies.
E-mail: choids@kimm.re.kr

Principal Researcher in the Department of Nano Manufacturing Technology, Korea Institute Machinery & Materials (KIMM). His research interest is ultra-precision micro/nano patterned mold machining technologies.
E-mail: jtj@kimm.re.kr

Senior Researcher in the Department of Nano Manufacturing Technology, Korea Institute Machinery & Materials (KIMM). His research interest is micro/nano manufacturing.
E-mail: jshan@kimm.re.kr
