Derivation and Verification of Novel Phenomenon-based Theoretical Formulas for the Axial Compliance of Circular Flexure Hinges
Copyright © The Korean Society for Precision Engineering
This is an Open-Access article distributed under the terms of the Creative Commons Attribution Non-Commercial License (http://creativecommons.org/licenses/by-nc/3.0) which permits unrestricted non-commercial use, distribution, and reproduction in any medium, provided the original work is properly cited.
Abstract
A circular flexure hinge is a core element for force transmission and relative motion of precision stages used in semiconductor processes. When designing a circular flexure hinge, calculation formulas for axial and rotational compliance are essential. However, in the case of axial compliance, results of the existing calculation formulas have significant differences from reliable finite element analysis results. In this study, calculation formulas for axial compliance of the circular flexure hinges were derived based on stress distribution phenomenon. Comparison with finite element analysis results confirmed that the newly developed calculation formulas were more accurate than existing ones. It is anticipated that these enhanced formulas will lead to more precise designs, ultimately reducing both time and costs in research and industry.
Keywords:
Precision stage, Flexure hinge, Phenomenon-based, Axial compliance, Finite element analysis키워드:
정밀 스테이지, 플렉셔 힌지, 현상-기반, 축방향 연성, 유한요소해석1. Introduction
Precision stages widely used in semiconductor etching processes use flexure hinges as connecting elements for rotational motion [1-3]. Conventional hinges, which are joints for relative rotational motion, have backlash and use lubricants, so they are not suitable for semiconductor processes where precision and contaminants significantly affect yields. However, the flexure hinge is free from these problems because it is made of a monolithic metal structure and is therefore widely adopted in semiconductor processes. Many studies have been conducted for a long time to calculate the axial compliance and bending compliance values of flexure hinges. Since most flexure hinges, including circular and elliptical notch flexure hinges, can be viewed as beams whose cross-sectional shape changes continuously in the axial direction, most previous studies have used the Timoshenko-Ehrenfest beam theory for analysis [4,5].
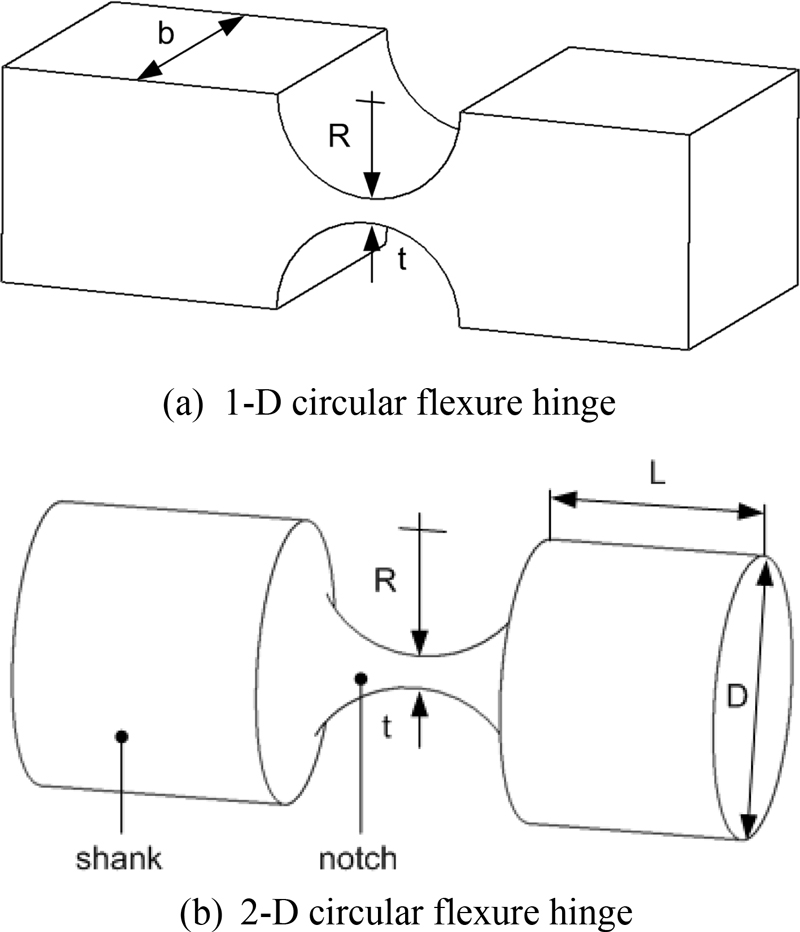
There have been studies by Paros and Weisbord [6], Wu and Zhou [7], and Lobontiu [8] to calculate the compliance of 1-D circular flexure hinges (see Fig. 1). Although the forms of the compliance calculation equations developed in these studies are different, we found that they are the same equations when the terms in their equations were expanded and compared in this study. This is consistent with the diagnosis in the paper by Yong et al. [9] that the calculation results of these equations are the same, and the reason is that these equations are derived based on the same Timoshenko-Ehrenfest beam theory. It is noteworthy that the Paros-Weisbord simplified formulas for the rotational compliance are more similar to the finite element analysis (FEA) results than the analytically derived full equations. In addition, Smith et al. [10], Tseytlin [11], and Schotborgh et al. [12] presented rotational compliance formulas for 1-D circular flexure hinges, but they were excluded from the comparison because this study deals with axial compliance.
Yong et al. [9] presented an accurate empirical formula for calculating axial and rotational compliance for the 1-D circular flexure hinge in the range of t/R of 0.1 to 0.25, and pointed out that when an axial load is applied to a circular flexure hinge, deformation occurs not only at the notch but also around it, but there is no compliance calculation formula that takes this into account. Li et al. [13] pointed out that a flexible joint with a circular flexure hinge consists of three parts: a notched segment, a segment close to the notch (as much as R), and a segment further away. They obtained an empirical formula for the compliance of a circular flexure hinge by regression to an exponential function from the deformation value calculated by finite element analysis minus the deformation value of the non-notched segment.
We recognized that although a lot of deformation occurs in the region close to the notch, as commonly mentioned by Yong et al. [9] and Li et al. [13], there is no compliance calculation formula that takes this into account. Therefore, our research started with the aim of making theoretical formulas to calculate compliance more accurately by creating a reasonable phenomenon-based model for the region close to the notch.
Meanwhile, studies on the compliance calculation method of 2-D circular flexure hinges have been relatively less frequent than those of 1-D circular flexure hinges, and the compliance calculation formulas of 2-D circular flexure hinges have been derived only by Paros and Weisbord [6] and Lobontiu [8]. Although the compliance calculation formulas developed in these studies have different formula forms, we found that they are the same formulas when the terms were expanded and compared in our study.
Since there was a significant discrepancy between the results obtained from theoretical formulas in previous studies and those obtained from finite element analysis, particularly regarding the axial flexibility of the flexure hinge, this study aims to achieve the following detailed objectives in order to derive more accurate calculation formulas for axial compliance.
First, reasonable assumptions for compliance calculation are established through the stress distribution that occurs when an axial load is applied to the flexure hinge.
Second, phenomenon-based theoretical formulas are derived based on the assumptions.
Third, the accuracy of the newly developed theoretical formulas is verified by comparing them with existing theoretical formulas, and FEA results.
Section 1 is the introduction. Section 2 describes the structure of circular flexure hinges and existing compliance calculation methods. Section 3 derives new theoretical formulas based on the phenomenon caused by axial load. Section 4 verifies the developed formulas through finite element analysis. And Section 5 presents the results and implications of the research.
2. Structure and Compliance of Circular Flexure Hinges for Ultra-precision Stages
Ultra-precision stages are mainly used for position control of masks in semiconductor etching processes, and they are in charge of micro-displacement control in a dual motion control consisting of large displacement and micro-displacement. The flexure hinge operates as a precision revolute joint without backlash and microdust due to the absence of lubricant, so it is adopted as an essential component for precision stages.
Circular flexure hinges can be divided into 1-D circular flexure hinges with one rotational degree of freedom and 2-D circular flexure hinges with two rotational degrees of freedom, as shown in Fig. 1.
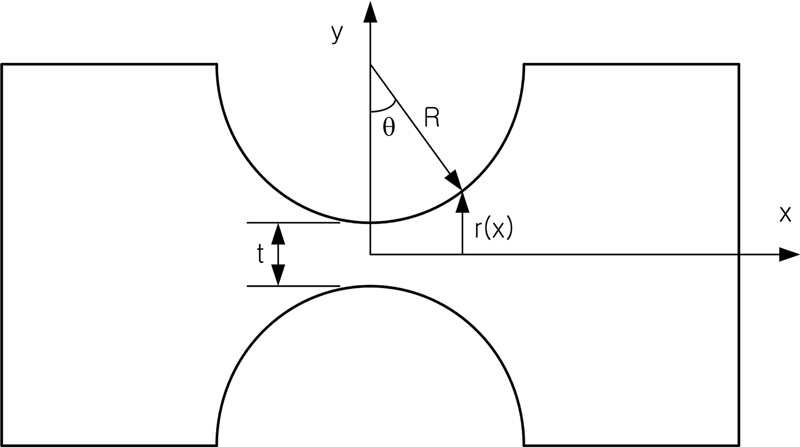
Theoretically, a flexure hinge has a compliance of six components (3 translational + 3 rotational), but the following two components of compliance of a circular flexure hinge are important. The compliance in the axial direction, where the force is transmitted, should be low, and the compliance in the rotational direction, where the intended rotation occurs, should be high. Therefore, in this study, only the axial and rotational compliance of the flexure hinge are considered. The names and coordinates of the variables for the development of the theory are shown in Fig. 2.
In this study, the Euler-Bernoulli beam theory was utilized to develop the equations for the following reasons: Since the load changes over time are not abrupt, the effects of rotational inertia can be disregarded. Additionally, for calculating axial and rotational compliance, shear deformation is negligible. When the effects of shear deformation and rotational inertia are excluded from the Timoshenko-Ehrenfest beam theory, it simplifies to the Euler-Bernoulli beam theory.
The compliance of a flexure hinge is based on the following two equations.
| (1) |
| (2) |
where i = x, y, z. δ and θrepresent the deformation length and deformation angle, respectively, and F and M represent the force and moment, respectively. The axial compliance Ca and the rotational compliance Cb are calculated as follows [14].
| (3) |
| (4) |
where E is the modulus of elasticity, A is the area, and I is the moment of inertia. In Fig. 2, r(x) is as follows:
| (5) |
With the above basic mechanical equations, previous researchers including Paros and Weisbord [6], Wu and Zhou [7], and Lobontiu et al [8] derived compliance calculation formulas. The formulas are included in Eqs. (A1)-(A14) in the appendix since they are used for comparison. The subscripts are added in the order of ‘compliance direction, degrees of freedom, author’, and the formulas are listed in the order of ‘degrees of freedom, compliance direction, author’ for easy comparison. In addition, the simplified formula of Paros has ‘S’ at the end of the subscript.
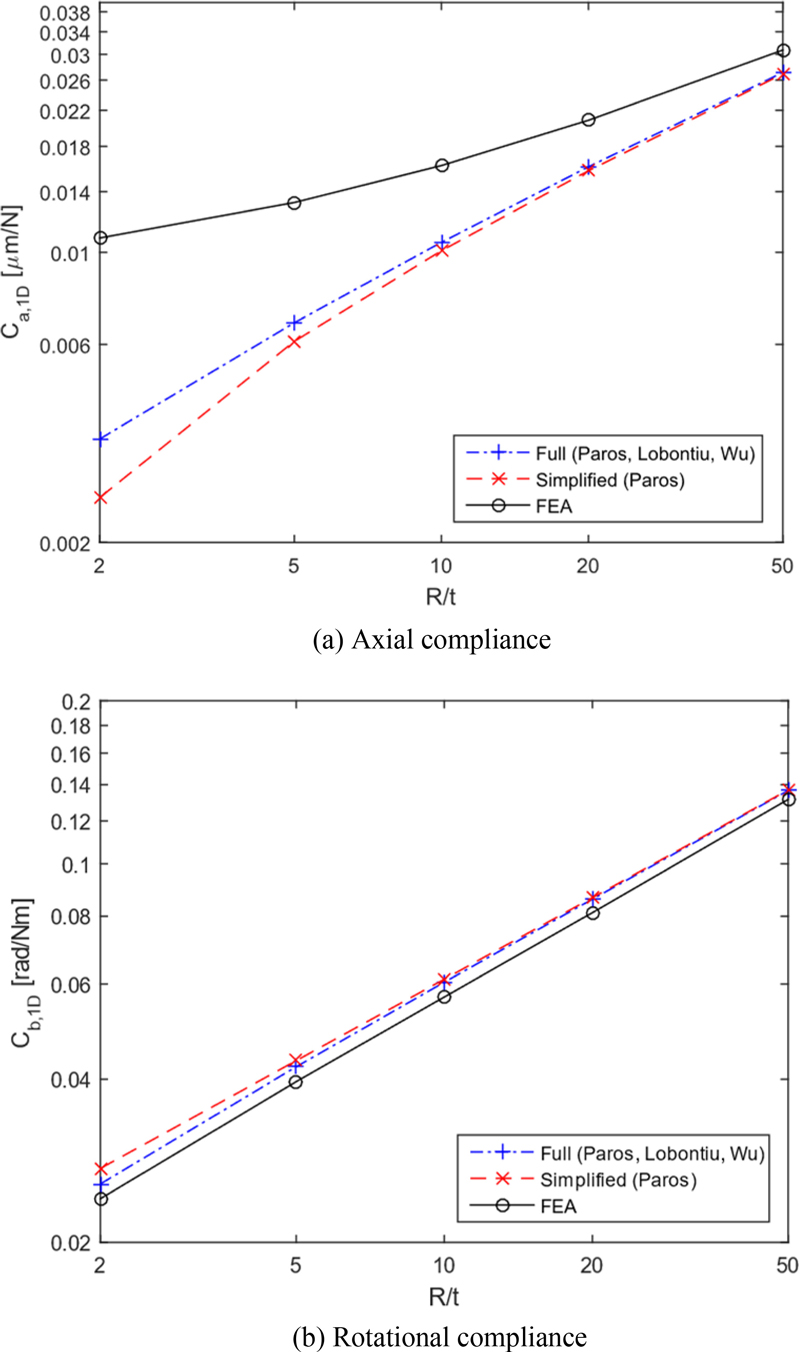
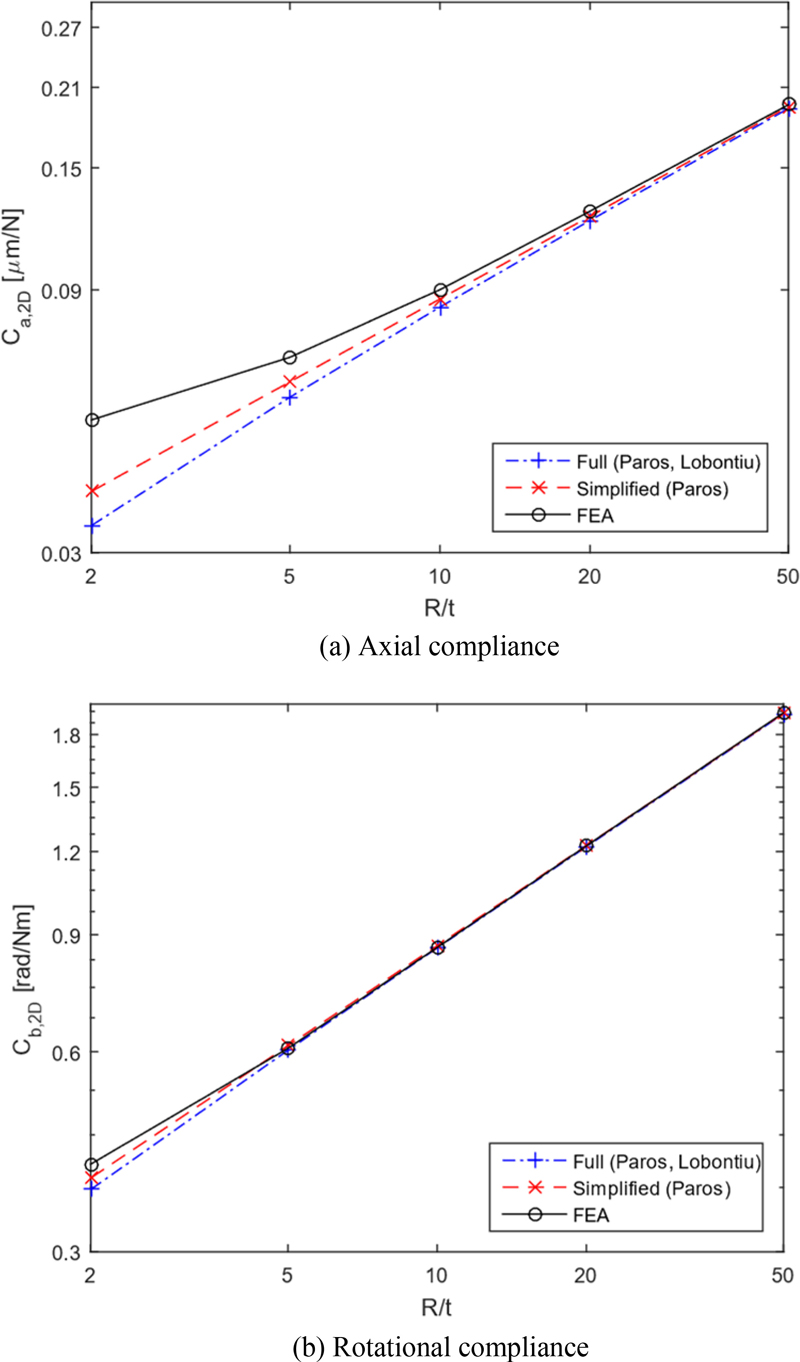
Since static linear structural analysis by FEA numerically produces only stress and deformation values under specific loads and constraints, additional application of Eqs. (1) and (2) is required to obtain compliance. In this study, the conditions for FEA are as follows: the left side of the flexure hinge is fixed, and the axial load and bending moment are applied to the right side, respectively. The thickness t of the hinge neck is 1 mm, the width b of the 1-D circular flexure hinge is 10 mm, and the selected material is A7075-T6 with the elastic modulus of 73.013 GPa. The load condition was set so that the maximum stress at the neck of the hinge is within the allowable stress obtained by dividing the yield stress of the material by a safety factor of 2. To obtain the rotational compliance, one end of the shaft was fixed, and a moment (100 N mm for a 1-D circular flexure hinge and 10 N mm for a 2-D flexure hinge) was applied to the opposite end. In addition, to obtain the compressive compliance, one end of the shaft was fixed in the same way, and a force (1000 N for a 1-D circular flexure hinge and 100 N for a 2-D flexure hinge) was applied to the opposite end.
Through Figs. 3 and 4, it is shown that the differences between the calculated values and the finite element analysis values for the rotational compliance are not large, but the differences are large for the axial compliance. Since it is judged that the calculation formulas for the axial compliance need to be improved, and new calculation formulas for the axial compliance are derived in this study.
3. Derivation of New Compliance Formulas for Circular Flexure Hinges
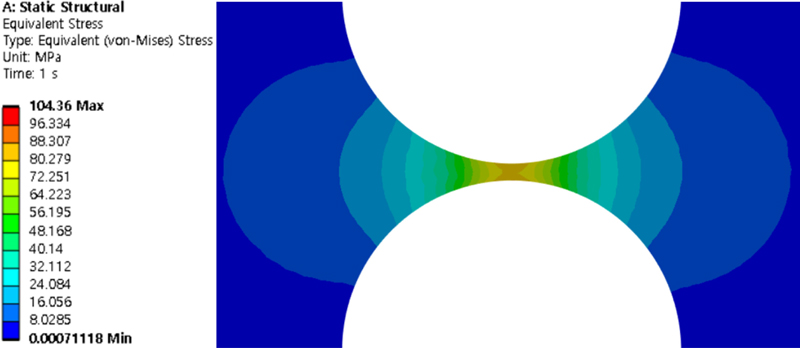
The discrepancy between the results of the theoretical axial compliance calculations and the finite element analysis was examined through an investigation of stress distribution. The stress distribution under axial loading is illustrated in Fig. 5. The stress contour (iso-stress line or surface) is approximately circular and approximately perpendicular to the outline of circular flexure hinge. This phenomenon is clear for the 1-D circular flexure hinge and less clear for the 2-D circular flexure hinge.
The existing theoretical formulas were obtained by integrating only up to the end of the notch part of the hinge, but the actual stress is widely distributed up to the shank part. It was assumed that a more accurate axial compliance calculation formula could be obtained by deriving the formula considering the shank part. The following two assumptions were made based on the insight obtained from the stress contour shown in Fig. 5: First, the stress contour is circular and intersects the outline of the hinge at a right angle. Second, the stress acts perpendicular to the contour plane.
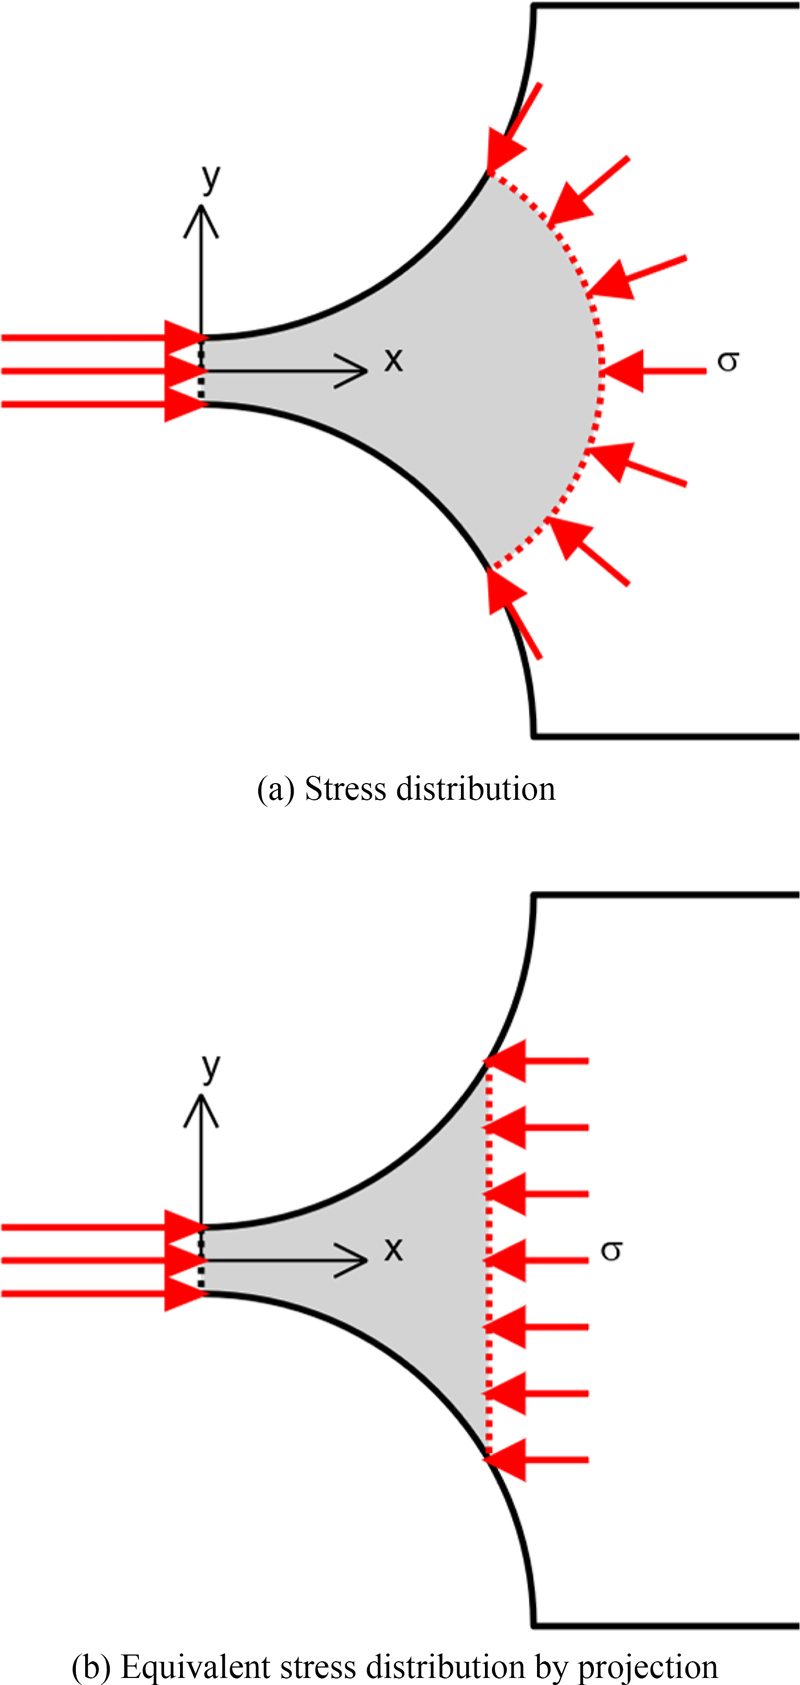
The free body diagram drawn by considering the latter first is as shown in Fig. 6. As can be seen in Figs. 6(a), the stress acting perpendicular to the stress contour can be projected as a stress perpendicular to the plane, as shown in 6(b).
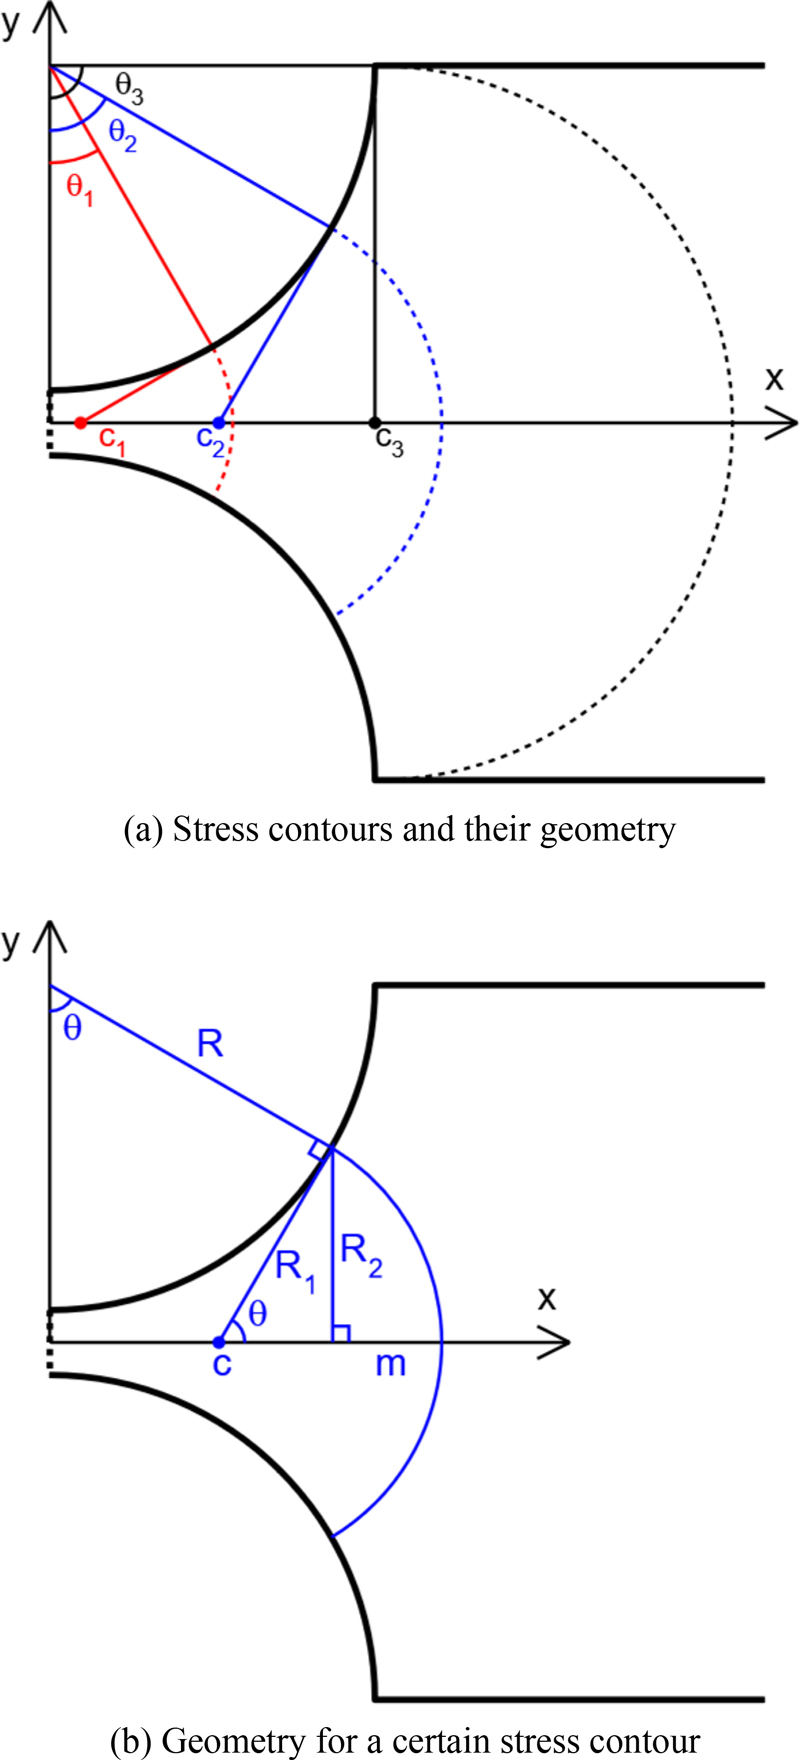
Since the shape of the stress contour (dotted line) in Figs. 7(a) is expressed according to the angle θ, the corresponding geometry for one stress contour is depicted in 7(b).
The equation of the circle forming the outline of a circular flexure hinge is:
| (6) |
Therefore, any point(x, y) on this circle can be expressed as follows:
| (7) |
| (8) |
Also, the equation of the tangent line at the point(x1, y1) on this circle is as follows.
| (9) |
Let the intersection point of this tangent line and the x-axis (y = 0) be (c, 0), then
| (10) |
This intersection point (c, 0) becomes the center of the circle forming the stress contour, and the equation of the stress contour circle is as follows (see Fig. 7).
| (11) |
Since the stress contour circle is assumed to be perpendicular to the outline of the hinge, the height m of the arc can be simply expressed as follows by a geometric relationship.
| (12) |
Considering that deformation occurs up to the stress contour area of Fig. 7(a), the axial compliance calculation formula of Eq. (3) needs to be corrected. Therefore, if the stress distribution is projected as in Fig. 6, while the area A is the same as in the existing formula, the variable of integration should be replaced from x to x + m.
| (13) |
Therefore, by replacing dx in Eq. (3) with d(x + m) in Eq. (13), we can obtain the following result.
| (14) |
The axial compliance formulas for the 1-D flexure hinge and 2-D flexure hinge obtained by calculating the integral of the above equation are Eqs. (15) and (16), respectively.
| (15) |
| (16) |
where s = R / t.
4. Verification of the Newly Developed Formulas by Finite Element Analysis
Finite element analysis is performed to verify the performance of the newly developed axial compliance formulas of Eqs. (15) and (16). The circular flexure hinge used in the finite element analysis was set to have a length of one end of the shaft excluding the notch of 120 mm, and the height (at 1-D circular flexure hinge) or diameter (at 2-D circular flexure hinge) of the shaft was set to 101 mm, which was set to a sufficiently large value compared to the neck of the notch so that the deformation of the shank did not affect the overall analysis results. The thickness of the neck of the notch was fixed to 1 mm, and the radius of the circular notch was determined so that R/t was 2, 5, 10, 20, and 50. The grid was created so that the size of one side of the grid was smaller than the thickness t of the hinge.
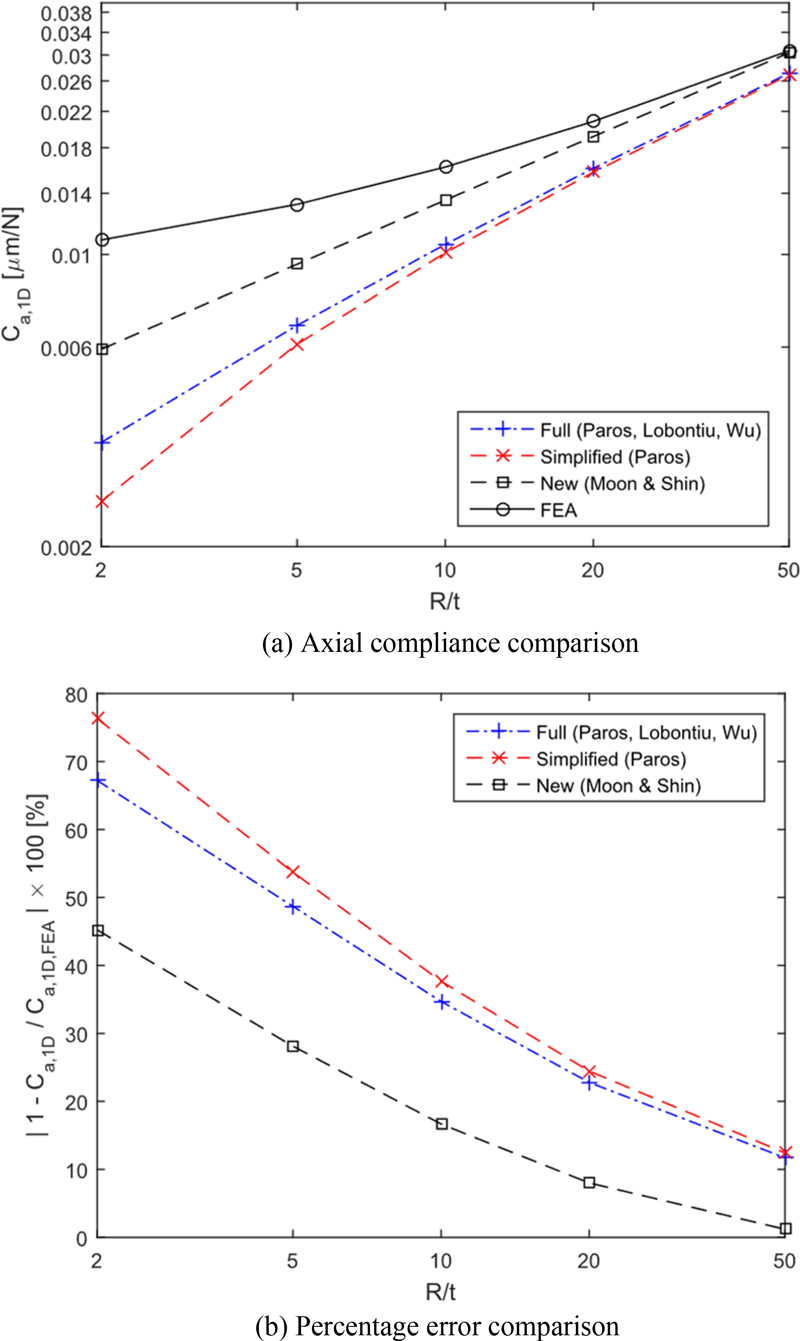
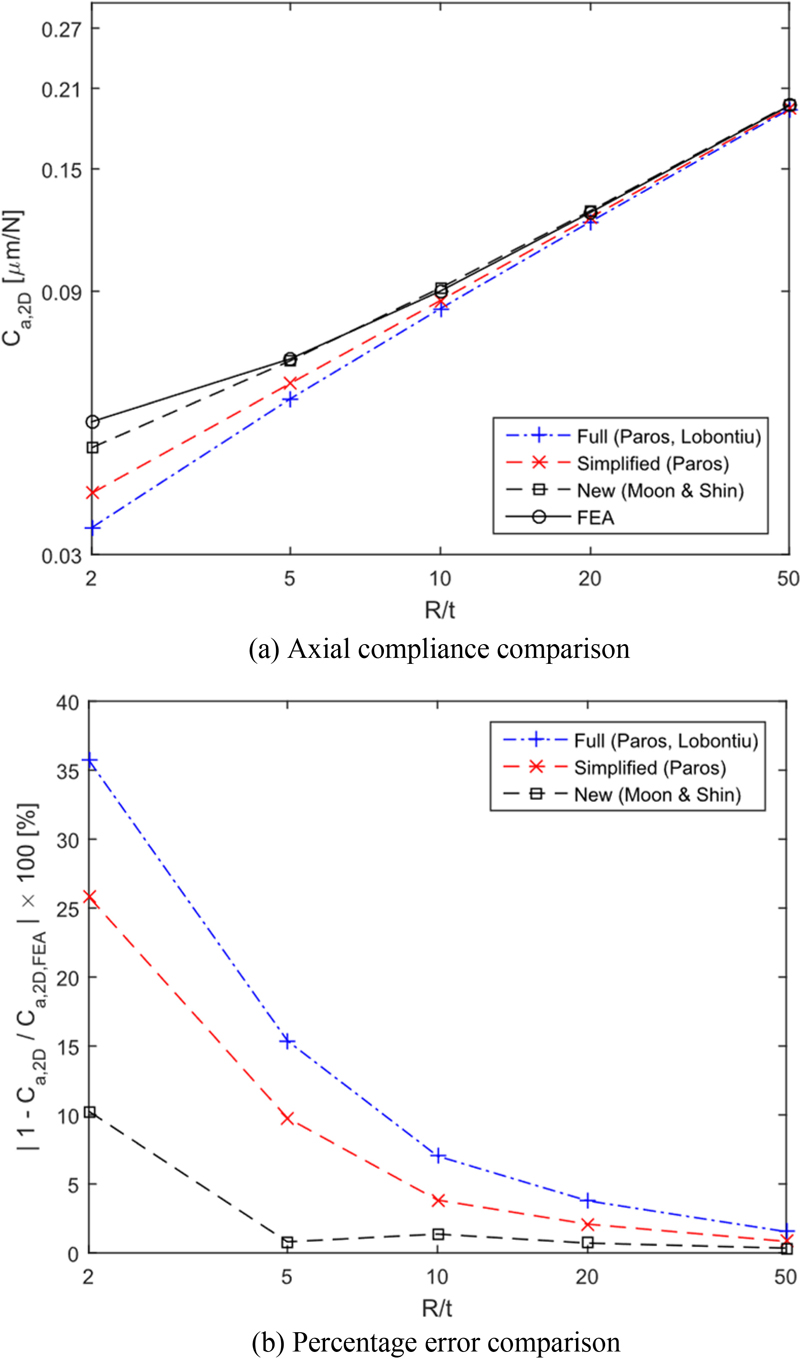
The results of comparing the existing methods and the new method developed in this study with the finite element analysis results are shown in Tables 1 and 2. In Figs. 8 and 9, the percent errors compared with finite element analysis are shown for the 1-D and 2-D circular flexure hinges.
The performance of the newly developed method was evaluated by the percentage error to see how close the results by the developed compliance formulas are to the finite element analysis results. The results are as follows: For the 1-D circular flexure hinge, the developed calculation formulas are 10.5 to 31.1% closer to the finite element analysis results across all values of R/t. For the 2-D circular flexure hinge, the formulas are 0.48 to 25.4% closer to the finite element analysis results for all values of R/t. These findings demonstrate that the newly developed formulas provide superior compliance calculation performance compared to existing formulas. Furthermore, the new formulas are simpler in form, enhancing their ease of use.
5. Conclusion
Firstly, we found a significant discrepancy between the axial compliance values of the circular flexure hinge obtained from existing theoretical formulas and those from finite element analysis (FEA). Secondly, reasonable assumptions were established for compliance calculation based on the stress distribution under axial load: the stress contour is circular and meets the outline of the hinge at a right angle, and the stress acts normally to the contour plane. Thirdly, axial compliance formulas for both 1-D and 2-D circular flexure hinges, presented in Eqs. (15) and (16), were derived based on these assumptions. Fourthly, the superiority of the developed theoretical formulas over existing ones was confirmed by evaluating the percent error relative to FEA results. Lastly, the newly proposed compliance formulas for circular flexure hinges are anticipated to be highly beneficial for industrial applications due to their accuracy and simplicity, potentially reducing both time and cost in design processes.
References
-
Moon, J.-H., Pahk, H. J., Lee, B.-G., (2011), Design, modeling, and testing of a novel 6-DOF micropositioning stage with low profile and low parasitic motion, International Journal of Advanced Manufacturing Technology, 55(1-4), 163-176.
[https://doi.org/10.1007/s00170-010-3033-4]

-
Shin, H., Moon, J.-H., (2014), Design of a double triangular parallel mechanism for precision positioning and large force generation, IEEE/ASME Transactions on Mechatronics, 19(3), 862-871.
[https://doi.org/10.1109/TMECH.2013.2261822]

-
Yong, Y. K., Moheimani, S. O. R., Kenton, B. J., Leang, K. K., (2012), Invited review article: high-speed flexure-guided nanopositioning: mechanical design and control issues, Review of Scientific Instruments, 83(12), 121101.
[https://doi.org/10.1063/1.4765048]

-
Moon, J.-H., (2022), Analysis of the cylindrical flexure hinges with circular notches, Journal of the Korean Society for Precision Engineering, 39(2), 151-157.
[https://doi.org/10.7736/JKSPE.021.112]

-
Shin, H.-P., Moon, J.-H., (2023), Analysis on elliptic and parabolic 2-DOF flexure hinges for spatial positioning stages, Journal of the Korean Society for Precision Engineering, 40(3), 229-236.
[https://doi.org/10.7736/JKSPE.022.120]

- Paros, J. M., Weisbord, L., (1965), How to design flexure hinges, Machine Design, 37(8), 151-156.
-
Wu, Y., Zhou, Z., (2002), Design calculations for flexure hinges, Review of Scientific Instruments, 73(9), 3101-3106.
[https://doi.org/10.1063/1.1494855]

-
Lobontiu, N., (2002), Compliant mechanisms: design of flexure hinges, CRC press.
[https://doi.org/10.1201/9781420040272]

-
Yong, Y. K., Lu, T.-F., Handley, D. C., (2008), Review of circular flexure hinge design equations and derivation of empirical formulations, Precision Engineering, 32(2), 63-70.
[https://doi.org/10.1016/j.precisioneng.2007.05.002]

-
Smith, S. T., Chetwynd, D. G., Bowen, D. K., (1987), Design and assessment of monolithic high precision translation mechanisms, Journal of Physics E, 20(8), 977-983.
[https://doi.org/10.1088/0022-3735/20/8/005]

-
Tseytlin, Y. M., (2002), Notch flexure hinges: an effective theory, Review of Scientific Instruments, 73(9), 3363-3368.
[https://doi.org/10.1063/1.1499761]

-
Schotborgh, W., Kokkeler F., Trangter, H., van Houten, F., (2005), Dimensionless design graphs for flexure elements and a comparison between three flexure elements, Precision Engineering, 29(1), 41-47.
[https://doi.org/10.1016/j.precisioneng.2004.04.003]

-
Li, T.-M., Zhang, J.-L., Jiang, Y., (2015), Derivation of empirical compliance equations for circular flexure hinge considering the effect of stress concentration, International Journal of Precision Engineering and Manufacturing, 16(8), 1735-1743.
[https://doi.org/10.1007/s12541-015-0228-5]

- Crandall, S. H., Dahl, N. C., Lardner, T. J., Sivakumar, M. S., (2012), An introduction to mechanics of solids: (In SI Units), 3rd Ed., McGraw-Hill.
Appendix
APPENDIX
A.1 Compliance Formulas for the 1-D Circular Flexure Hinge
(1) Axial compliance formulas for the 1-D circular flexure hinge by Paros
| (A1) |
where
by Lobontiu
| (A2) |
by Wu
| (A3) |
where S = R / t
(2) Rotational compliance formulas for the 1-D circular flexure hinge by Paros
| (A4) |
where
by Lobontiu
| (A5) |
by Wu
| (A6) |
where S = R / t
A.2 Compliance Formulas for the 2-D Circular Flexure Hinge
(1) Axial compliance formulas for the 2-D circular flexure hinge by Paros
| (A7) |
by Lobontiu
| (A8) |
(2) Rotational compliance formulas for the 2-D circular flexure hinge
by Paros
| (A9) |
by Lobontiu
| (A10) |
A.3 Simplified Compliance Formulas for the Circular Flexure Hinge (by Paros)
(1) Axial compliance formulas for the 1-D circular flexure hinge (by Paros)
| (A11) |
(2) Rotational compliance formulas for the 1-D circular flexure hinge (by Paros)
| (A12) |
(3) Axial compliance formulas for the 2-D circular flexure hinge (by Paros)
| (A13) |
(4) Rotational compliance formulas for the 2-D circular flexure hinge (by Paros)
| (A14) |

Associate Professor in the Department of Mechanical Engineering, Yuhan University, Gyeonggi-do, South Korea. His research interests include the design and control of flexure linkages and micro-positioning stages.
E-mail: junheemoon@gmail.com

Associate Professor in the School of Robot and Automation Engineering, Dongyang Mirae University, Seoul, South Korea. His current research interests include the design of redundantly actuated parallel mechanisms and ultra-precision positioning stages based on flexure hinges.
E-mail: hpshin@dongyang.ac.kr

